

SantaMonica
-
Posts
765 -
Joined
-
Last visited
-
Days Won
6
Content Type
Profiles
Forums
Gallery
Posts posted by SantaMonica
-
-
Never heard of Orange before. 2700K is best. Is slightly pinkish.
All types of algae is reduced.
-
Results of the week:
Broder on the SARK site: "I have been running my tank with an algal filter for about 3 months now. I removed the skimmer on the 10th last month. My display has never looked better. The [nuisance] algae has almost totally dissapeared. My SPS colonies are thriving. Not only are they growing well, but the colouration has become vibrant due to 0 PO4 (Salifert test) and 0 nitrate. I've seen better colouration in systems that were using Zeovit, but I'm more than happy with the results the algal filter achieves."
Sly on the SWF site: "The back glass used to be absolutely covered in green algae, but now it's staying clean on its own. I have never cleaned it. The rocks weren't that bad, but there were some patches of cyano in places that are now gone. It now seems to be staying cleaner on its own. My ORP has started rising again and is a 270mv without ozone. I don't know if it's related but as my tank levels have improved lately, my Mandarin is coming out more in the day time. This is the first picture I have ever been able to get of him in the open... and I've had him for over 2 years. The live rock and the substrate both have zero algae on them"
TODJ2002 on the SWF site: "i added a scrubber several months ago after reading this thread. my nitrates and P slowly lowered and went to zero for the first time. they have both been at zero since. everytime i check levels i am expecting to see a rise, but always zero. i also added cheato to my system and i believe boths items are a must for any system."
Adee on the SARK site: "Ok so its been about 6 weeks since i fired this scrubber up. Did the 1st "harvest" on just the one side; i'll do the other side next weekend. My phosphate reading is a zero according the Elos color chart... and for the very first time the complete back glass pane has broken out with coraline algae. Its never done that before due to the back always being covered with the normal glass algae/diatoms. Since the latter no longer appears, the coraline is now growing. I'm sure in a few weeks I'll have a complete pink wallpaper at the back. The fact that the scrubber makes the ideal platform for all this gunk to grow OUTSIDE my display tank, was well worth the investment."
Bob the (reef) Builder on the SARK site: "Both my filters are going great guns. Probably the best is the sun [powered] one, it's big and now that its settled, grows algea like crazy. My phospates down to 0.00 - 0.01ppm on a Hanna meter. Never seen it this low before. My corals are starting to grow and colour up really well now."
RentalDeceptionist on the UR site: "Ooh the [nuisance] algae. Well, it has certainly receeded massively. It's not 100% gone but I feel I'm on top of it. The hair algae which virtually smothered every flat surface is now down to about 20% of its mass, and there is more rock than algae. I do believe decreasing the lighting has helped."
-
Scrubber FAQ 3.0 is now up, with about 50 percent new info:
-
2700, as long as the wattage, and the distance, are the same.
-
Both will work, but a CFL floodlight would be better that a PLC (is more focused).
-
Yes that's the right screen size. Although, for such a small screen, it might be easier to just double the area, and make it one-sided (thus using one bulb instead of two).
Yes you should start the scrubber now; it will help to have all the nutrients from the cycle, and it will then be ready for livestock when the cycle is done.
-
Bob the (reef) Builder on the SARK site made this PDF for a club presentation three months ago, and I just found it; maybe it could be used by others:
-
Creetin that is much better. Now give it a week and clean it.
Simon if you increase area, you have to increase lighting to cover that area. But 1.7 square cm per liter of water is good for most people.
-
what is a CFL bro? what is ur additive regime for ur skimmerless tank? any plans on increasing the surface area of the mesh like shining into centre of a cylinder rolled up mesh? what kinda of bulbs r best used? r we talking abt e type or lumens?
Compact Fluorescent Light.
No additives, except for Kalk in the top-off.
I'm currently designing a 2-screen version of my scrubber.
-
Well as a test, in order to stimulate a dark purple gorg that was not opening, I increased the daily dose to 21.6 ml, and reduced the interval to 20 minutes (0.3 ml per 20 minutes). It worked; the gorg started opening all night, and about half the daytime. The dendronephtha was already always inflated, so no change there. However I don't know if it was the increase in food, or the decrease in interval, that caused the change.
Figuring the increase in food would overload the scrubber, I added a small bag of Rowaphos. All is well so far; N is clear, and P is just a very slight blue that almost looks clear. But I'm going to remove the Rowaphos soon and see what happens. I'll also be looking for my next round of NPS to add, after I make some tank videos.
-
Wilson you can see that it only grows near the light, so yes you'll need more light in there. You could also just clip-on a bright CFL and point it down there.
Creetin you'll see in the next 7 days that there will be a lot more growth.
-
Got a pic of the lighting setup?
-
Part 3 of 7:
Taken from "The Food of Reefs, Part 3: Phytoplankton" by Eric Borneman
http://www.reefkeeping.com/issues/2002-10/eb/index.php
"Phytoplankton are the major source of primary [food] production in the ocean, and one of the most important driving forces of global ecology. In fact, phytoplankton production influences all life, by being at the lowest rings of the food chain.
"The reason [phytoplankton] are so important on a regional or global scale is simply by virtue of the fact that the upper 200 [meters] of oceanic waters is filled with phytoplankton and covers over 70% of the earth's surface.
"What eats phytoplankton? In the water column, zooplankton [food] are without question the primary consumers of phytoplankton. Zooplankton grazers vary according the area and the time of year, but include primarily ciliates, copepods, amphipods, and tintinnids.
"Stony corals are generally not well adapted to the sieve or filter type feeding that characterizes the soft corals (Fabricius et al. 1995, 1998). They are, however, well suited to the capture of zooplankton prey.
"It is of paramount importance to recognize that the biomass of potential grazers [which need food] in an aquarium is many times what it would be in the same volume of water or surface area as the bottom of oceans or on reefs, and also, that the availability of water column borne food is many times greater in the ocean than in an aquarium.
"Perhaps most importantly, is the almost ubiquitous interaction between bacteria and phytoplankton. Phytoplankton release dissolved organic substances, and bacteria utilize them as nutrient sources. Most phytoplankton cells, especially large ones, are coupled nearly continuously with coatings of bacteria [which are consuming the dissolved organic substances].
"The amounts of phytoplankton present in reef aquariums are not known but are probably considerable. However, they are also probably rapidly removed by grazing and export devices [skimmers].
-
Yep gotta get more flow...
-
Update of the Day: Freshwater Cleanings
You absolutely must use freshwater, in your sink, when cleaning your screen once a week. If your weekly cleaning gets delayed, at the very least turn the pump off and pour RODI over the screen to kill the pods. Otherwise the pods start growing underneath, eating the algae, then falling off into your water. You will not see the holes they make unless the algae is very thin. It becomes an issue of the scrubber not removing as much nitrate and phosphate, because the pods eat the algae you've grown, and then re-introduce the nutrients back into the water. FW of course, kills the pods. SW does not. So use FW weekly. And don't worry about getting rid of all the pods; you won't. The next day there will be millions more.
-
Results of the Week:
jtremblay on the MD site: "the last few strands of HA have disappeared from my 40's display, and the build-up of detritus is continuing to go down, despite there being no skimmer on this tank."
nitschke65 on the SWF site: "My biocube is currently being filtered by my custom [nano] turf scrubber in chamber two; there is also a ball of chaeto in the bottom af chamber two, and a bag of Chemi-pure Elite in chamber three. My protein skimmer stopped working two or three weeks ago. (My mushrooms and zoas have never looked better!) I also have some polyps, hammers, and galaxia. There's a few nassarius, and a few hermits, an emerald crab, and possibly a pepermint shrimp. There's a lawnmower blennie, two green chromis, a scarlet hawk, and a Potter's angel. I haven't cleaned my screen or done a water change in 2 weeks [bad!]. This mornings readings: Ammonia - 0 Nitrites - 0 Nitrates - 0
Skunkbudfour20 on RC: "Yes i built one, Yes i am running it, and YES my nitrates, nitrites, ammonia and phosphates all dropped to almost 0 within the first 3 weeks, and yes algae growth in my display has come to a stop, and slowly recedes... I am still running my skimmer, even though it doesnt seem to be doing AS much, its still doing something for now."
Worley on the AS site: "As for lights, I have seen an improvement in the type of algae growing and in the overall amount of growth since changing bulbs to the lower 3500K colour temp. I've been getting more hair [on the screen], macro algaes, some interesting dark green very very long hair-like algae (6"+ long). The cyanobacteria [in the display] is nearly completely gone, along with less brown slime algae, both in the tank and on the screen. And best of all, still no water changes, nearly 5 months on, with good calcium, dKH and PH. I've easily saved the price of the equipment used to make the scrubber from not having used an entire bucket of salt, and everything in the tank looks more healthy than I've ever seen in a marine tank I've kept before, I'm loving it, and so is my girlfriend!"
-
Would be nice, but there are no pumps with similar specs.
The problem with a cheaper enteral pump (like a "Ross Patrol"; minimum dose = 1 ml/hr), or a regular peristaltic pump (like the Reefdoser; minimum dose = 0.4 ml/hr) is the large dose. They can't go down to 0.1 ml/hr. So only large tanks would be able to use them as is, for things like Reeds Phytofeast (which is very concentrated.) For things like Rotifers or Mysis, 0.4 ml/hr would be 3 cubes/day, and 1 ml/hr would be 8 cubes per day. And that's the minimum. The only way around this is to dilute the food with water (which Reed's says not to do), but then a month's supply would not fit into the wine cooler, which means it would not fit on top of the tank, which means it would have to be kept in a refrigerator far away. And that was the original problem with continuous feeding.
-
Pic in signature link. Main effect has been the Sun corals and Flower Pots staying open. Also the Digitada has grown quite a bit.
-
The chiller is 65 watts.
-
In my related research of reducing Inorganic Nitrate and Inorganic Phosphate, overfeeding was always an issue. Scrubbers help, by introducing live (instead of dead) copepods to the tank, but the rest of the feeding always causes excess food to get stuck in the rock and sand, and rot. The solution to this could be an Automatic Continuous Feeder. The writeup is here:
-
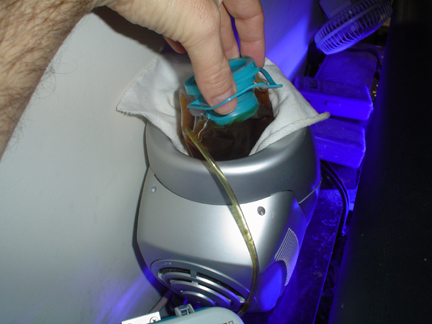
Part 5 of 5
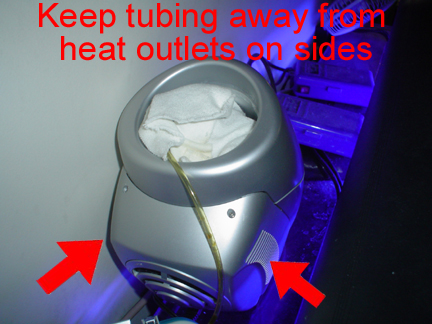
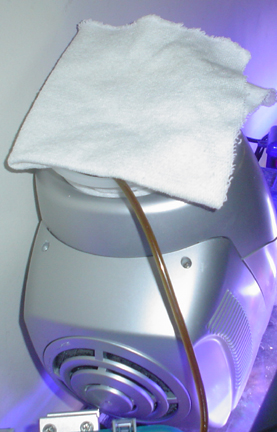
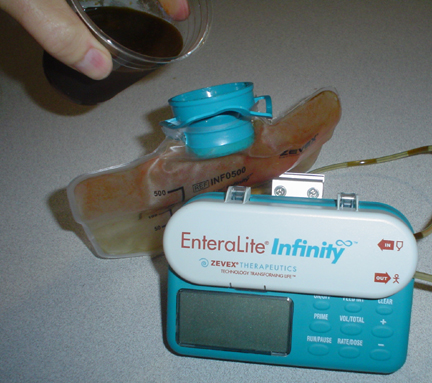
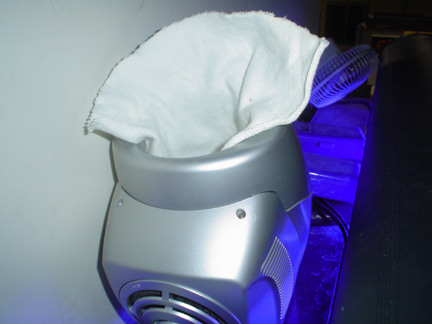
Insert the bag into the chiller/towel, but be very careful to not bind the tubing where it connects to the bag at the bottom, and also keep the tubing in the middle as it leaves the chiller; you don't want it getting near the heat outlets on the sides of the chiller:
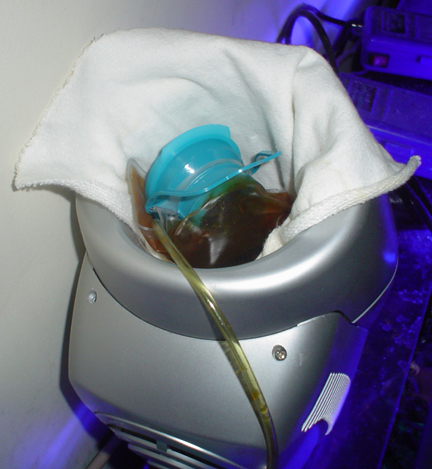
Now fold down the cap of the bag into the chiller:
Fold the remaining towel (if used) over the top, or if you used a filtersock, cover it. You'll have to experiment with how much towel to use, and how tight, so that it does not freeze:
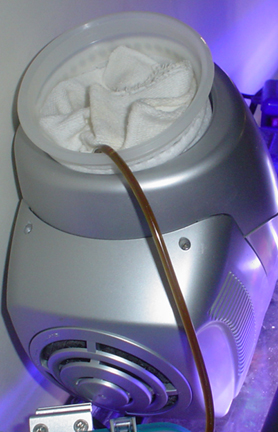
Instead of a towel, you may try inserting a small filtersock:
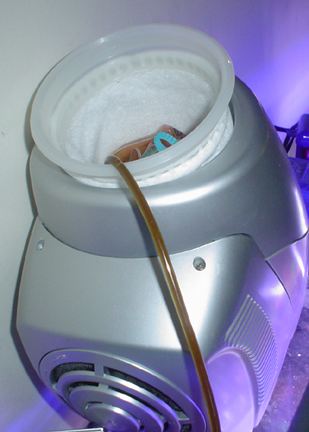
Covering the filtersock loosely will keep the food less cold:
Covering the filtersock tightly will keep the food more cold:
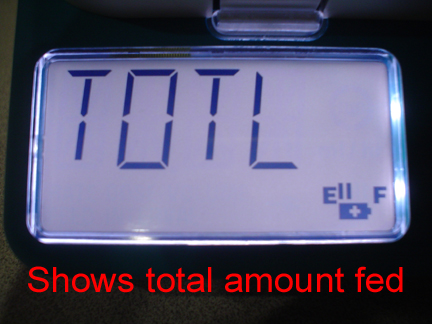
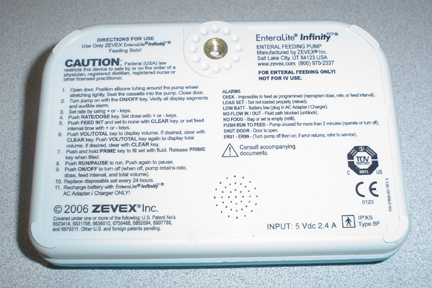
Lastly, use the "prime" button again to bring the food all the way to the end of the tubing, and then push "run". It will begin by pumping one dose, and then the timer will wait for the next one. At anytime, you can push the "vol/total" button and it will display how many ml has been fed since you pressed "run":
To make any pump adjustments, push the "run/pause" button first (which pauses it), and then make your changes. You can reset the "total amount fed" to zero by pushing the "clear" button when it is displaying. You can turn the unit off while it's running or paused; when you turn it back on, it will be in the same state (run or paused) that is was in when turned off. And it remembers all settings, including total amount fed, even it you unplug the AC adapter.
Things to watch out for:
Bag positioning if noise is a concern: The chiller has a thermostat, but the annoying thing about it is that it clicks every 30 seconds or so as it adjusts temperature. If it's in your basement, then it's no problem. But if it sits on the tank like mine does, or if it's in your bedroom, then you don't want this clicking. The way to eliminate it is to put the temperature selector on the coldest setting. This causes the thermostat to always stay "cooling". This fixes the clicking. However the temperature can get very cold after a day or so, and if you seal the top of the chiller with a towel, then the food will eventually freeze. To prevent this, leave the top of the chiller loosely open, and don't push the bag in down to the bottom. Use a towel, loosely wrapped around the bag, to keep the bag from touching the metal walls or bottom of the chiller. This works; it won't freeze. But if you wrap it too much, then the food will not stay cold enough. So this is certainly one area where experimenting will help. Of course if you don't mind the clicking, the thermostat will keep the food perfectly at just above freezing for you.
Frozen spots: If you are using the "quiet" option where the chiller stays running constantly (no thermostat clicking), keep a close eye on the parts of the bag that touch the metal walls. If it's going to freeze, it will probably take 24 hours, or maybe even 48. So check it the next few days by pulling the bag out and squeezing/mixing it all around, especially the bottom where it connect to the tubing. If any part is frozen, then use paper or a towel to keep the bag away from the wall. Also, you could pull the bag up a little, so it gets more air. A good idea is to wrap the bag around the tubing, before you slide the bag in. You might also put a thermometer in with the bag, which sticks out the top, so you can see it while it's running.
Tube near heat: Watch where the tubing goes when it leaves the chiller and heads to the pump. Hot air exits the chiller on both sides, so you want to route the tubing along the back part. Avoid strong lights too.
Charger for pump: You don't need the AC charger to operate the pump, but you do need to plug it in once a month or so, for six hours, to charge it back up. So make sure you can get the charger cable to the pump, without having to move the pump. Of course, you could also just run the pump with the adapter connected, but that's one more cable going to the top of the tank.
Power failures: If the power goes off, nothing happens to the pump; it keeps working on its batteries. The chiller however will stop. But the important point is that this model chiller, when the power comes back on, will switch to full-cooling (no thermostat). This is fine if you were previously running full-cooling, but if you had a temperature set (because you did not mind the clicking), the food will freeze when the power comes back on. For this reason I really recommend the full-cooling setting to be used all the time.
Tube in display water: You want the tube to go into the tank water, so that it does not dry out. If kept above the water, food slowly starts drying out at the tip, slowly clogging it, and causing it to start spraying sideways.
First attempts: I recommend trying it first in your sink, using just water in the bag. Do everything including putting it into the chiller, and letting it run for a few hours. If ok, then fill with food and start it. This first time, and anytime you make changes to the bag, try not to do it right before you go to bed, because if you folded the bag too tight, or if it freezes, the "No Flow In" alarm will sound and wake you up. Better to do it in the morning.
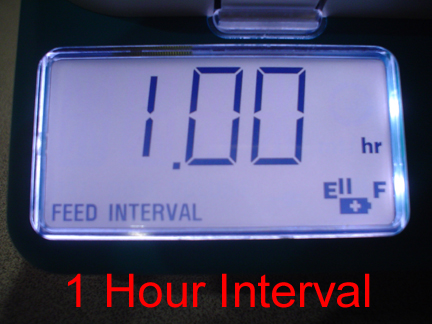
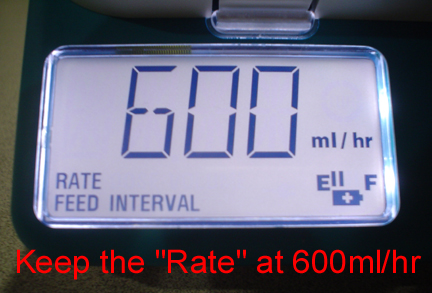
Settings: When first trying to set the settings, it may sometimes not want to accept the numbers you try to set. This is because you have selected a dosing combination that is not possible. For example, if you accidentally set the rate to 0.1 ml per hr (instead of 600), and set the dose to 0.2 ml, and then set the interval to 1 hour, it won't accept it because if you dose 0.2 ml every hour, that is more food than the 0.1 that you set the rate for. Keep the rate at 600 and you should not get stuck as much.
Tubing replacement: The tubing "sets", according to the operating manual, are designed for 24 hours of use at 125 ml/hr. This is a total of 3 liters that the tubing would flow, before it starts to "wear out". Since I'm only pumping 0.4 ml/hr (.0004 L/hr), it would take 7500 hours, or 312 days, before the "wearing out" started to occur. And I'm sure the manufacturer is being conservative since someone's life is on the line. So 6 months (180 days) would seem to be a good replacement time at 0.4 ml/hr. If you were pumping 0.8 ml/hr, you would replace every 90 days, etc.
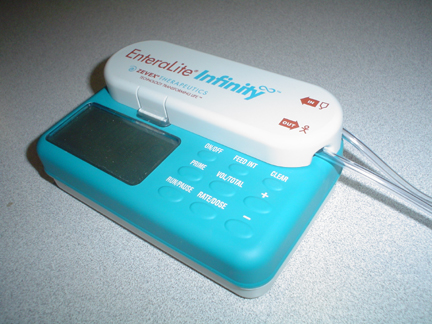
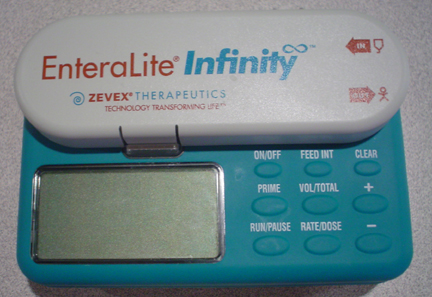
Proper pump model: Make SURE you get the Zevex EnteraLite Infinity blue pump. There are other EnteraLite pumps which are not Infinity, and they WON'T work. And there is another Infinity which is orange and not blue; it WON'T work.
Improvements:
Several things could be improved with more tinkering or more money:
Separate units: Reeds Foods recommends not mixing food unless just before feeding. This would be accomplished with the (expensive) addition of a chiller/pump unit for each type of food you feed (I use three).
Temperature alarm: Would tell you if the bag gets too warm, or if it starts to freeze. I imagine a freezer alarm would work.
Shorter tubing: The length of tubing from the chiller to the pump could be reduced by 6" or so, if you cut it and spliced it with a connector. You'd need to test it though, to make sure the food you are using can get through the connector. Mysis might be a problem.
Mixing: Although the crinkled and rolled bag will keep much of the food from sinking to the bottom, somebody should find a small, cheap paddle or servo that will shake or vibrate the bag every so often.
Fan quietening: The chiller uses a computer fan that runs all the time. On larger tanks the sound is not noticeable, but on smaller or quieter tanks, or tanks in your bedroom, the fan could be made slower/quieter by inserting a resister into the power lead of the fan. The chiller is powerful and freezes as is; less chilling won't hurt anything. You'll have to experiment with the resistor size.
Food types: With some experimentation, you could mix some solid foods (crushed flakes, tiny pellets, etc) into liquid foods, and maybe even add some type of thickener to it, to keep the solids suspended. Krill is too big for the tubing, but large mysis or small ghost shrimp should fit. Always test it first.
Related Information:
If you are have nitrate, phosphate, or nuisance algae problems, especially when dosing concentrated foods, you may find my other thread on Algae Scrubbers useful:
http://www.sgreefclub.com/forum/index.php?showtopic=73162
Article recommending continuous feeding:
http://reefkeeping.com/issues/2003-02/rs/feature/index.php
Zevex Pump Manufacturer:
http://www.zevex.com/enteral/pumps/infinity
Ebay for medical devices (search for "zevex"):
Zevex operating manual:
http://www.zevex.com/download/manual_infinity.pdf
http://www.radio-media.com/fish/PumpManual.pdf
One of the U.S. distributors of the chiller:
http://www.vinotemp.com/View.aspx/3003/Sin...-Chiller-Warmer
Chiller operating manual:
http://www.vinotemp.com/Resources/Document...ttleChiller.pdf
-
Part 4 of 5
Now for the settings. Think of this pump as putting sugar into coffee, using a spoon. The size of the spoon is the "dose"; the time between spoons is the "interval"; and how fast you pour the spoon in is the "rate". We only care about adjusting the size of the spoon (dose), and how much time between spoons (interval). We do not care how fast we pour the spoon in, so it might at well be as fast as possible so the fish don't hang out at the pipe and eat it all.
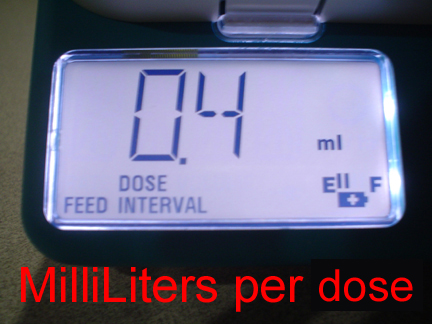
Set how much you want dosed each time; I started by setting it to 0.4 ml:
Set how often (interval) you want it to dose; I started with once per hour:
Set the rate; Max is 600 ml/hr:
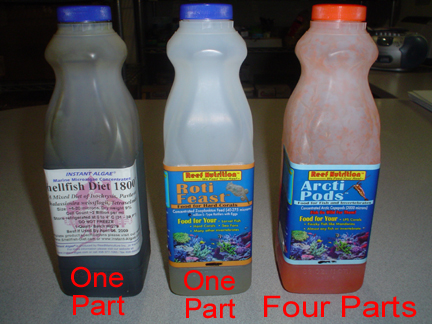
Now mix your food ahead of time; I started by using 1 part phyto, 1 part rotifers, and 4 parts pods:
Mix together and pour it into the bag:
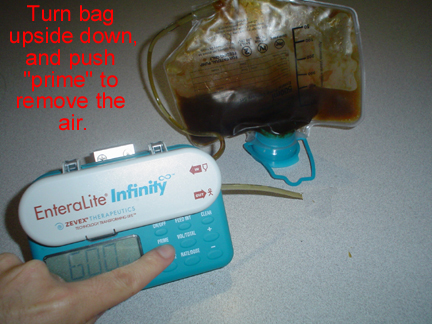
Get as much air out of the bag as you can before you put the cap on. Then, turn it over and use the "prime" button to pull the remaining air out (might take a while.) The less air in the bag, the less bacteria will cause nitrate and phosphate to develop:
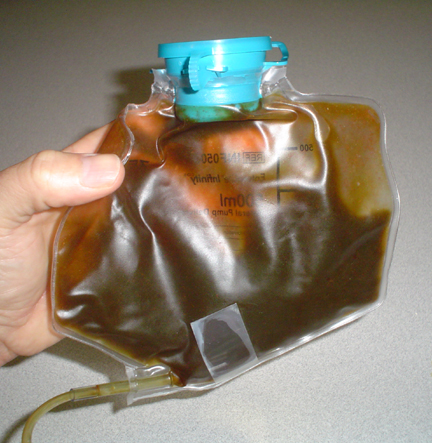
Now you are ready to fold the bag and put it into the chiller. This is 120 ml of food in the 500 ml bag (it could hold a lot more):
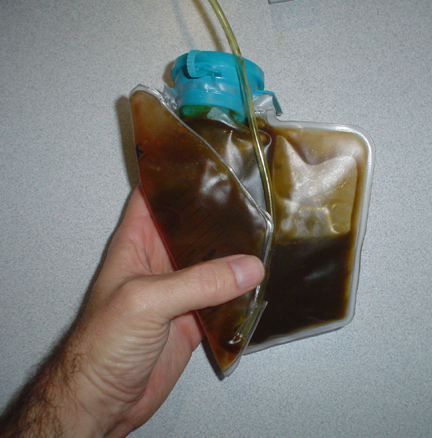
Fold the side with the tubing first, so that it stays on the inside (which helps keep it from freezing.) Don't fold it "tight" or you will cut off the flow. Just curve it around. If you get a "No Flow In" warning after running it, it's either because you folded this too tight, or something has started to freeze:
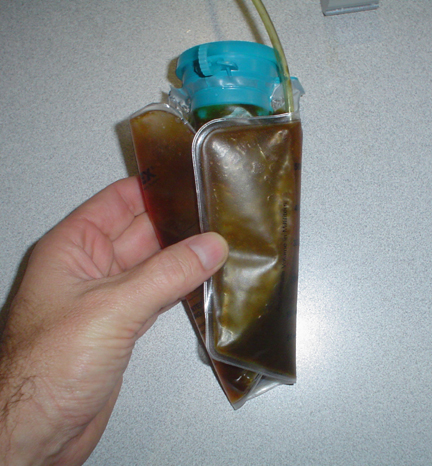
Next fold the other side; the idea here is to surround the tubing to keep it from touching the metal wall of the chiller:
A very thin towel (or a small filtersock), lining the metal chiller wall, will keep the bag from touching it and will help keep it from freezing (this is only needed if you keep the thermostat set to full cooling):
-
Part 3 of 5
Here's why you need to stick to this model pump: There are hundreds of medical pumps on Ebay. You WILL be tempted to get a cheaper one (I got two cheapies, one for just $25! Was a complete waste of time.). Here's why you want to pay the extra money and stick to this Zevex model:
Small Dosages: This is the important one, and you probably won't find out until you get the wrong pump in your hands (I didn't). Most enteral and IV pumps are 1.0 ml minimum. This means that the smallest amount it will pump at one time is 1.0 ml. That's a LOT of concentrated food! (One mysis cube is 3 ml.) I'm currently dosing 10 ml/day. If I had to dose 1.0 ml at a time, I'd have to wait to dose about every two hours. And a 10g nano could only dose this once a day. So having a 0.1 ml capability opens up an entire world of feeding. The other advantage of small dosages is that you can dose even more often than once per hour. I could dose 0.1 ml every 15 minutes, and still end up with 10 ml/day.
Interval Feeding: This is the other important one. Many pumps don't have this option (and they don't list this info on Ebay, so you won't know); instead they dose a constant amount, all the time. If you dosed constantly, your most aggressive fish would hang out at the tubing and eat everything before the other fish and corals got anything. You need to burst out all the food at one, every so often. Of course, a coral-only tank is different, and fortunately the Zevex pump does continuous pumping also.
Not for IV use: IV pumps are those huge ten or twenty pound contraptions that are mounted on a pole in hospital rooms. They are very complex, and many of them have computer connections. And they are very expensive. The only way to get one under a few hundred dollars is to get one from the 1990's, but then it becomes impossible to finds the "drip sets" (or "cassettes") that you MUST have for it to work. I bought two of them, and could get neither to work without the cassettes.
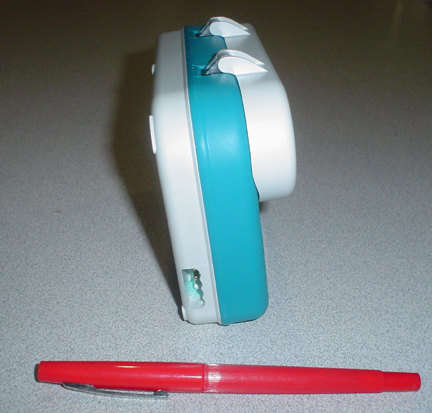
Small Size: IV pumps are just too big to set on top of a tank. Even some enteral pumps are too big. But this Zevex model is probably the very smallest there is of ANY pump. And certainly the thinnest. Most pump pics on Ebay don't show or tell you how deep the pumps are. They look small, but when you get it, it's 9" or 12" deep. The Zevex is just 2" (5cm), including the tubing cover.
Waterproof: Very few pumps of any type are waterproof; they were made for the hospital room, not for walking around outside. But this Zevex pump, if operating on batteries, would actually work underwater if you dropped it in your tank.
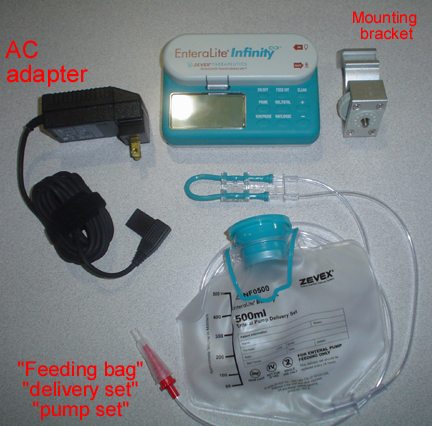
Current Model: This model is NEW, and is CURRENTLY (January 2009) being manufactured (it just won the product of the year award for medical feeding devices.) This means that you will be able to get the feeding bags ("delivery sets", "pump sets") for many years. A delivery set (usually with a feeding back attached) is required to run the pump, since the pump detects that the proper set is installed. Delivery sets are cheap to buy, but impossible to DIY.
Looks Nice: I think this pump is the best looking of all of them. You won't see it very much on top of a larger tank, but on a nano it would be very noticeable.
Easy to Use: After reading the instruction book, you can set the options up in about 10 seconds. Adjustments like dosage and interval take about a second to adjust. It's an amazingly well built pump; I really think it's worth the $1500 retail.
Note: Some folks have experimented with syringe pumps. But syringe pumps are very large, not battery operated, and unless you get the expensive "retracting" models, then you have to take the syringe out and retract the plunger each time it bottoms out. Plus I'm sure these pumps are not waterproof. After looking at syringe pumps long and hard, I finally gave up and kept searching until I found the Zevex pump. I can see why continuous feeding has had a rough start until now.
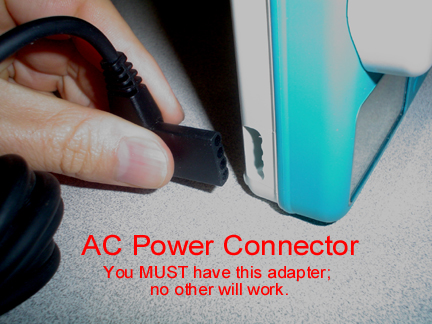
Important: (1) Make absolutely sure you get the AC adapter with the pump. The adapter uses a proprietary waterproof connector to the side of the pump. You cannot use any other type of adapter, and you cannot buy this adapter anywhere else. (2) Get several "delivery sets" (also called "feeding bags" or "pump sets"). You have to replace them every so often; see recommendation further below. (3) Ebay requires the seller of medical devices to say something like "you must be a licensed medical professional to buy this product"; but don't worry, they never actually ask.
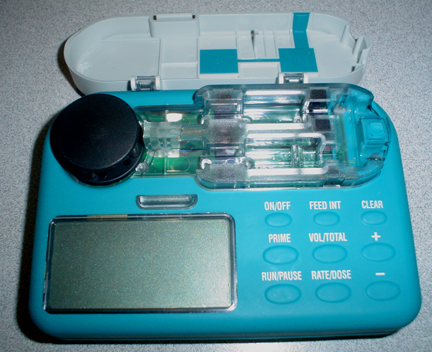
Pump operation:
AC power connector for charging battery (does not need to be connected to operate):
Open the cover:
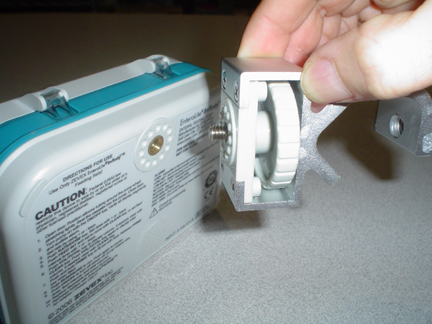
The "delivery set" or "pump set", which is the blue flexible silicone tube, is stretched over the big black wheel to the left:
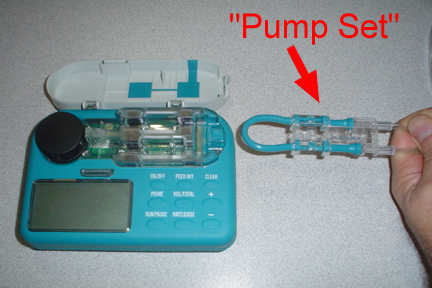
Installed:
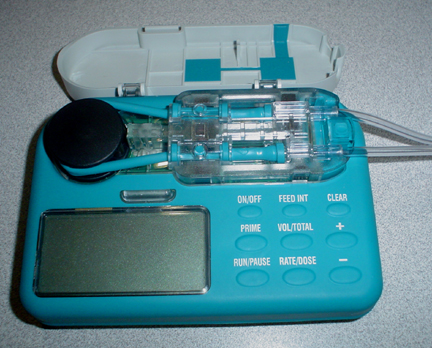
Close cover:
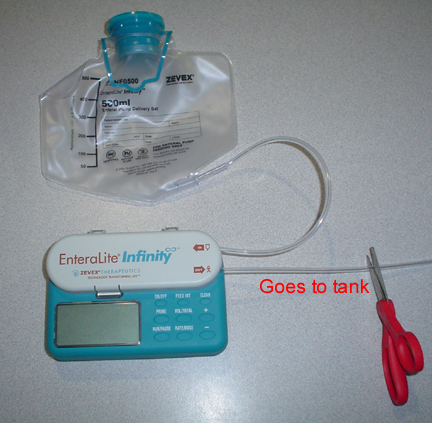
Cut the tubing so that it barely reaches into your tank water:
-
Part 2 of 5
Here's how these two devices solved the continuous feeding problem...
(1) Tiny feeding amounts: Since enteral feeding pumps are designed to feed concentrated liquid foods to people, they are already set up to handle small amounts of these types foods. My display is about 100 gal, and my starting point was 0.4 milliliters every dose.
(2) Adjustable feeding amounts: This pump can pump as little as 0.1 ml at a time, and is adjustable by just pushing the up or down buttons. I'm feeding 0.4 ml per dose (about 10 ml per day) in my 100gal. A 10 gal nano could get about the same concentration of food by feeding 0.1 ml every 2 hours. As corals or fish are added/removed, or as filtering varies, you can adjust the feeding amount so that nitrate, phosphate and nuisance algae don't get out of control.
(3) Adjustable feeding schedule: This pump can feed as often as every 60 seconds. However, if I did this, I think the fish would hang out at the feeding tube and eat everything that came out. So I feed every hour; this way the fish can't get all the food, and it makes it to the corals.
(4) Thick liquids: Although you are not supposed to mix the Reed's products together for any length of time, it is a concession I had to make (otherwise I'd need three separate feeders). So, with all three mixed (I'm using one part phyto, one part rotifers, and four parts pods), it's a medium-thickness liquid, similar to coffee creamer. But if I wanted to add mysis, the pump would have no trouble with it (and the mysis would fit easily in the tubing.)
(5) Refrigeration: This was a tough one. Like other people, I first thought about a dormitory fridge, but that would be difficult to set on top of the tank. And you don't want a lot of distance between the fridge and the tank, because the food will be sitting at room temp (actually higher when it gets near the lights.) So the wine chiller works perfect. The distance of tubing from the chiller, through the pump, and into the water, is 24" (60cm) (although this could be shortened with creative placement and splicing). At my current rate of 0.4 ml/dose, the food moves 2.5" (63mm) per hour, thus staying at room temperature for 9.6 hours. Seems to be an acceptable time for my first attempt. Less is better, of course, because it's less nitrate and phosphate that bacteria will cause.
(6) High capacity: This was an easy add-on feature, since everything is already in place. The Zevex pump uses 500 or 1000 ml bags; the 500 bag fits right into the chiller, but not if you fill the bag all the way up. 120 ml (12 days of food at 10 ml/day) is no problem, however, with plenty of space. I'll be trying more soon.
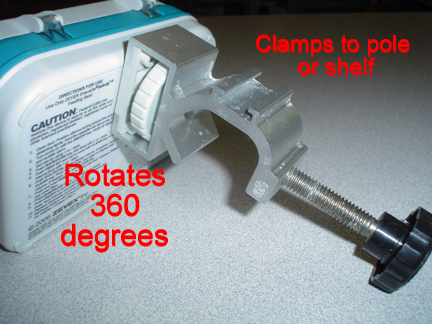
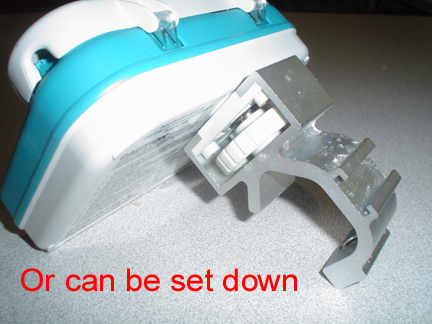
(7) Top of Tank: When turned sideways, the chiller is only 6" (15cm) wide, and fits easily behind my light. And the pump can be laid flat, or stood up, or attached to the chiller (or pole, or bracket) with the included screw-on bracket. This allows the food to be released right in front of a powerhead, which sprays the food all over the corals/display.
(8) Reliability: The pump was designed for battery operation, and sure enough I've gone well over one month of operation without charging it. (Most medical patients use much more food than we do, so the time between battery charges is much much longer.) And if the bag runs out of food, a beeper lets you know.
(9) Mechanically Safe: The last thing you want is for a month's supply of food to be dumped in at once. Being a medical device that keeps people alive, there is very little chance of this pump failing in that fashion. And if the bag were to ever leak or break, it's inside the chiller (which you seal with silicone at the bottom), so the food would just sit there and stay cold.
(10) Electrically Safe: The pump is completely sealed; not just water resistant, but waterproof. The instructions actually say to wash the pump by pouring water on it. Salt creep or splashing is a non-issue. Electronically, there is no way for the pump to stick "on" and accidentally dump the whole bag. There are all sorts of safety features that would stop this from happening. The chiller is powered by just 12V (the transformer is a long ways away). While it would be possible to splash water on the chiller and short it out, it should not harm anyone/anything. If the chiller did fail, the food would still be fed to the tank, but it would just slowly start getting warmer over the next few hours.
(11) Settling: If you were to have a large container with thin and thick foods mixed together, the thick food (like mysis) would settle to the bottom and either not get used, or get used first. The feeding bags used by the pump, however, can be twisted and rolled up, thus making many small places for the bigger food to stay.
(12) Cost: The chiller is easy; mine was $20 USD (new in box) from Ebay; just add shipping. The pump is a different story. I monitored Ebay for two months, and saw these pumps sell for as little as $130 used, or up to $600 new. (They are $1500 retail). Plan to spend some time in your Ebay search, checking each day for a new listing. I paid $300 for mine, and $350 for another one. Another "ebay" site, for medical items, is DotMed.com. Just search for "zevex". In any case, make sure you get the blue Infinity, NOT the orange one. The orange one will not work.
Pump details:
Here's why you need to stick to this model chiller: All wine chillers will cool a bottle of wine, but the big differences are:
Will it cool to freezing? Some units will only cool to 25 or 30 degrees (F) below the room temp. The room temp near the lights could be 100 degrees, and thus, 70 degrees is too hot for the food. This unit can chill to freezing while it's right next to the lights.
Is the inside compartment waterproof? There will be constant condensation, melting ice, and the possibility of a broken bag. This model is almost waterproof the way it comes; with one application of silicon along the bottom seam, it is totally sealed.
Does it connect to 12V or 120V? You don't want 120V leading all the way up to the chiller. Instead you want the 120V to go to a converter/transformer (like with a laptop), and then have the low voltage wire run up to the chiller. This model works this way.
Will it continue to run if not touched? Many models are designed to turn off after a few hours. This model stays on constantly.
Mega Powerful Nitrate and Phosphate Remover - DIY!
in General Reefkeeping_
Posted
This is the best nano build I've seen yet. Nitschke65 on the SWF site built this for his Aquapod-type tank. Should work on the back of any similar nano: