


Spencer Lim
-
Posts
72 -
Joined
-
Last visited
Content Type
Profiles
Forums
Gallery
Everything posted by Spencer Lim
-
I mounted the relay socket to the enclosure to prevent it from dangling. If you see from my pic, the probe and power cord need to exit the enclosure to power supply and into the tank. By this, there will need to be a hole, so when there's a hole, its no longer water proof right? So we need to do 2 things. 1) make sure the rubber gasket ( my earlier pic of the cover, that black thing is the gasket) that is supplied with the enclosure is correctly place. Put the gasket along the edge of the cover and push them down, make sure the flats goes in, with the rounded edge facing you when putting in. This will provide a seal between the cover and the box itself once screw in. 2) get a tighten-to-seal plug to seal up the hole. TAKE NOTE. Make sure you put this in first before you exit the wire out of the cut hole at the side of the box. In case you do not know much size to buy, these enclosure box have pre-marked hole for your cutting and is labelled with the rightful size. It should start with PG (in my case PG21). When getting the plug, make sure its also the says the corresponding size. As the name suggest, these plugs will seal itself as you tighten it, creating a seal. So folks, this is the final product, yet to mount it to my cabinet. Hopefully this can be of help to anyone out there looking to put together a external temp controller.
-
So now putting everything together. Tools used: Dremel with cutting disc, drill and filling stone Holes cut for insertion of controller and power socket Inserting in the controller and power socket. Note that I cut 1 corner for that it can sit in snugly. If you are putting it in the middle than dont bother about this. Of, in case you ask, why my box so big? I intend to use it to mount other things also la. Maybe wave maker controller can mount on top also. Just to make use of the space. We all know space is precious beneath the tank. Everything in!!!
-
WK Lim. Try to go at evening time, than not much people than got free time. If not they will charge a bit. If you are getting everything from Sim Lim Towers also can get the uncle there to help you la. The shop just behind Acez Instrucments. But you will still need to cut the box la.
-
So why is this a not so diy DIY project? I bought all the connections from KOBA, and when all the items are consolidated, the young boss asked: " You want me to connect for you?". Than go back you just cut the box and put it in. Lol. Mai tu liao. Quickly grab the offer and went for dinner, went back to pick up in 20 mins. Save me to do the connection it myself.
-
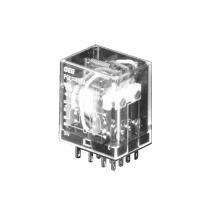
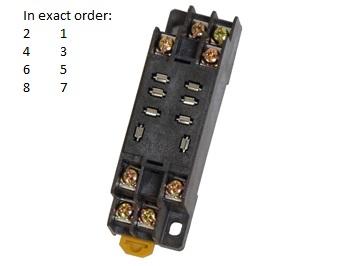
Ok. So here we go on putting everything together. First, the wiring. The controller itself requires a power supply, however, that ends there. It does not provide power through the relay, instead it makes a close circuit on receiving the signal to close the contact point. So, the power cord will be splice to L & N, creating the node "L" and node "N". Next, the power socket will be connected to the relay socket, with the L connected to Pin 4, setting the stage for the close circuit, and the neutral goes to the "N" node. Well we need to understand a bit on the relay wiring, so the number you see correspond with the connection on the relay socket. 7 & 8 is the power, while 4 and 6 is the NC (Normally Close) and Common. (Hint: COM is normally beside power / coil and NC is indicated with the pin touching, not touching refers to NO (Normally Open). In this setup, once the controller relay hits the set temperature, its relay will will send a signal to this relay to close the circuit and allow power to flow through the power socket, powering up the chiller. The final connection is to the controller so provide power to it's relay for logic control. Hope the below drawing helps. DISCLAIMER: This is a single pole 10A relay, yours might defer. Exercise self judgement by searching for its datasheet if you are unsure.
-
I stay sengkang, if you need to cut can do it at my place. I got a dremal for cutting, drilling or filling.
-
Sorry folks, didn't managed to get time to post the progress yesterday. Stay with me for awhile . Cheers.
-
Thanks for pointing that out. So now we know confirm this set up is good for even 1hp drop in coil:) I saw your posts and you put together a external temp controller too. If I miss out anything, feel free to add in. Cheers.
-
bro james72, no particular grade of wiring. Just usual 230 - 250v 50/60 hz wire will be fine (simply put, normal household electronics store will have it). All items are available at sim lim tower. I just prefer to go to my fav store in People's park except for the controller.
-
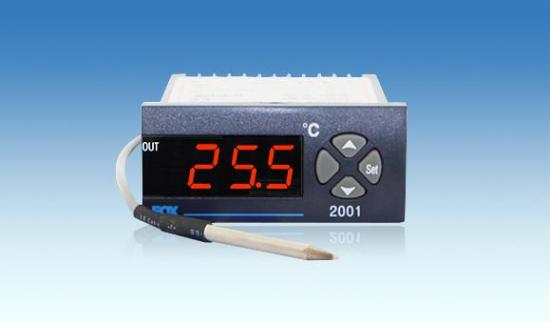
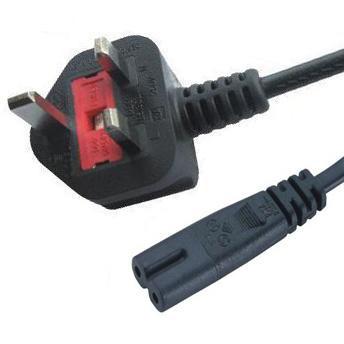
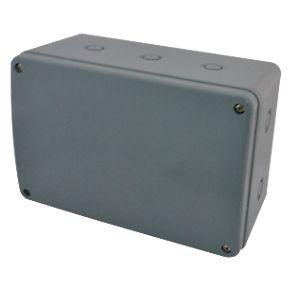
Hi all, This is just to document my (not so DIY) DIY external temperature controller. The main purpose for the controller is to trigger my chiller once the controller sense the set temperature. Its present a more accurate reading than the one that is built into my chiller (Hailea HC-300A). As my chiller was kicking in like every other 1/2 an hour, it makes sense to add in the controller to decrease the frequency of it kicking in. Some will say its because of my in flow rate causing the sensor to pick up false reading, while other might debate that the thermo sensor in the unit is faulty. Well, nothing is perfect in this world and hence this device is put together to make a better world, or at least for the fishes and me. There are a couple way you improve the temperature sensing / kicking in of the chiller. Open up the chiller and disconnect and install a seperate temperature probe ( requires dismantling of the chiller, need to determine if its NTC or PTC probe) direct connection of the temperature controller to the chiller by retrofitting it and wiring it (limited to the output current of the controller and requires dismantling of the chiller. Put together a external temp controller and configure it to trigger power supply as and when it sense the set temperature to kick start the chiller and pump. I'm going with #3, which is easier for those of you that not so into the idea of dismantling your chiller. Also, if you decide to upgrade your chiller or even to a drop in coil, this can be reuse, just need to change the relay accordingly and made slight modification. Decided to document this as I was searching for similar guide within the forum and did not manage to find one that has any pic ( PIC speaks a thousand words, they say). Many use fox controller, bro triggerfish had earlier document a similar for his chiller, but i can't seems to find one with a diagram that could make the build a little easier. DISCLAIMER: This is based on my purchased controller, its schematics as well as the technical specification of my chiller. Yours may differ a bit, please exercise abit of self judgement unless yours is 100% similar setup. I will try to state as much details as I can. --------------------- So here we go: Material required: 1 Fox-2001 temperature controller ($50 as of today. From Acez instruments, Sim Lim Towers #B1-38.) 1 10A DEG PCLH-108A1S relay ($6.50 as of today. From KOBA electronics, my fav electronics stores, People's Park Centre #03-06) 1 relay plug in socket ($3.50 as of today. Also from KOBA) 1 3 pin fused power cord. Its 3 pinned for easier connection, but only 2 wire in it ($3 i think. Aloso from KOBA) 1 single-gang socket ($5.80 as of today. Also from KOBA) Enclosure box to house all the above ($10 - $20,depending on your preferred size from Jalan kayu hardware store) Reason for selection: 1. The fox-2001 is one of the cheapest and most basic temp controller i could find. It comes with a 3m NTC probe, allow user to set highest and lowest temperature, provides a relay output (sadly only 250V - 2A) and it takes in 220v power. Other variant are available, such as one that allows 2x or even 3x output for your fan or pump, or 1 that includes alarm. Product inforamtion: http://www.acezonline.com/products.php/temperature/temperature-controller/fox-2001 Datasheet: http://foxeng.co.kr/upload/pty3/1397457444_0.pdf 2. The controller provides a relay output of 250V, 2A. This pose a problem. My chiller max running at 3A, or so i think from the datasheet that I have got. The Hailea HC-300A states the current rating as 1.8A (3A). So to be on the safe side, i got a 10A!!!! more than enough to power the chiller and allow future upgrade without the need to change the relay. You don't have to get the same relay as me, I'm just kiasu. However, this relay has to at least match the current rating of your chiller's or any thing elsethat you are running, otherwise it will 100% fry your controller or the equipment. Worse case, both. More is better. LESS IS NOT!!! Make sure you buy one with plug in terminal, not pcb terminal. We do not need to do soldering. Datesheet: http://docs-asia.electrocomponents.com/webdocs/04ab/0900766b804aba9a.pdf 3. The relay plug-in socket is solely for the relay and ease of connection. All you need to do is identify the correct port and connect the wire. 4 & 5. Both power cord and socket are meant for 3 pin. The temp controller requires only 2 wire, Live and Neutral, hence the power cord. It comes with fuse just as a additional safety in addition to the relay. 6.Waterproof enclosure allows your to safely house all components without fear of water splash or condensation sipping in, since the final product will be place near water. ------------------------------- Ok. Time to sleep. Tomorrow update on the connection and why this is call (not so DIY) DIY external temp controller.
-
Hi all, looking to trade Tunze 6065 with magnet holder for controllable wavemaker. Still in tank. Interested party please pm me. Thanks
-
 Ya its pretty heavy. Have to load it in as bulk cargo if i really bring them in. Whiskie, how's your HS-90A sounds like when kick in?
 -
Really? They accept DBS credit cards? I have nv shop in taobao before, always my wife doing it and mostly house deco stuff. I just print screen and send it to them. I'm looking at hailea HS-90a which is around S$330 - 360 include delivery. Went clementi and they are selling $595. Tempted, though it means i have to get a foldable trolley in my luggage.
-
Hi Bros, any one had any experience buying equipment directly from China? Pumps? Chillers? Cree LEDs? anything? Am going to Shanghai and Qingdao frequently and would like to see if anyone know of good location to purchases these. I saw Hailea's chiller 1/2 hp in taobao for only $300+... Meet with a reefer earlier this week and was told Abyzz pump was S$200+ cheaper per piece Any idea? For discussion.
-
If you have one of the above, PM me your Brand / model / condition / age / price. Thanks
-
Bro Moonwater, how much was your 5feet reflector at De Lighting?
-
Bro can share where you get your lighting fixture?
-
Bro, any idea where to get cheap slim Jerry cans? I'm just rodi water for my new tank and foresee should have quite a fair bit left over. I'm holding my rodi water in a inflatable baby pool now.
-
Depending on the quality, most lighting shop should carry it also.
-
Does the Leds come with angled lens? Can post a pic on the performance?
-
Bump
-
Bro, I can pick it up from you this weekend. Pm me your contact k?
-
@SteveS, i think it all depends on the type of coral you are keeping and also whats the temperature of your water. Many did not do with a chiller. Just that with chiller will have better colors for your fishes and coral. Soem can thrive at 29c
-
Changed it to a freshwater for betta, with 1 tetra and cory. Moved the previous tenants to a 3 footer.
-
The base was sourced through a fellow selling candy machine. Than I retrofit the tank through a glass maker at Kelantan. It comes with a top, and its not really that filmsy, unless you shake it, but who will go shake their own tank, yeah? Went to get a better lighting, but after some consideration, decided to convert 3ft fresh tank instead and place it in my study room. Now the fishes are in QT until my 3ft stablized. Converted this tank to a freshwater for 1 x betta. Will post the pic again. Cheers!