

.jpg.6ff77eabb205146e13b742b0340b97ef.jpg)
SubzeroLT
-
Posts
2,330 -
Joined
-
Last visited
-
Days Won
119
Content Type
Profiles
Forums
Gallery
Posts posted by SubzeroLT
-
-
On 11/9/2022 at 8:59 PM, he said:
The spotted clam looks huge, how long have you been keeping it ?
Got it as a baby clam (~ 2.5") from SAS back in July 21. So its about 16 months.
-
Many thanks to Peter from Aardenasia (Distributor for Prodibio & Colombo test kits) for the invite to a small gathering and sharing at Specialised Aquatics Solutions last week.

Learned some product insights from Dr Nicolas along the way.
.jpg.2592341d46df4e2a11bb70cceb77566c.jpg)
Thanks so much for the goodie bag
")
.jpg.b269b8dd27235a1f0508872972cb2a32.jpg)
Photo credits : Lincoln
-
 1
1
-
-
The clam enjoying a good dose of light.
.jpg.6c364370d9421b1515ecb8c5745778fb.jpg)
.jpg.62ad5982c06ea77dcff4857cdaa369e2.jpg)
-
Decided to print a PAR meter holder so it hands on the edge of the aquarium. Easier to snap a photo of the reading for record purposes. Easier than writing on a piece of paper.
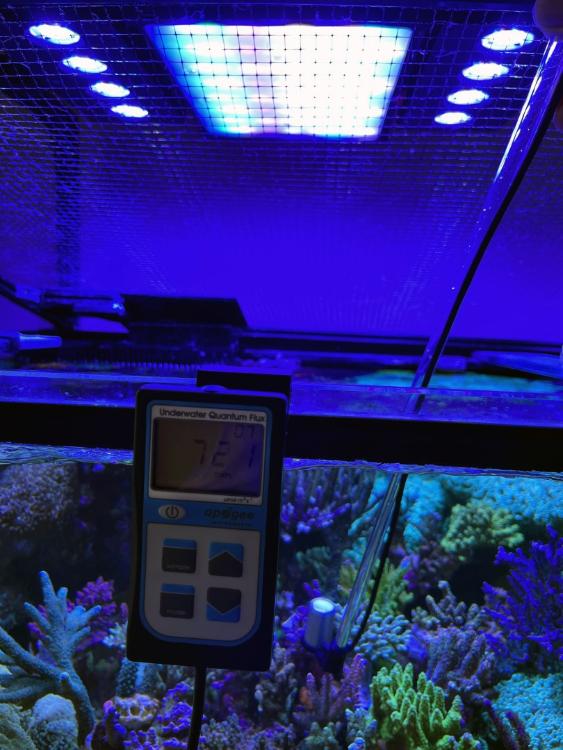

The orange font shows the PAR readings at 2pm.
The blue font shows the evening to night PAR readings when the lights are Blue & Royal blue.
Picture taken at night with yellow lens. So ignore the double image of the lights (due to internal reflection of the dual later yellow lens + polarizer)
The Apex Sky provides a blanket of light to the SPS section. Love it!
Peak setting is 70% intensity.
-
Several weeks back, a fellow reefer asked me recently on my opinion between the Apex Sky vs Aqua Illumination Hydra. That query piqued my interest on the Sky. I managed to get hold of a used SKY. A short review here.
Key take away from specs point of view :
- 200W of power
- 104 LED spread over a wide area to provide a blanket of light (no hotspots)
- Many programming options. This one is true - many many templates to choose from
- Can run independently (no apex) or integrated with Apex
- Runs very silent
- https://www.neptunesystems.com/products/expansion-modules/sky-led-reef-aquarium-light/
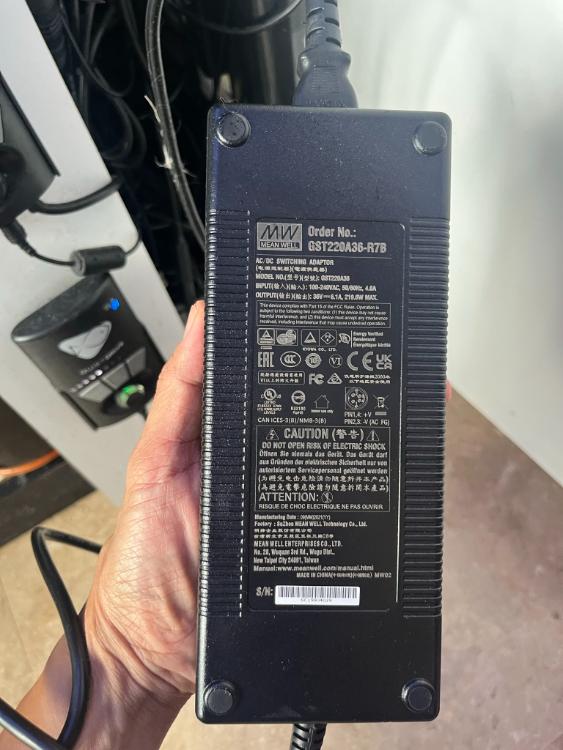
Hardware setup is very easy. The mounting points make use of Ecotech Radion mounting kits. The screw widths are the same width as the AI Hydra, so the slide into my light stand directly (no mounting kit required).

Cable is 3m long to connect to the Mean Well power supply. For those who are not aware, Mean Well power supplies are reputed to be of better quality & reliability
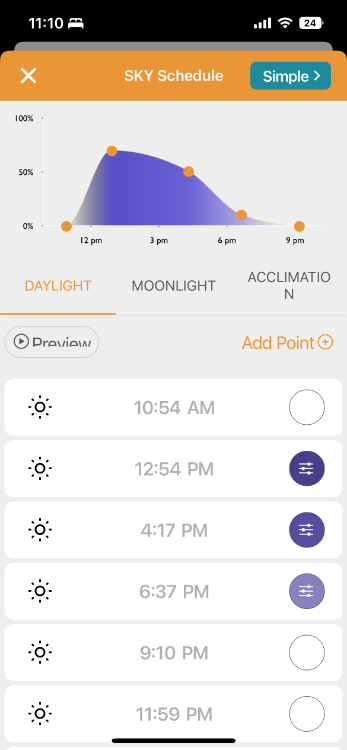
Some screenshots of the templates available :
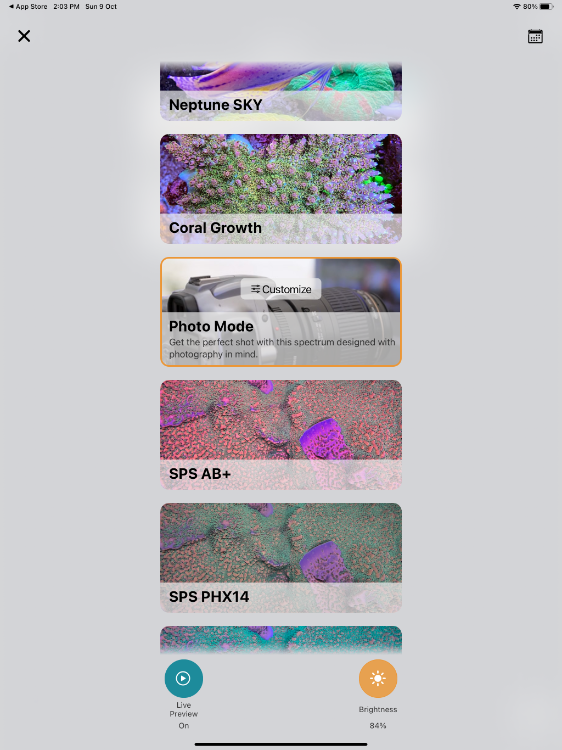

Templates are always good to have. Easy to switch switch. Then just set the brightness power percentage. The light adjustments are clustered around 4 groups.
- Channel 1 - Amber
- Channel 2 - Violet
- Channel 3 - Royal Blue
- Channel 4 - White
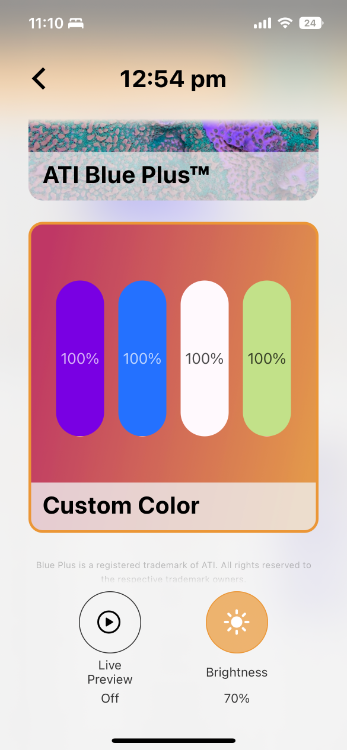
Some comments on the templates & settings available :
- Neptune Sky : around 20k color setting but less blue.
- Coral Growth : max of all 4 groups. Max PAR
- Photo mode : 40% on channel 1-3. 100% for White
- SPS AB+ : Emulates the famous setting from Ecotech Radions
- SPS PHX14+ : Emulates the 14k spectrum of Phoenix Metal Halide lamps
- ATI Blue Plus : Emulates the very popular ATI Blue Plus HO Flurorescent bulbs
- Several preset color temperatures fromn 5K to 20k
- You can turn on the cloud cover feature if you are worried about burning your corals
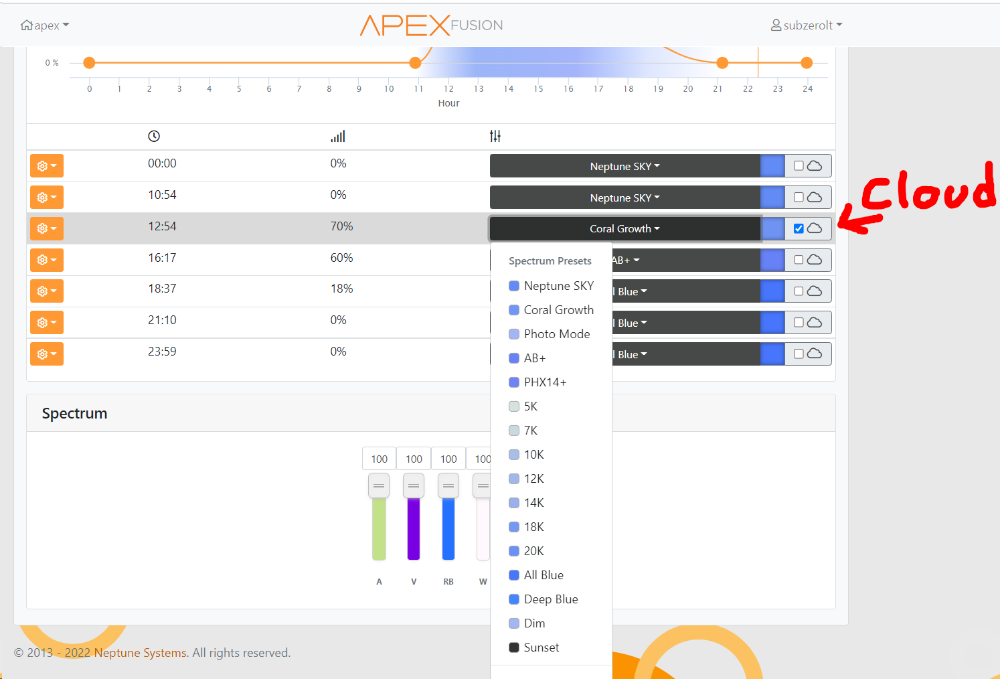
Configuration interface when using PC.

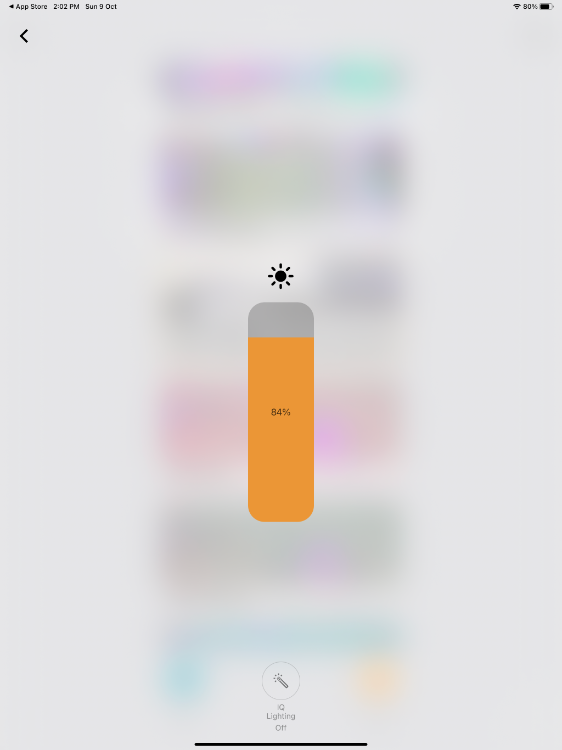
View on the mobile app.

Current setup. A blanket of light above the SPS.
Plan to measure the PAR during the week. A sample check at intermediate power setting made today.
.JPEG.536a501169173082d9f69954139fbad0.JPEG)
-
CO2 scrubber. Best to get those color changing type, so you'll know when they are depleted.
I had some cheap Taobao media on hand. They claim to be color changing but apparently don't. Not even sure if they work or not.
.jpg.e30fefbe5c6f142804397e5e3b37d407.jpg)
The one i'm using is TLF CDX
This is the tank pH difference. Roughly 0.1pH increase.
-
Some random pics from the last week..
Starry Blenny hanging out at the wavemaker. Time to give the Vortech a quick scrub.
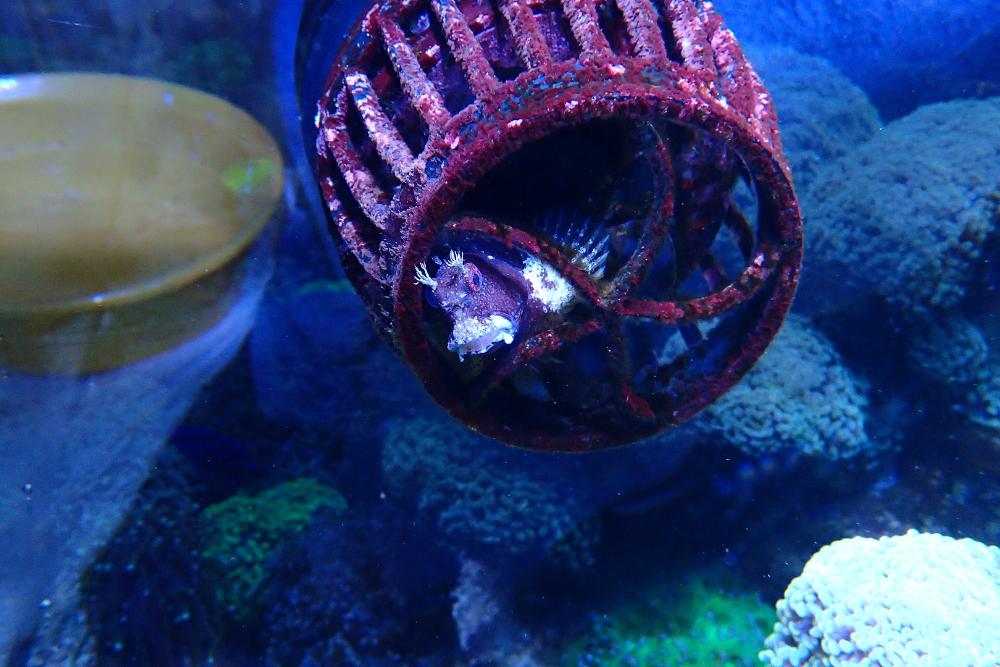
Hosting this pectinia for a fellow reefer till his tank is ready. Hmmm....not sure if he remembers its still with me.
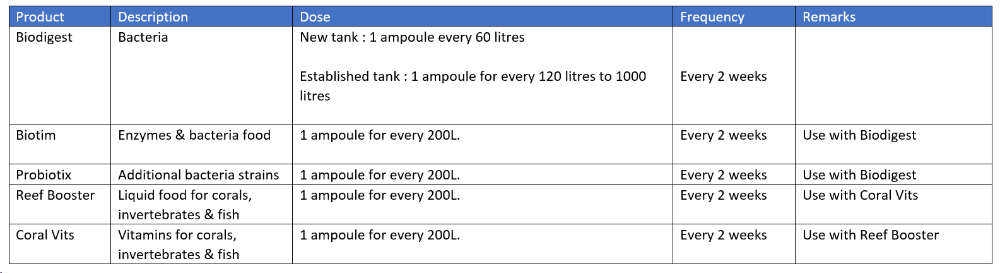
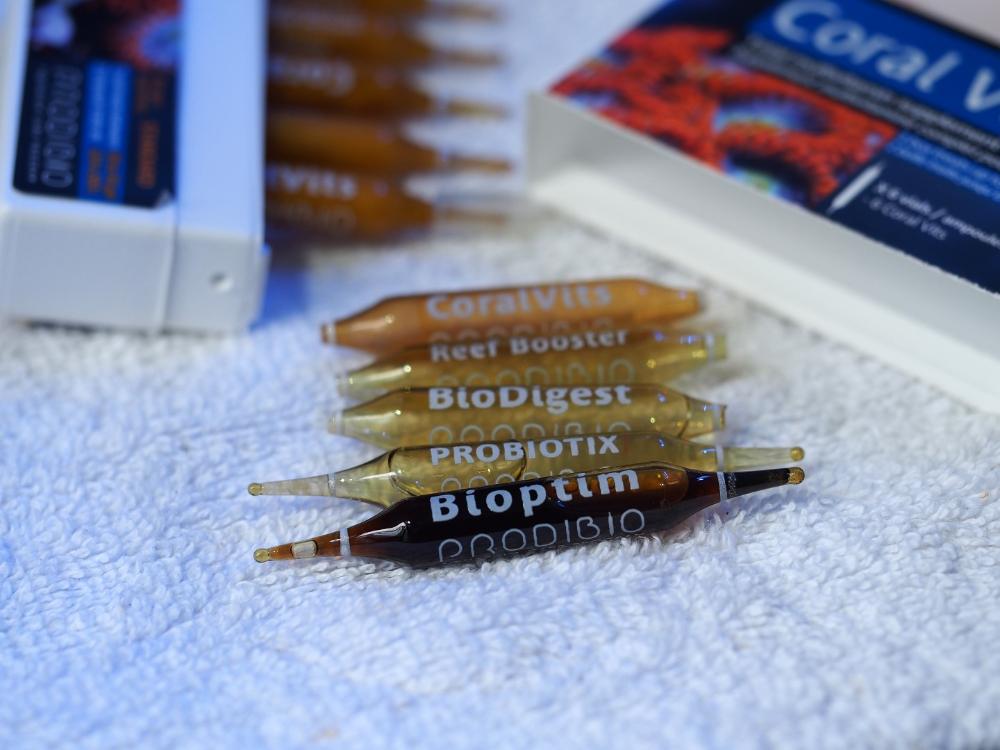
Dosing regime of bacteria & supplements every 2 weeks. This helps provide some confidence to improve nutrient & bio filtration performance of the tank.
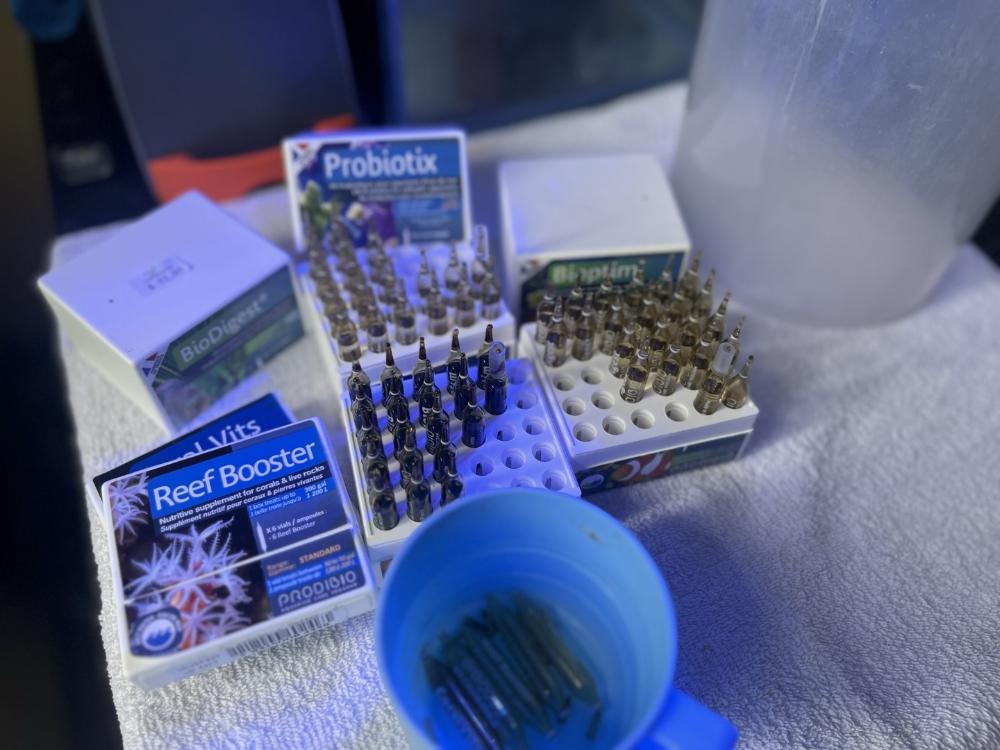
Refer to my earlier post on 4th Sept on the writeup.
- Biodigest – bacteria source
- Biotim – enzymes & bacteria food
- Probiotix – additional bacteria set to complement Biodigest to enhance biological filtration
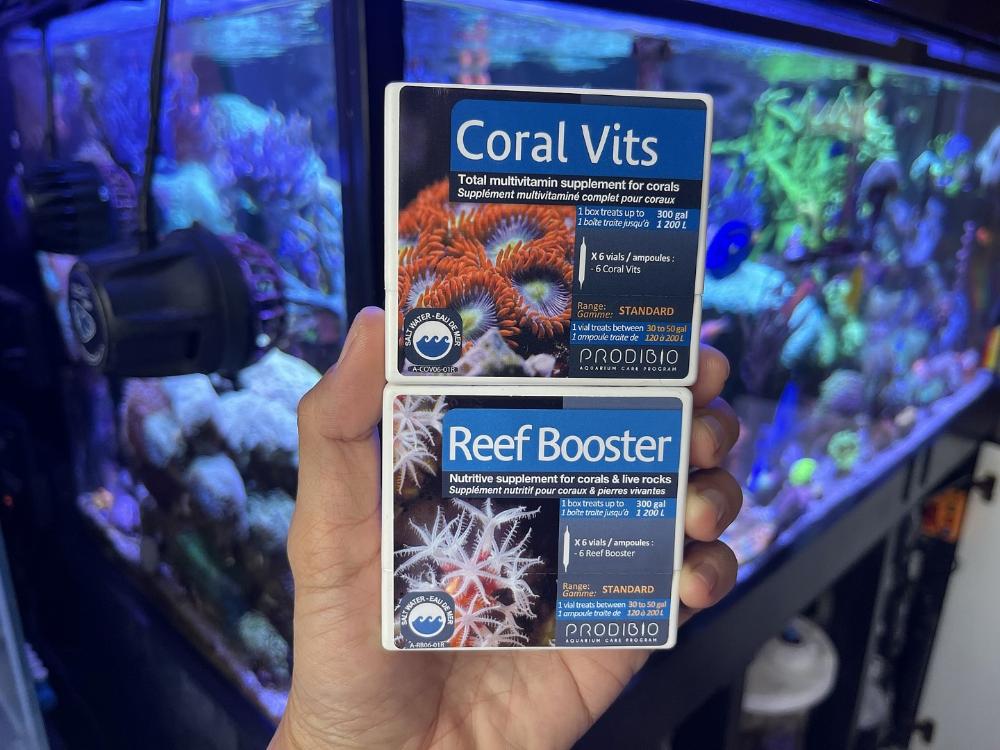
- Reef Booster – Liquid food for corals, invertebrates & fish
- Coral Vits - Vitamins
-
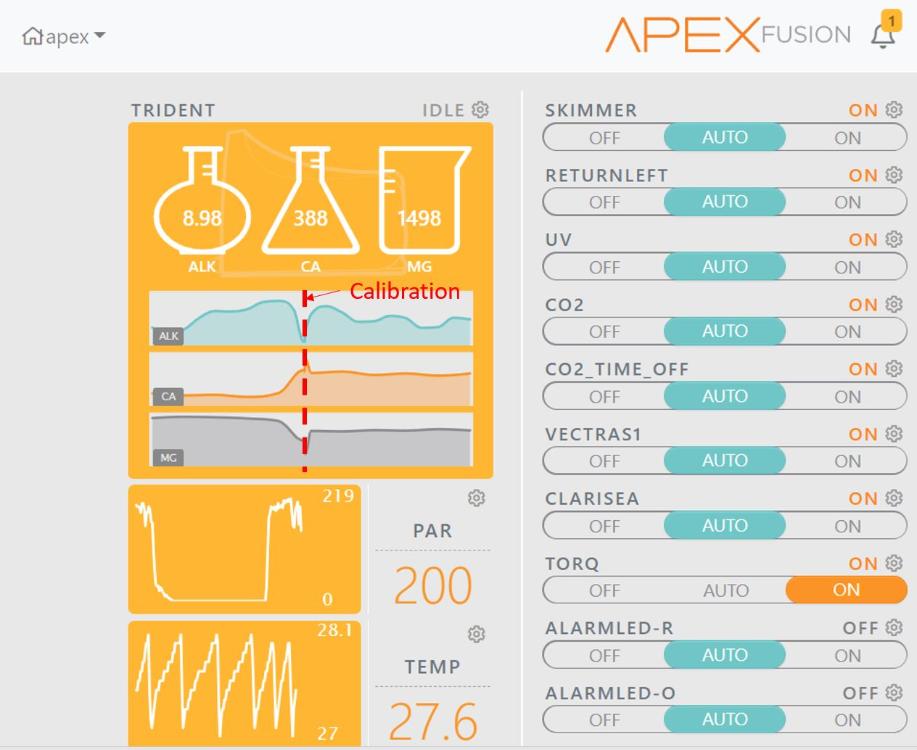
It is well known that different testers/test kits will produce slightly different results. Its nice to have it all aligned to a single number (though it really does not matter in the big scheme of things) since we are really checking for big deviations.
In any case, I got some bad advise that its OK to calibrate the Trident by inputting manual measurement numbers (eg. readings from Salifert manual testing). End up getting haywire readings for Ca, Mg, KH
Best solution is to calibrate with the calibration solution provided.
.JPG.bd4f3a9698cfd7806bea77bfae289611.JPG)
See the difference before/after using the the calibration solution. All good now.
-
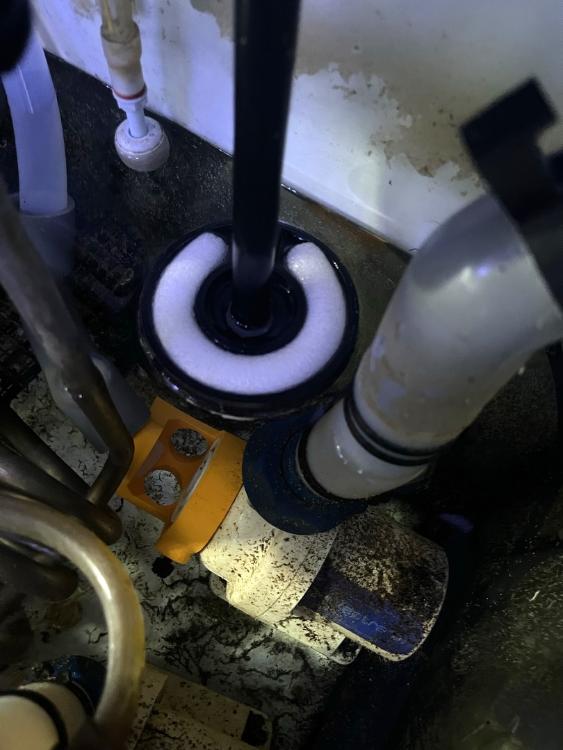
Working to reduce phosphates down to the 0.1ppm range. Currently climed to 0.3ppm
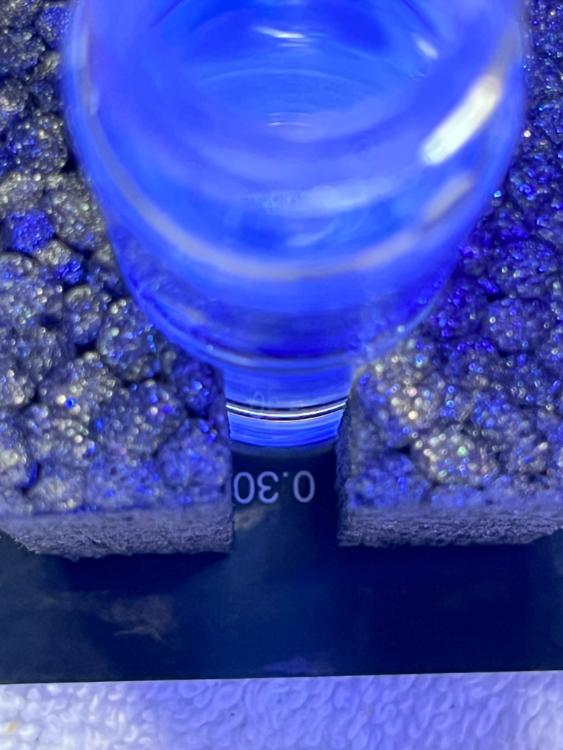
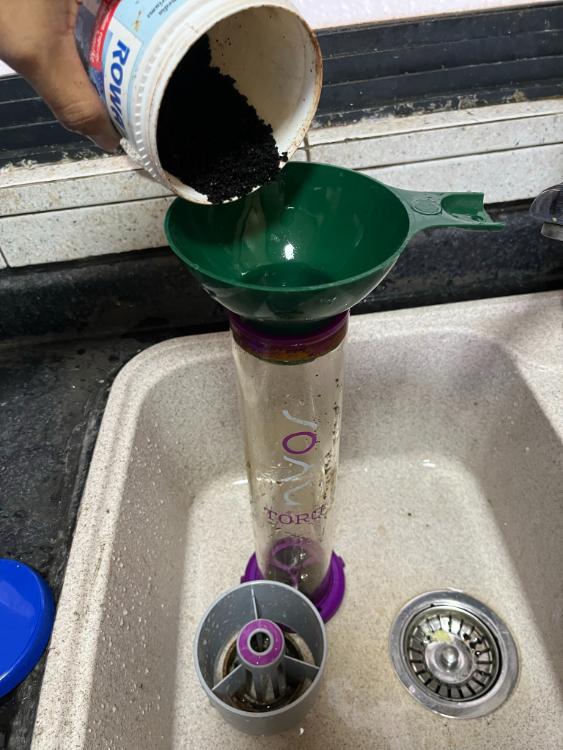
Rinse by pouring water down the Torq
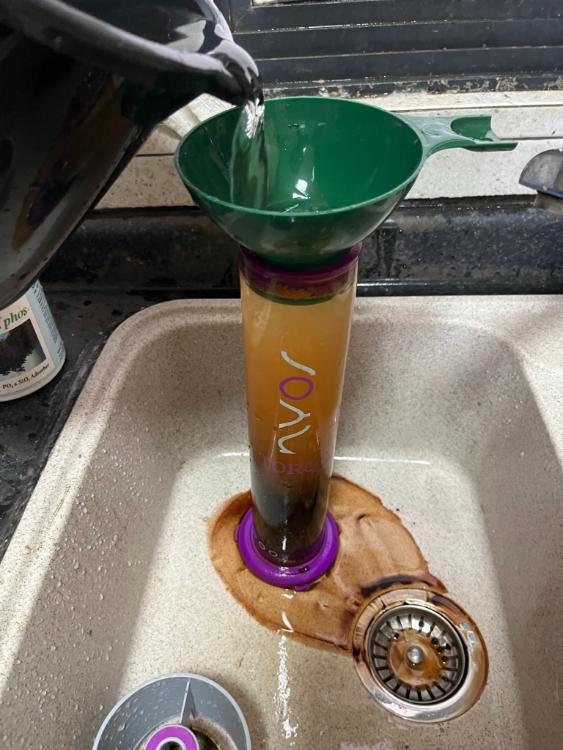
All clear after a few rounds.
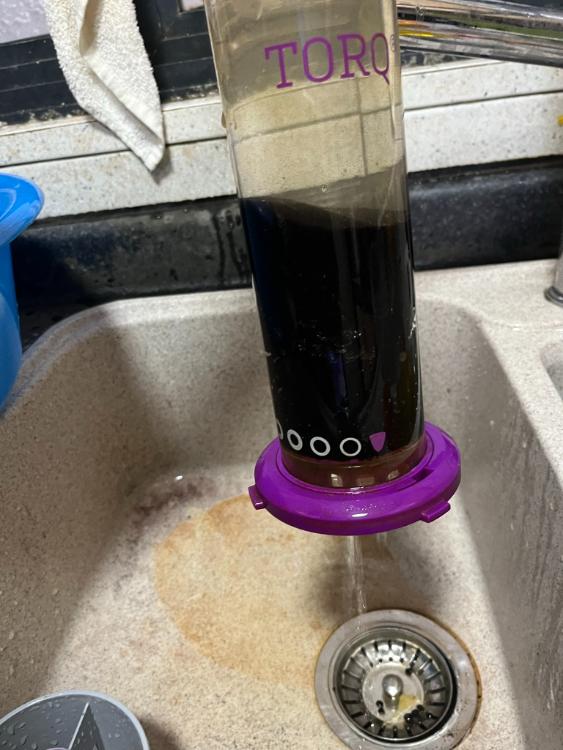
Sponge is cleaned weekly.

-
A fellow reefer recently asked about what I used to clean the glass.
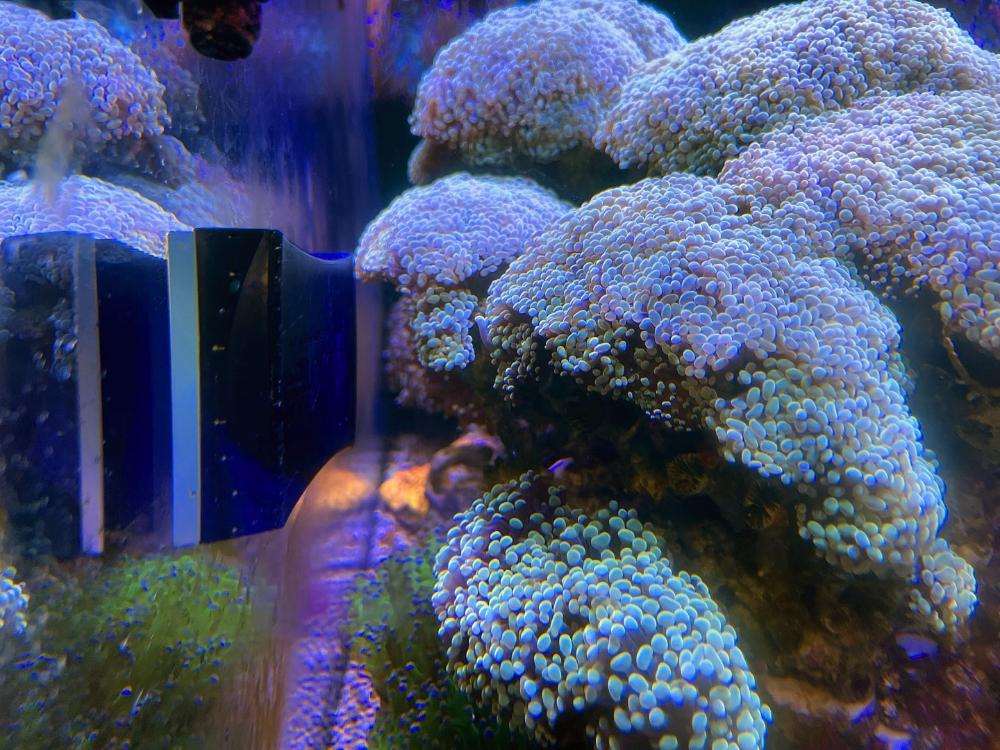
Main magnetic cleaner is this DD Blade Runner. Note there are 2 versions - Standard & Strong (depending on your glass thickness). My tank is 15mm glass - so I got the "strong" version for 15-20mm glass. Very strong magnet so fewer passes are needed. And it does not have a scrubber on the inside so there is little risk of sand getting trapped => little risk of scratching glass.
.JPEG.c9e404e9f2b75d03812d8f431e5665de.JPEG)
Very thin profile. Good for those cramp sections.
For difficult to reach places or where manual scrubbing is needed, the best one i've used so far is the Seachem Algae Scraper. Using it since March 2020. Still on the 1st blade. Full plastic handle. And almost no rust on it. Its not cheap but well worth the $$. Be careful of those manual glass cleaner you buy from taobao or LFS that use a metal handle. It'll rust internally and leach bad stuff into the tank.
.jpg.21d05f45c3cd6869d151d052870b192a.jpg)
Externally, just use a dedicated wet cloth for cleaning glass. Then squeegee of with Ikea LILLNAGGEN Squeegee
-
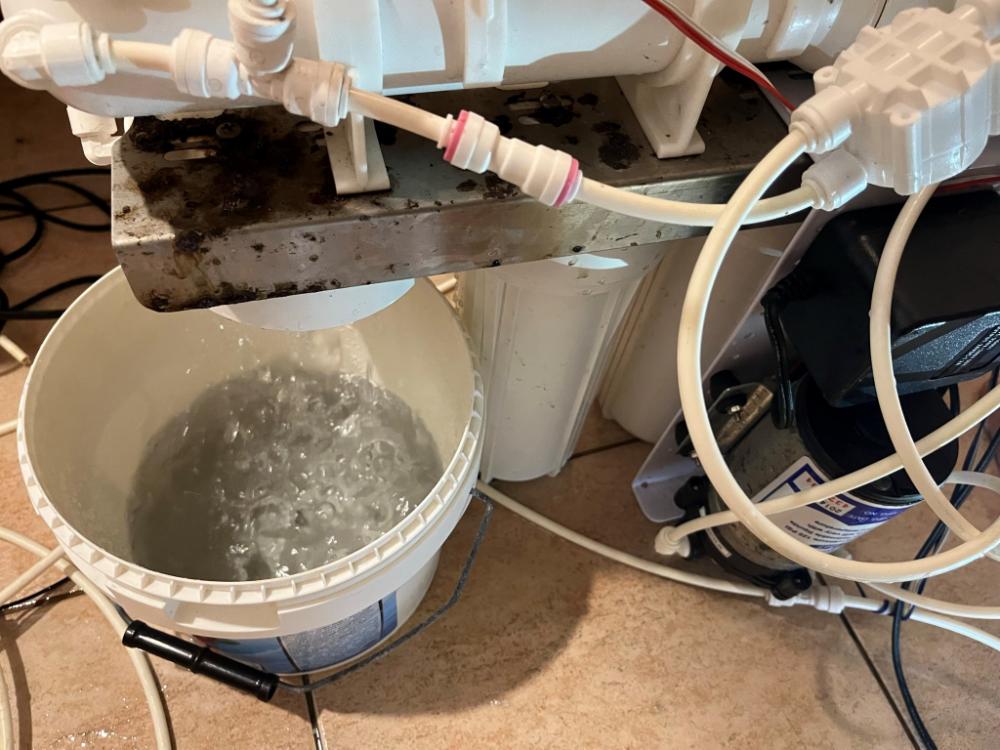
Totally lost track of the last time the water filter filters were changed.
- RO membrane last changed ~ October 2016. Decided to change it after finding the TDS after the RO membrane is in the 18ppm range.
- Carbon & sediment filter probably 18 months ago. Ideally I should change them every 6 months to 1 year. Quite important to ensure the carbon filter are not depleted else chlorine will simply pass through the carbon filters. This will deplete the DI resen very quickly ($$$)
Based on rough count, i use about 300L of clean water a month for water change & evaporation top up.
The filter produces about 200L waste water. So in total about 500L passes through the carbon/sediment filters per month. Or about 3000L in 6 months.
.JPG.4295377bce7fda814a7f84e470dac45c.JPG)
Configuration :
Water inlet -> Carbon filter 1-> Carbon filter 2 -> Sediment filter -> Booster Pump -> RO membrane -> DI resin 1 -> DI resin 2 -> Water outlet
After swapping out the filters, i disconnected the hose after carbon filter 2 to let the carbon flush out. This is how much carbon dust comes out for the initial 5L of water
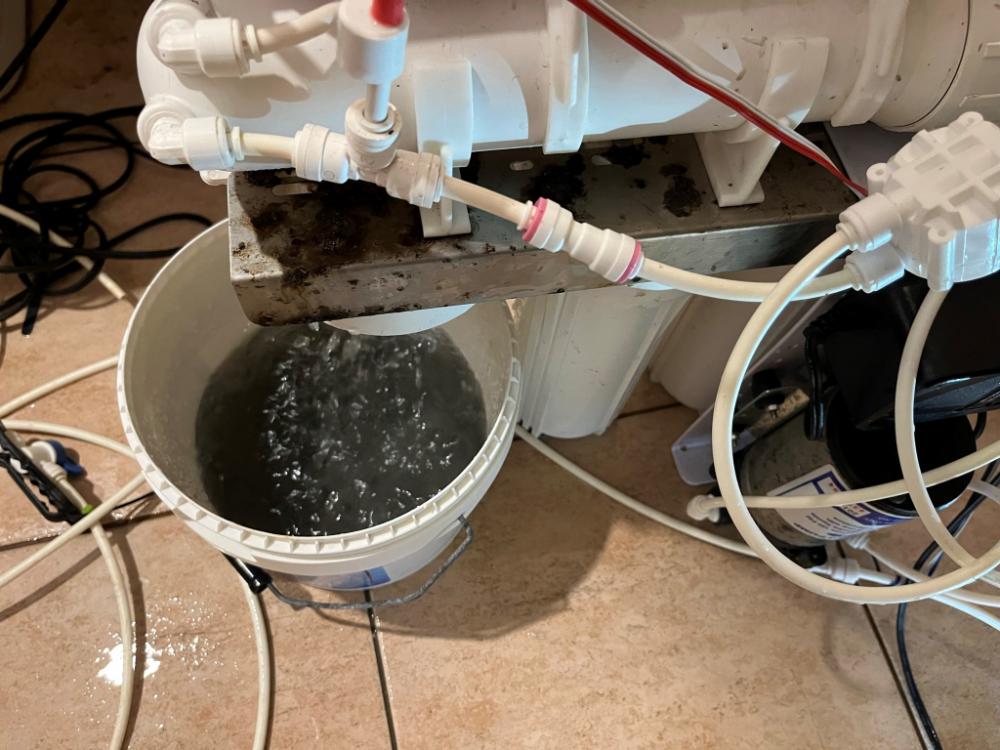
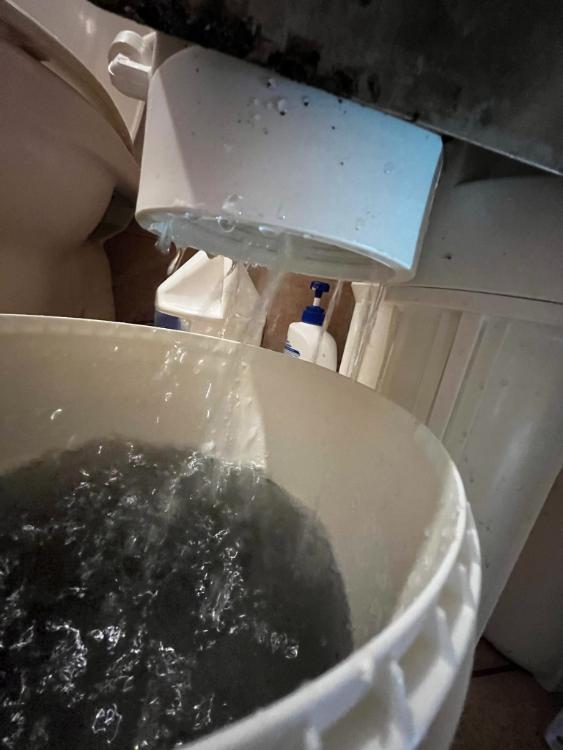
After 10L
After 20L. All clear! Then attach the sediment filter back to the system.
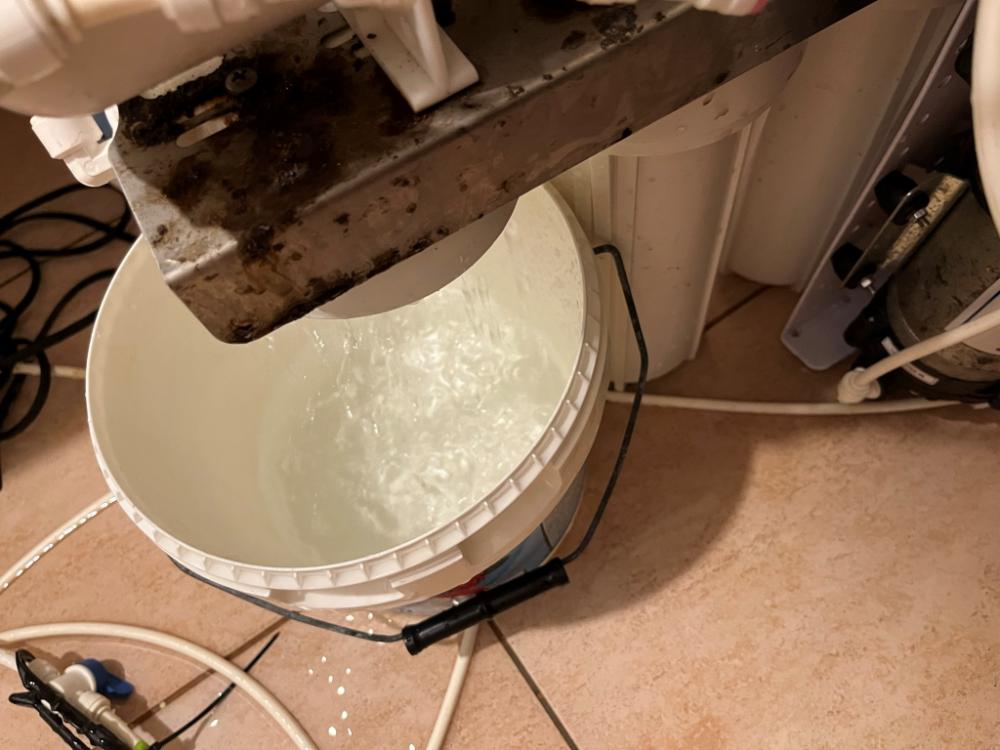
With the RO membrane also replaced, TDS readings i'm getting are :
Water inlet ~ 67 TDS
After RO membrane ~ 3 TDS
After DI resin ~ 0 to 1 TDS
-
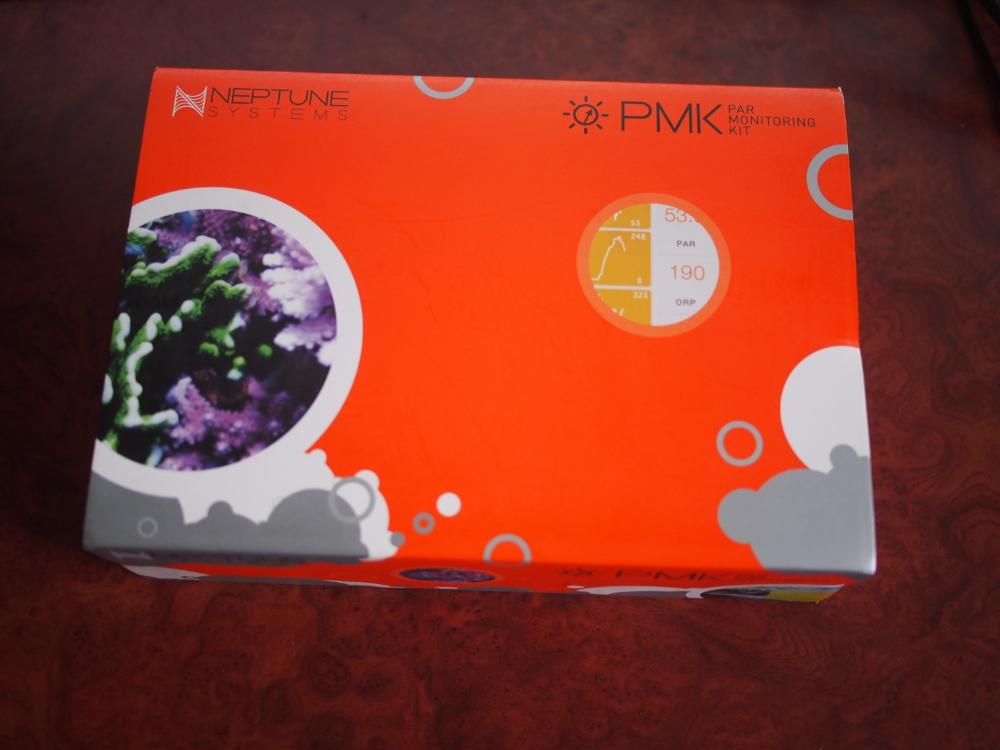
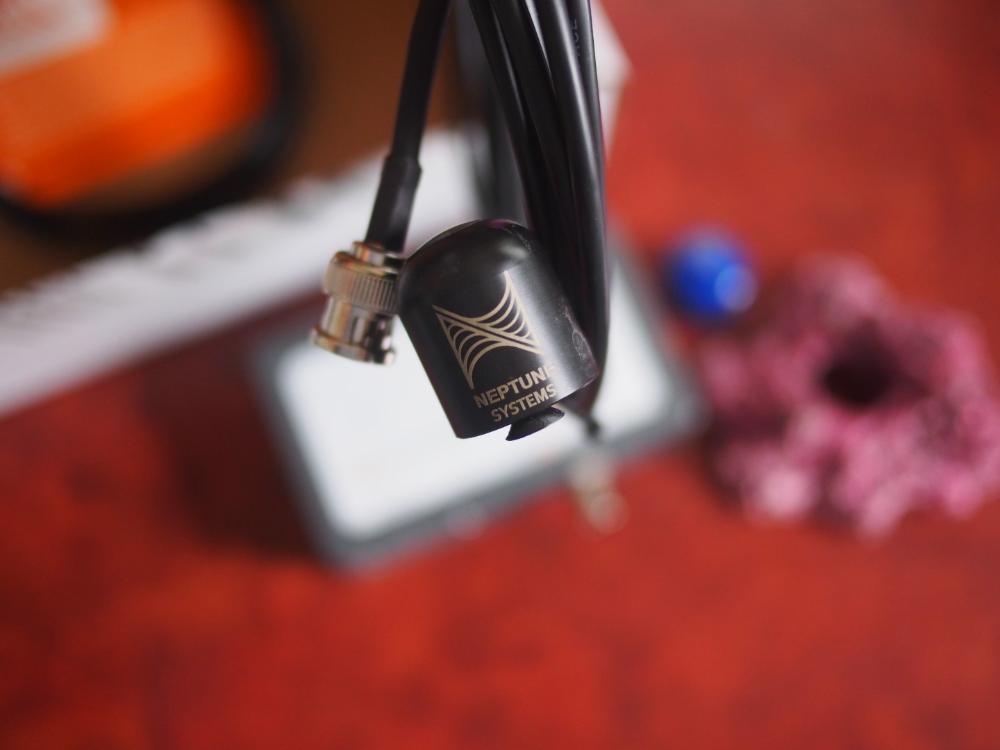
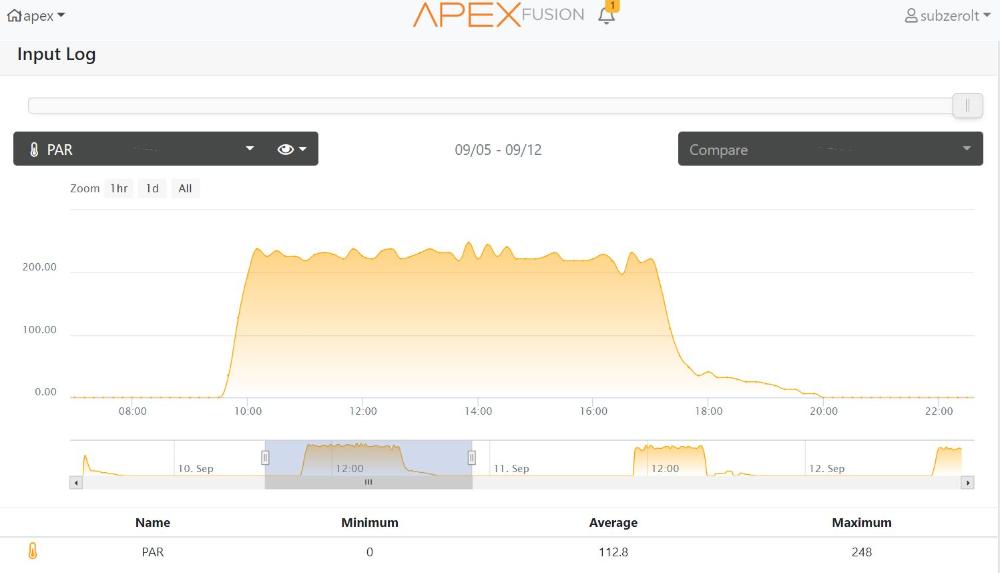
Got an Apex PMK (PAR measuring kit) recently. Now able to measure PAR throughout the day. Also with the ASM module that comes in the kit, its now possible to integrate other commercial sensors to the Apex.
First, some terminology :
PAR stands for “Photosynthetically Active Radiation”’ and refers to the wavelength of light that is used for photosynthesis. Typically between 400nm to 700nm of the light spectrum
PPF (Photosynthetic Photon Flux ) is the term used to define the measurement of PAR over a period of 1 second. Unit of measure is μmol/s (read as micro mole per second)
Strictly speaking, what we measure with the PAR meter is PFFD (Photosynthetic Photon Flux Density) – which is PPF over a specific area. Unit of measurement is μmol/s/m2. (read as micro mole per second per square meter)
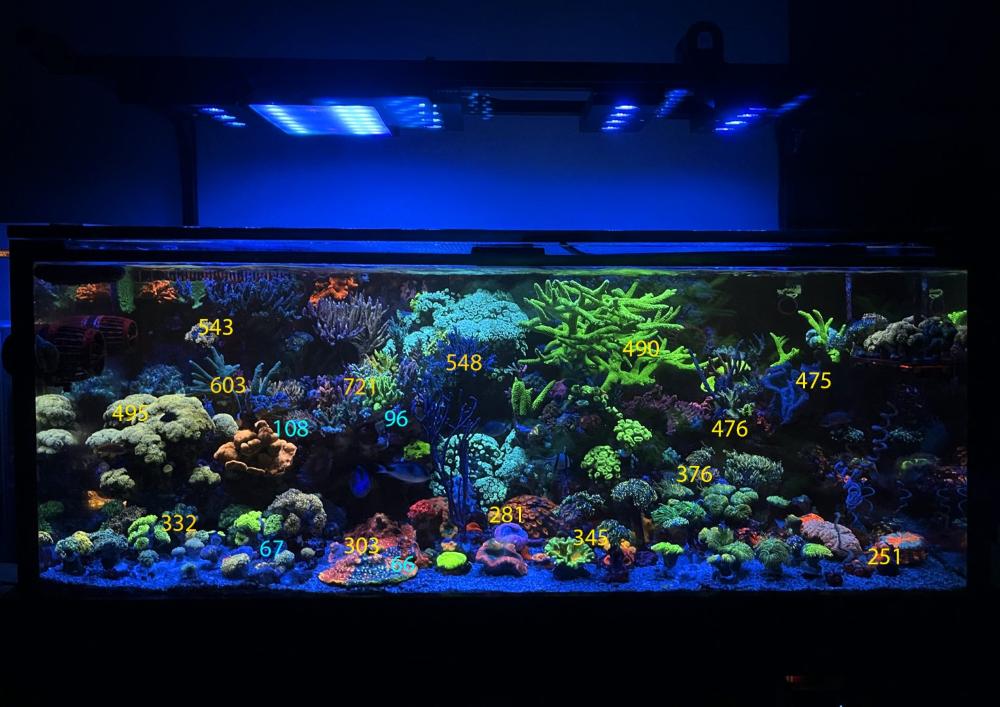
Old PAR measurements from this post : https://www.sgreefclub.com/forum/topic/142862-my-slice-of-nature-part-3/?do=findComment&comment=1963038
.jpg.c8917a44a85ca1551bded5734ccbcc91.jpg)
With the PMK, we can use the data to easily calculate DLI (Daily Light Integral) – total PFFD over a 24 hour period. Some setups have higher powered lights capable of reaching very high PAR & vice versa. Hence it is useful information to help tune high PAR settings to shorter lighting period. Or low PAR but longer lighting period. Unit of measure for DLI is mol/day. Will post more about this later on.
Main items : ASM module, an Apogee quantum sensor, a ceramic rock with compartment to hide the Apogee sensor, Aquabus cable
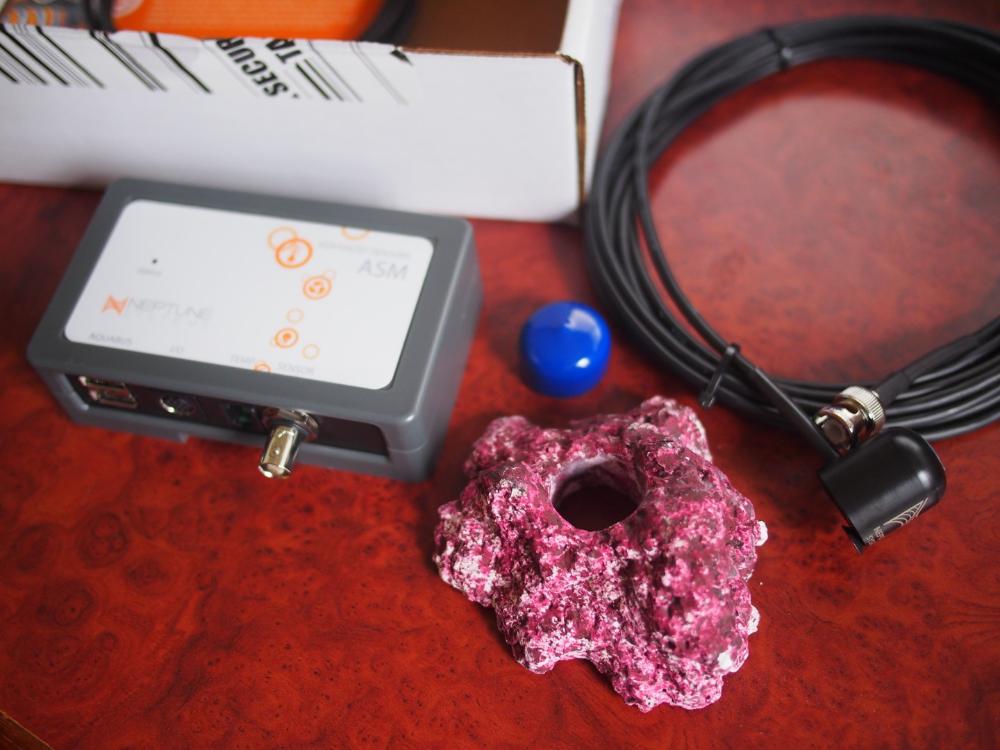
The ASM also has an I/O port to hook up another breakout box and temperature module.
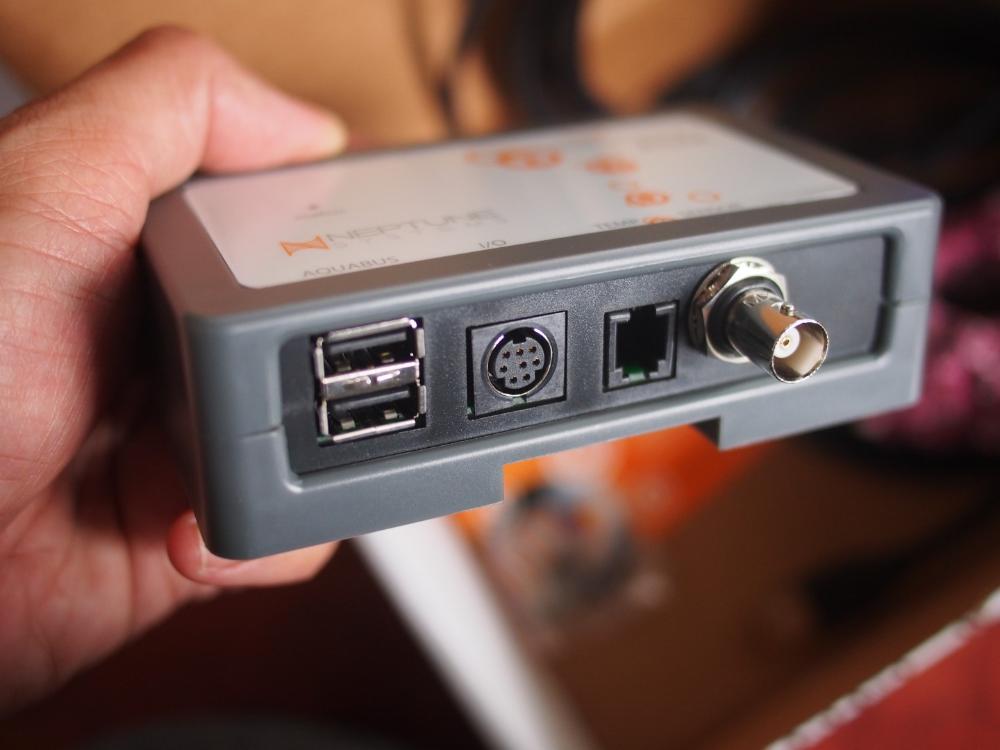
The Apex version of the quantum sensor has a plastic body and designed to be left in the water for extended periods of time.
 +
+
.JPG.13a6ecbd4708b9f3eaa1bc56cec84ac7.JPG)
.JPG.3216ce38197aa2a3c8a5ea67c689b1f1.JPG)
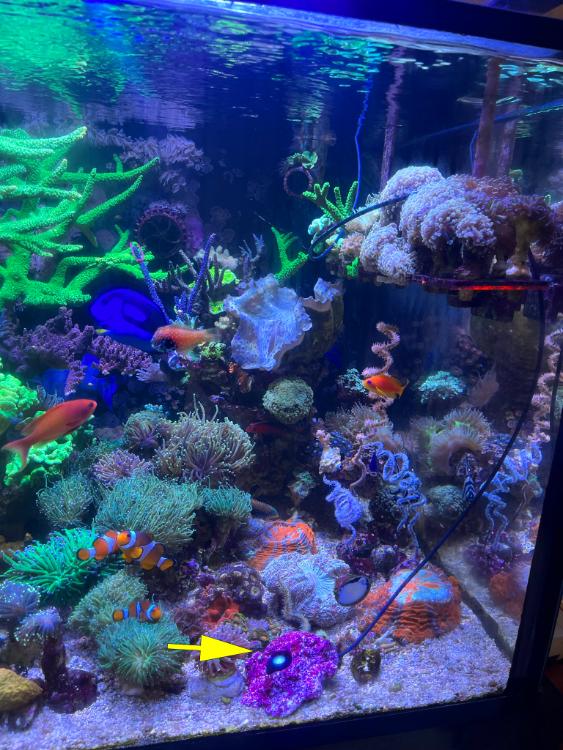
An example of the PAR readings at this section near the Acanthophyllia(Prata) corals.
-
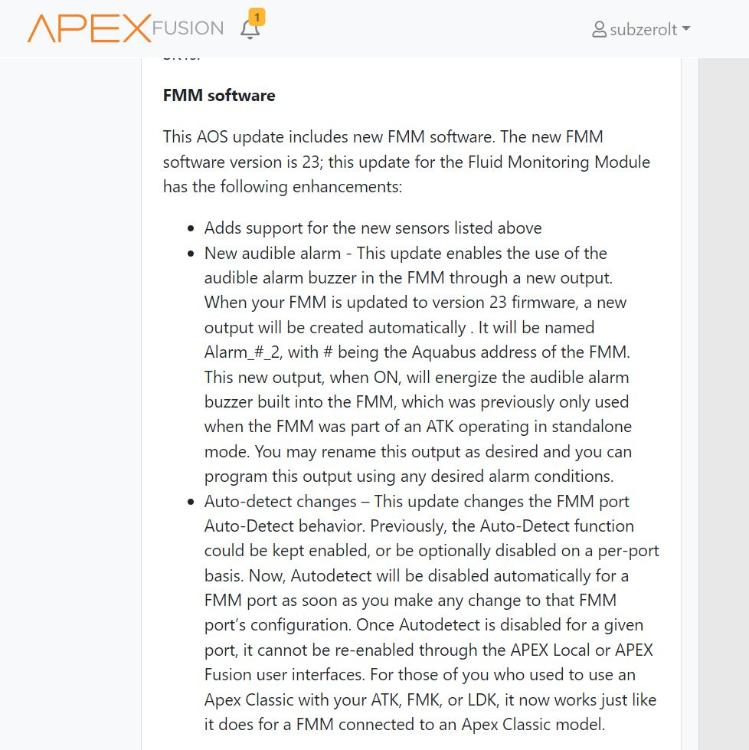
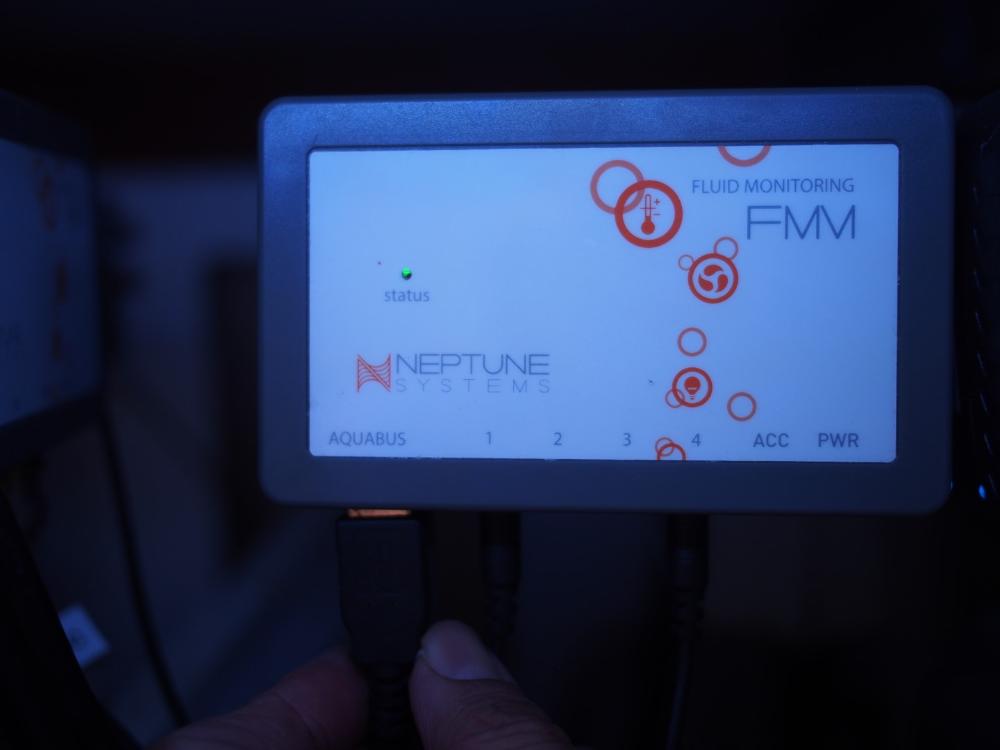
For those who are not aware, Apex released a new firmware for the FMM module to add support for the new fancy liquid level sensors. And for immediate practical reasons, enabled a buzzer alarm on the FMM module.
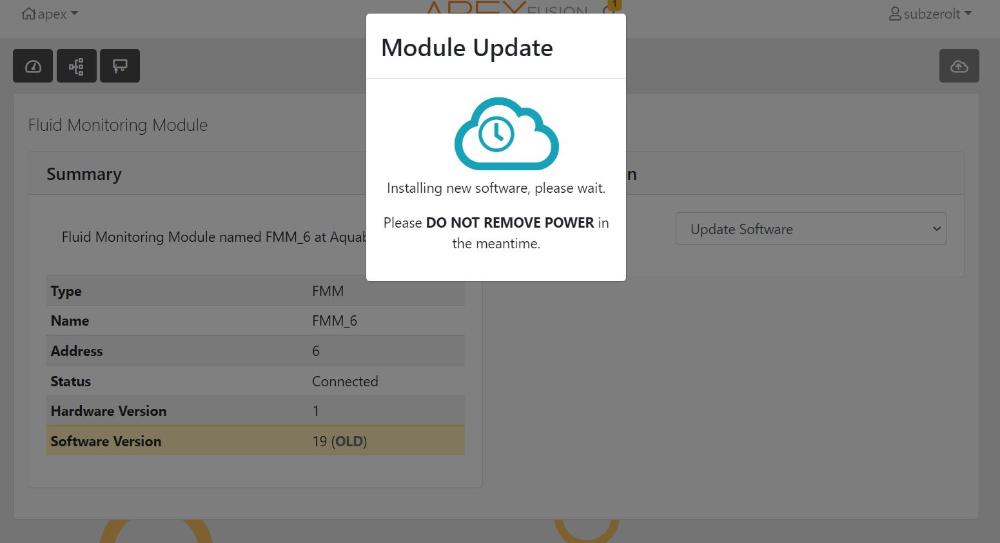
Software release notes
On my tank system, I used to have a red LED to notify me when things need attention. Recently I added an addiitonal orange LED as well. And now with the FMM buzzer, its able to provide better feedback on the level of urgency to attend to the tank.
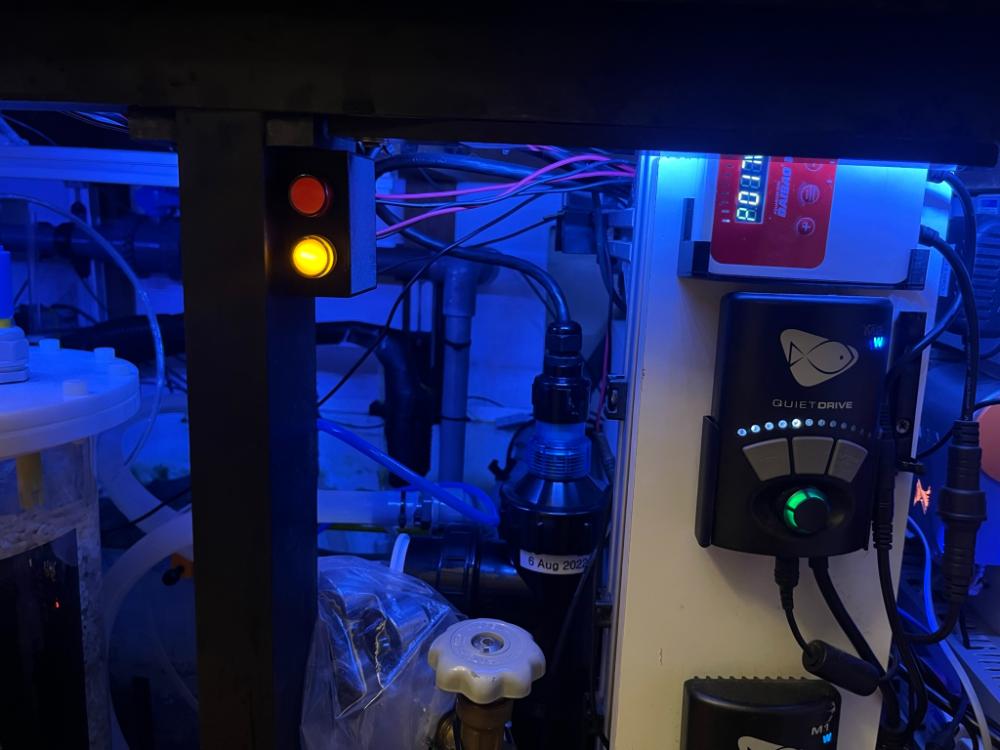
- Red LED + Orange LED = (1) temperature too low/high, (2) CO2 tank empty
- Red LED = (1) ATO empty, (2) Skimmer bucket is full (skimmer stop), (3) Sump water level low
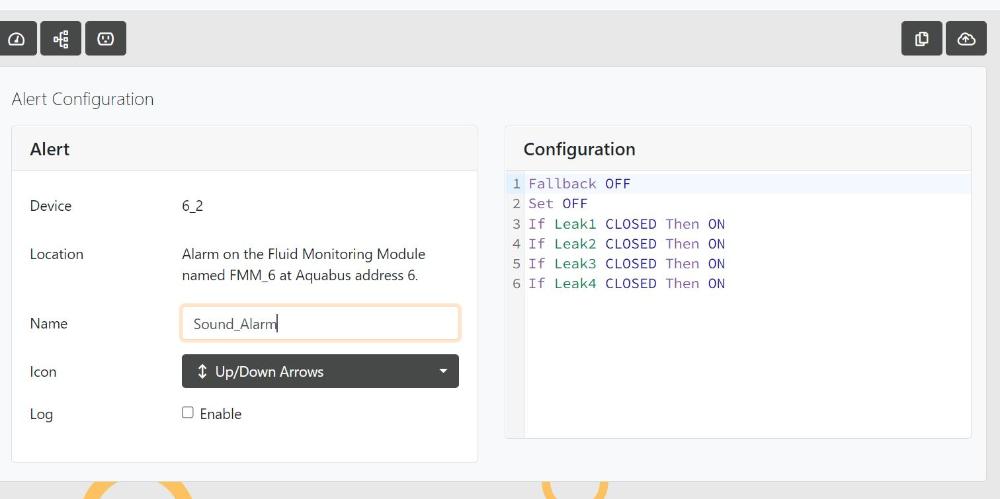
- Red LED + Buzzer = Water Leak!!
- Orange LED = (1) Skimmer is off, (2) Skimmer waste bucket quite full
With the FMM alarm feature, a new outlet called Sound_Alarm is added to the dashboard.
-
Received several queries recently about
- Managing water parameters and water quality,
- The type of bacteria to dose when cycling a new tank,
- Whether there is a need to dose bacteria in an established tank.
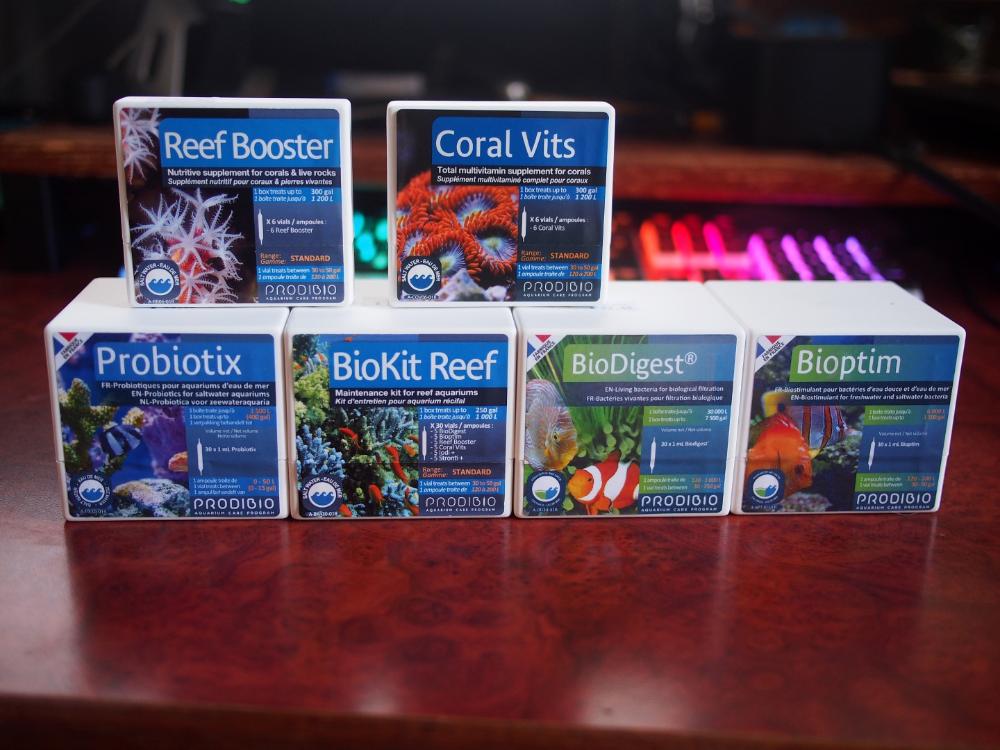
Hence I’m sharing my process & views about a group of products I’ve been using.
Firstly, water parameters & water quality are linked but not exactly the same thing. Water parameters are quantitative & easier to track. (1) Measure the major water parameters weekly at minimum (eg. Ca, Mg, KH, NO3, PO4, K) and adjust your process/dosing accordingly. And (2) Dose your trace elements & check with ICP as often as you can afford.
Water quality is more qualitative. Its equally important but often overlooked. A big part is linked to biological filtration – the conversion of toxic ammonia to harmless nitrates, the reduction of nitrates & phosphates and the denitrification of nitrates to elemental nitrogen. So let’s start with this topic.
My tank was initially cycled using Prodibio Biodigest bacteria + market prawn as the ammonia source. Completed the cycle in about 2 weeks (Cycling started Oct 17. Live stock added 2nd Nov)
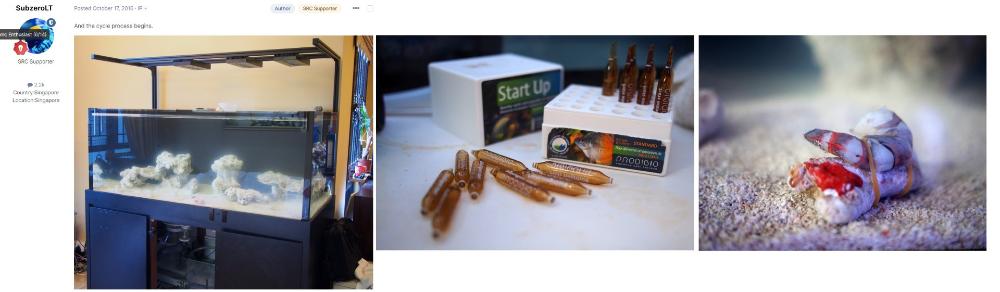
Link : Refer to this link for that post
The tank is coming to 6 years & has been relatively problem free. In the past few months, i added ~ 10 fish and also about 10 non photosynthetic corals. Whenever new fish are added, I’ll feed a little more in the initial weeks (Aside from the default morning & night feeding) I’ll add additional frozen food feeding in the afternoon & evening. With the non photosynthetic corals, I now feed Reef Roids twice a day.
With the heavy feeding regime, nitrates & phosphates started to creep up & more algae started to form on the rock. I worry about old tank syndrome.
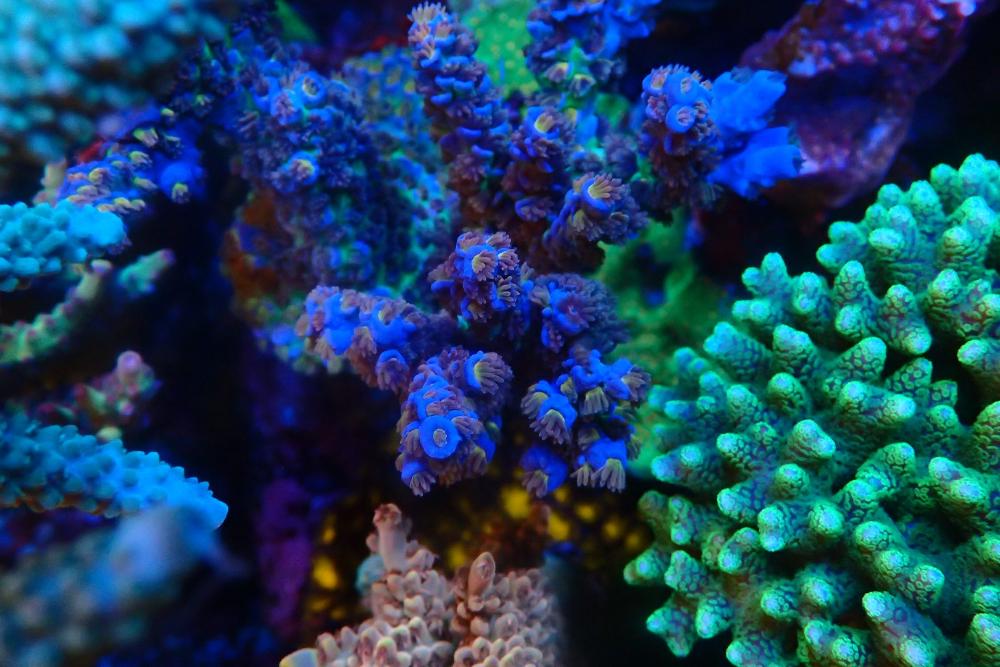
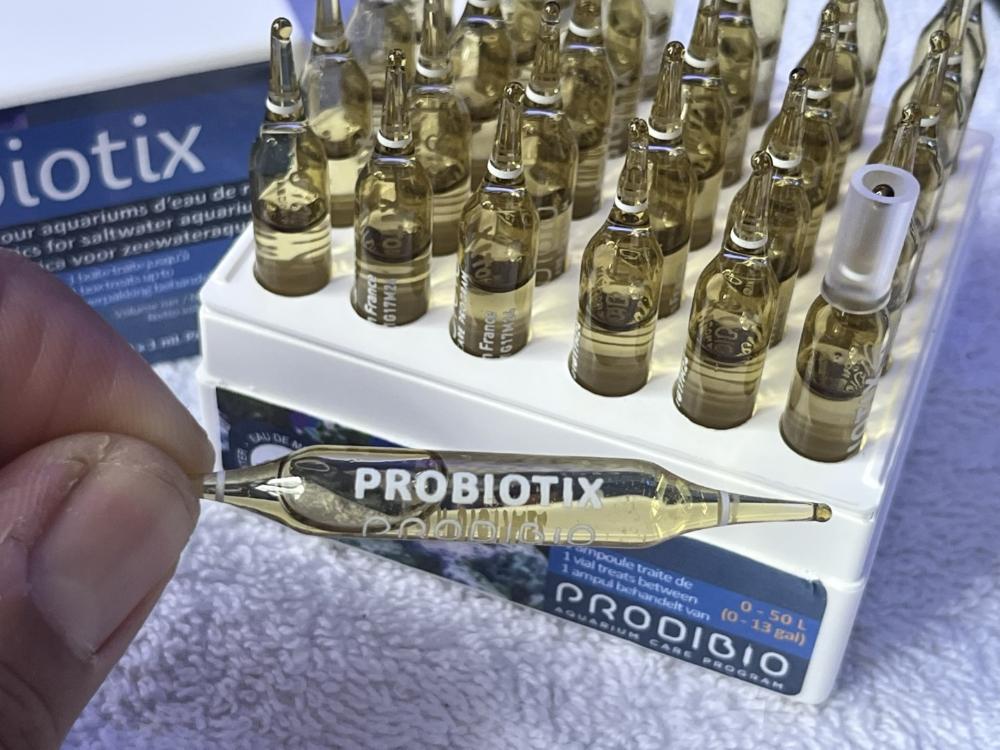
I’ve been dosing Prodibio Biodigest on regular basis even though its an established tank - to maintain the biological filtration balance & reduce nitrates/phosphates. And to step it up, recently, started to supplement with Biotim, Probiotix & Reef Booster with good results. Nitrates/phosphates back under control. And corals/fish are looking happy.
- Biodigest – bacteria source
- Biotim – enzymes & bacteria food
- Probiotix – additional bacteria set to complement Biodigest to enhance biological filtration
- Reef Booster – Liquid food for corals, invertebrates & fish
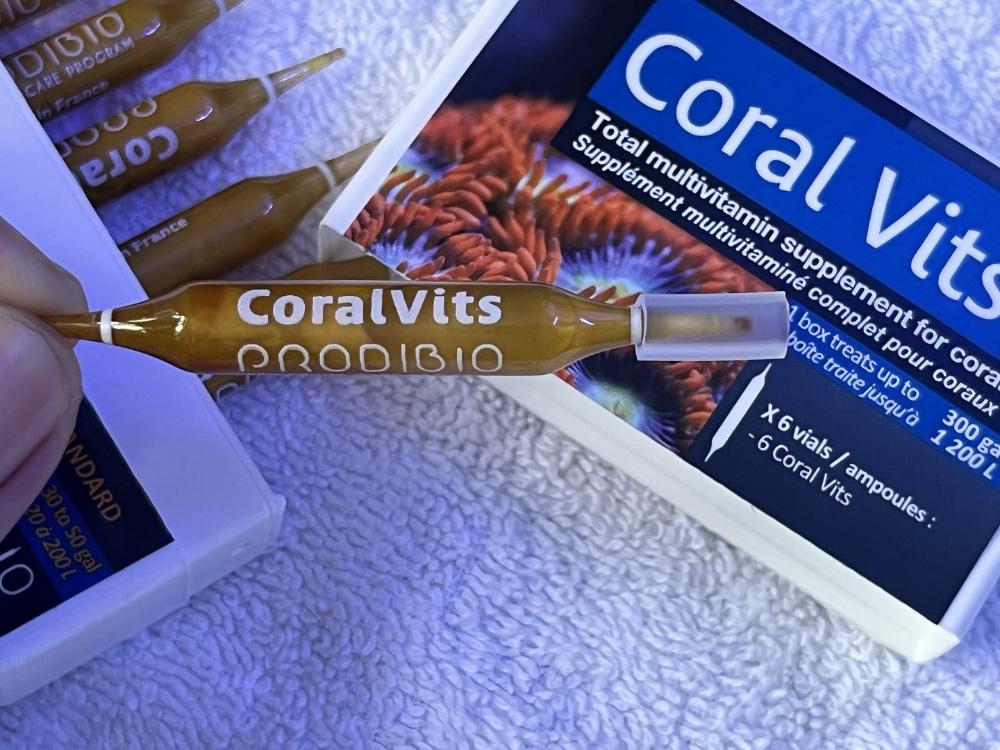
- Coral Vits - Vitamins
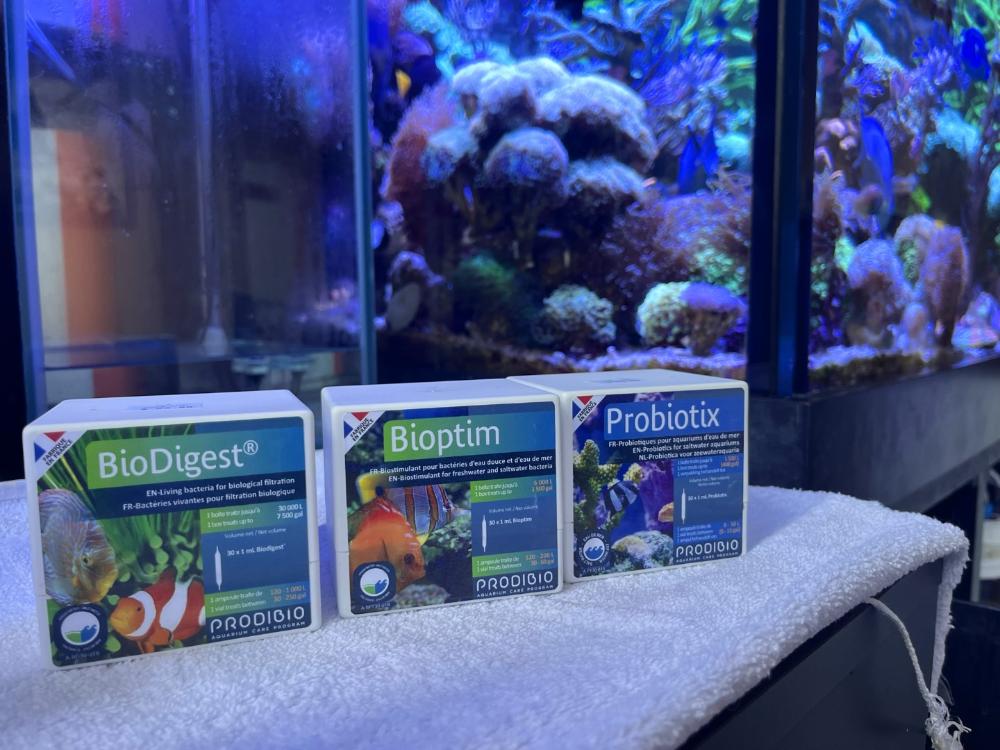
My process : Dose Biodigest, Biotim & Probiotix after water change. These are bacteria related or complement each other. Turn off the UV sterilizer for the day to let the bacteria settle in.
Daytime pic with yellow lens :
Daytime pic with yellow lens :
My process for Reef Booster (liquid food) : though its not stated in the instructions, dose it at night just after lights off. The skimmer may overskim for a while. So I’ll typically open up the skimmer gate fully for the day. So it’ll still oxygenate the water but won’t overflow.
Below is a consolidation of information found on the web + some of my inputs.
Biodigest
Biodigest is fundamentally a hyper concentrated mixture of various bacteria strains.
One important advantage is Biodigest (and many Prodibio products) come sealed in a argon filled ampoule (Wiki : Ampoule = small sealed vial used to contain a sample. Usually made of glass). Argon is an inert gas. Without the presence of oxygen, the bacterial remains dormant until the liquid is put in tank water. The dissolved oxygen then awakens the dormant bacteria. As such, the bacteria does not have an expiration date & can be stored even in room temperature for a very long time (supposedly >5 years!) => 100% potency when used. I didn’t understand the concept of dormancy until someone used the analogy of baby brine shrimp eggs in dormant state which hatch when exposed to water. Storing the bacteria in an ampoule avoids the issue with “Bacteria in a Bottle” where the bacteria is known to degrade over time when exposed to air after opening.The nitrogen cycle (toxic Ammonia -> Nitrites -> Nitrates) requires a mixture of bacteria strains to complete the entire process. Some heterotrophic strains start the conversion process (eg Nitrosomonas europaea from ammonia to nitrite), then hand off to other strains of bacteria to take on the next stages and so forth and finally finish the nitrogen cycle (eg Nitrobacter winogradskyi from nitrite to nitrate). According web information, Biodigest contains various live bacterial strains of the right proportions to perform the above. Biodigest also contains Paracoccus denitrificans & Pseudomonas stutzeri – strains that can convert nitrates to elemental nitrogen under anaerobic conditions (i.e. living in your bio media to reduce nitrates)
(Heterotrophic definition : capable of utilizing only organic materials as a source of food)
About dosing in an established tank.
Over time, some strains will die off. Some strains will dominate. Some mutate This may reduce the effectiveness of your biological filter over time. There is mention that over time, a dominant strain will emerge – something known as a “mono culture”. Anecdotally, this could be the trigger for cyano or nuisance algae even in established tanks. To prevent this, its best practice to dose Biodigest every 2 weeks to maintain optimal purification proportions of key bacteria strains.
Other times to dose Biodigest is during nitrate surge events – adding new fish, fish/coral death, after cleaning sand bed or after water change etc.
Biotim
Simply put, Biotim adds micro nutrients to the tank, which Biodigest (bacteria) consumes. And also contains other content that is beneficial for livestock.This is a summary of what I found online : Contains selected amino acids, enzymes, vitamins (including riboflavin = Vitamin B2 - involved in conversion of food to energy, metabolize fats & proteins). Also contains trace elements generally useful for livestock – Sulfur for proteins, iron for plants & fish blood, cobalt for Vit B, Boron for cell building etc. On the whole, Biotim affects cellular bioactivators (definition : A bioactivator is a biologically active (bioactive) material which is able to decompose agricultural solid wastes). It accelerates the digestion of organic matter. You can observe this if you have an ORP meter to monitor your tank’s redox potential. By increasing the number of bacteria in the population, you improve the rate of nitrate/phosphate reduction & ultimately improve water quality.
Probiotix
This is a relatively new product (introduced in 2017). Probiotix contains strains of bacteria different from those of BioDigest.
The diversity reinforces the crucial phase of the nitrogen cycle and is more flexible and better able to adapt to varying conditions (eg. Temp, pH etc)
Reef Booster
A complete nutrient supplement for corals, invertebrates & fish. Helps reduce nitrates & phosphates by feeding anaerobic bacteria in sandbed/rocks/bio media.
Contains phospohlipds, amino acids, omega-3 marine fatty acids, vitamins, carotenoids.Let’s understand what some of these are for :
Phospholipids - major components of the cell membrane and also provide a fluid character to the membranes.
Fatty acids - integral part of cell membranes throughout the body and affect the function of the cell receptors in these membranes.
Specific to Omega 3 - Studies have shown that fish develop stronger heart muscles and healthier circulatory systems. This results in lower mortality and less disease, as well as improved fillet quality.
The most common diseases are due to parasites that they may carry within and outside their bodies, causing issues such as infection or inflammation. Omega3 reduces inflammation and hence reduces the risk of serious infection. By reducing inflammation, they recover quicker.Shake the vial thorough before use & pour into a high flow area. It turns the water cloudy for a while. Instructions mention to turn the skimmer off to prevent it from overflowing. But personally I just open the skimmer gate valve fully for several hours.
Caratenoids : Beneficial anti-oxidants that can protect one from disease & enhace the immune system
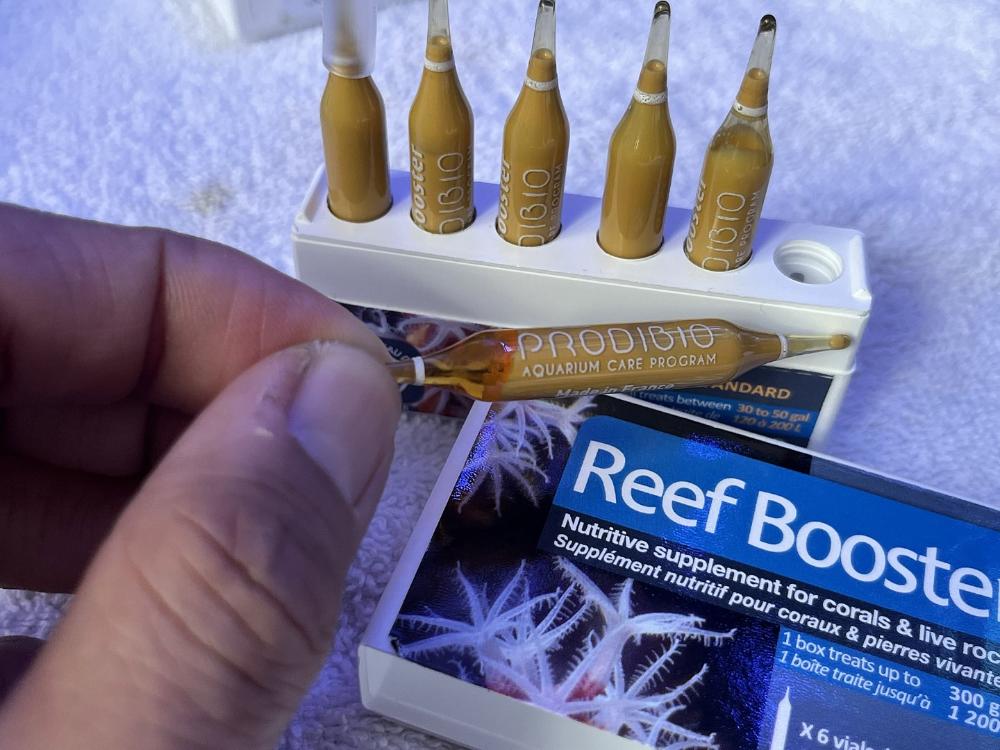
Shake the vial thorough before use & pour into a high flow area. It turns the water cloudy for a while. Instructions mention to turn the skimmer off to prevent it from overflowing. But personally I just open the skimmer gate valve fully for several hours.
Coral Vits
Corals, fish & invertebrates require vitamins for proper cell function. Some organisms can synthesize vitamins but not in sufficient quantities & hence need to be supplemented.
Coral vits contain water-soluble vitamins (B1, B2, B3 (or PP), B4, B5, B6, B7, B8 (or H ), B9 (or Bc), B12) and fat-soluble (A, C palmitate, D2, D3, E, K1, K2 and K3)
To be used with Reef Booster dosing regime. Either together or alternate weeks. (once every 2 weeks)
Biokit Reef
To keep things simple, Prodibio also has an all-in-one pack called Biokit Reef
Contains 5 items : BIODIGEST, BIOPTIM, REEF BOOSTER, IODI+, STRONTI+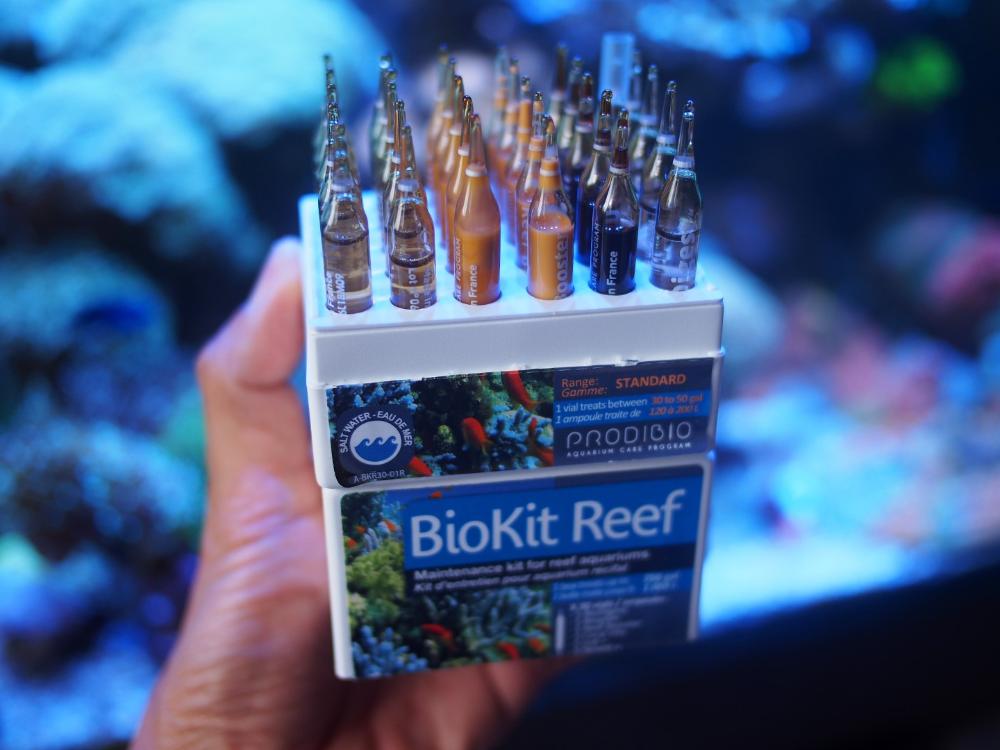
Iodine is one of the most important trace elements. In fact this is one of the elements that I also measure on a regular basis with home test kits.
Low iodine will result in dull tissue & more susceptible to parasite attacks (eg. Less resilient to Acro eating flatworms).Strontium is a macro element that is quite close to Calcium. It supports growth of stony coral skeleton. Low strontium will result in slow growth. Brittle skeleton.
Good levels will show up as increased growth rate/encrustation & thicker/sturdier SPS branches
A long post but to sum it up :
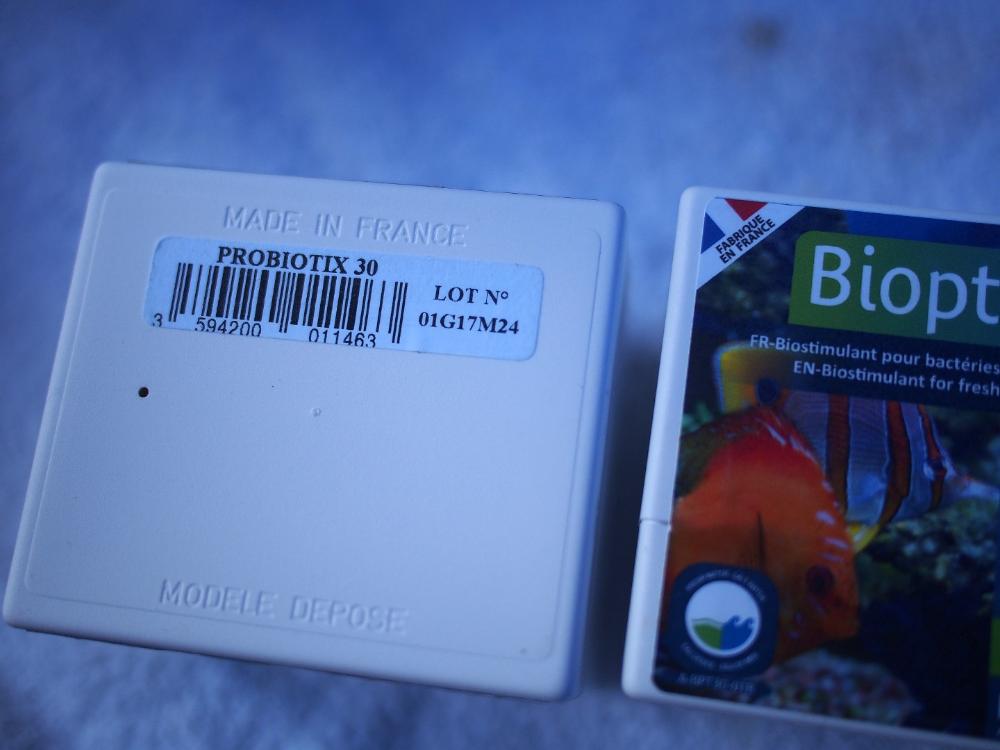
Batch information for traceability. Made in France
Restocked recently
-
1
-
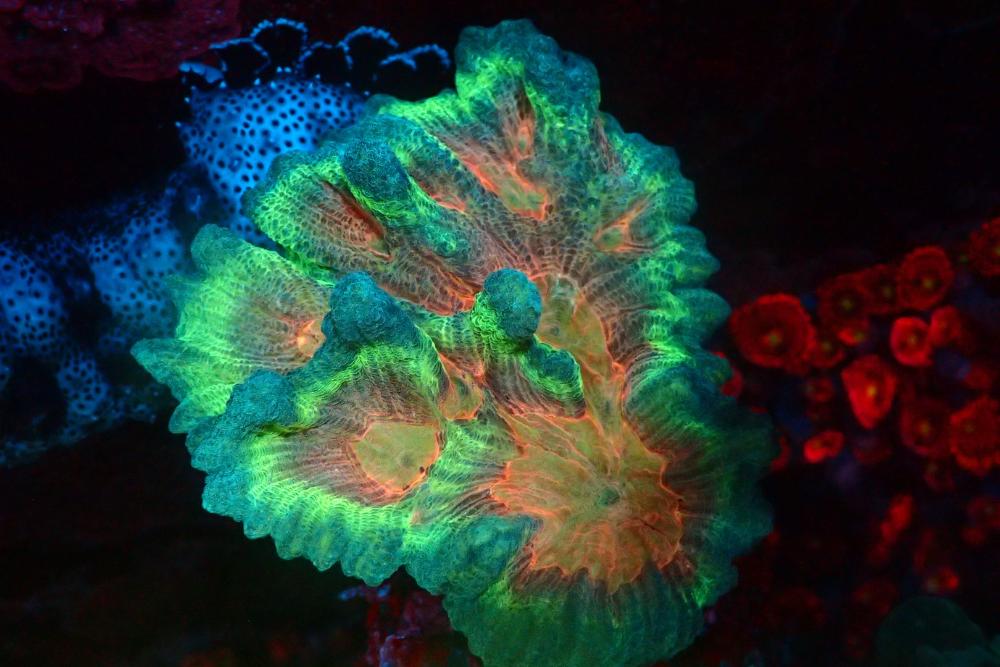
Some recent coral pics
From a frag previously from Mike Stone in 2020.
Corner prata collection. All from The Reefer.
-
On 8/12/2022 at 3:31 PM, he said:
Seem like there is so much use for the 3D printer , do u sketch those dimensions of the item yourself to be printed?
Sent from Singapore Reef Club mobile app
Yep...self drawn on CAD software. Not difficult.
Some recent printouts
A new version of a tube holder mounted in front of the Vectra M2 return pump. Purpose is place the outlet of the UV sterilizer right in front of the inlet of the return pump - so that all the 'clean' water goes straight to the display tank. By placing it right in front of it, perhaps 95% of the water goes up....and not get recirculate within the return section of the sump.
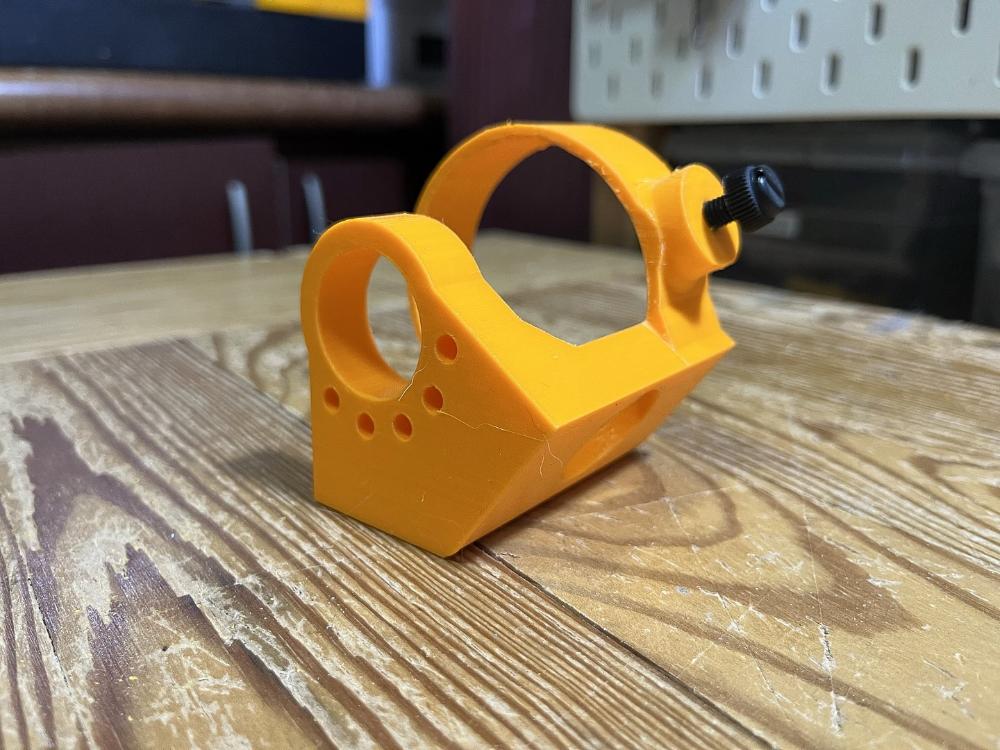
What it looks like.
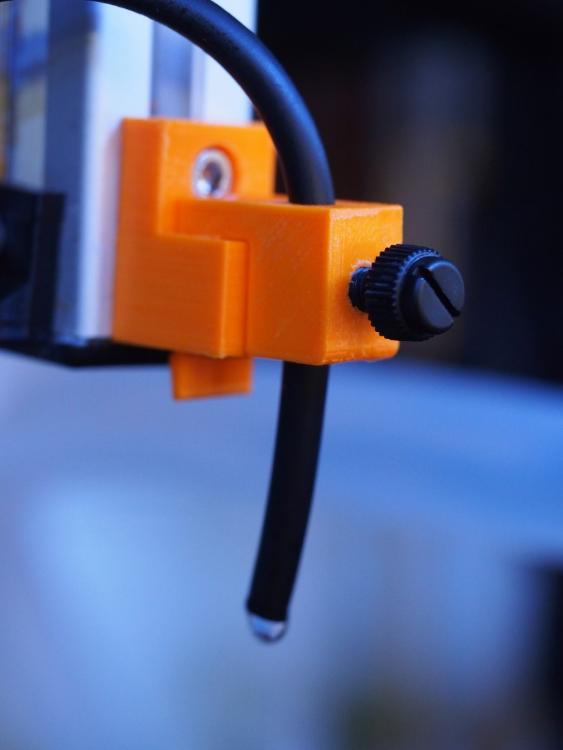
Also made this clip +pinch valve for the sulfur reactor.
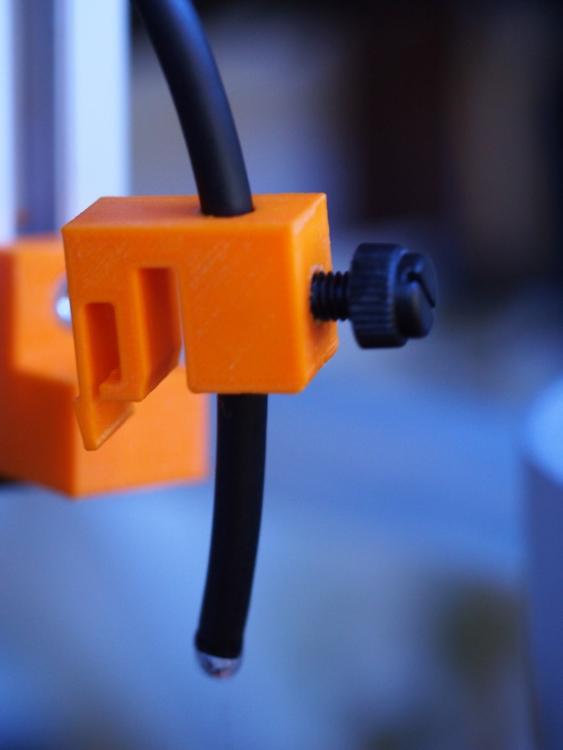
Clips onto a holder in the sump so the effluent tube is well within view. And a thumb screw to control the drip rate.
The clips keeps it securely in place. Had a bad experience where the tube slipped out to the outside of the sump when I was out the entire day.
-
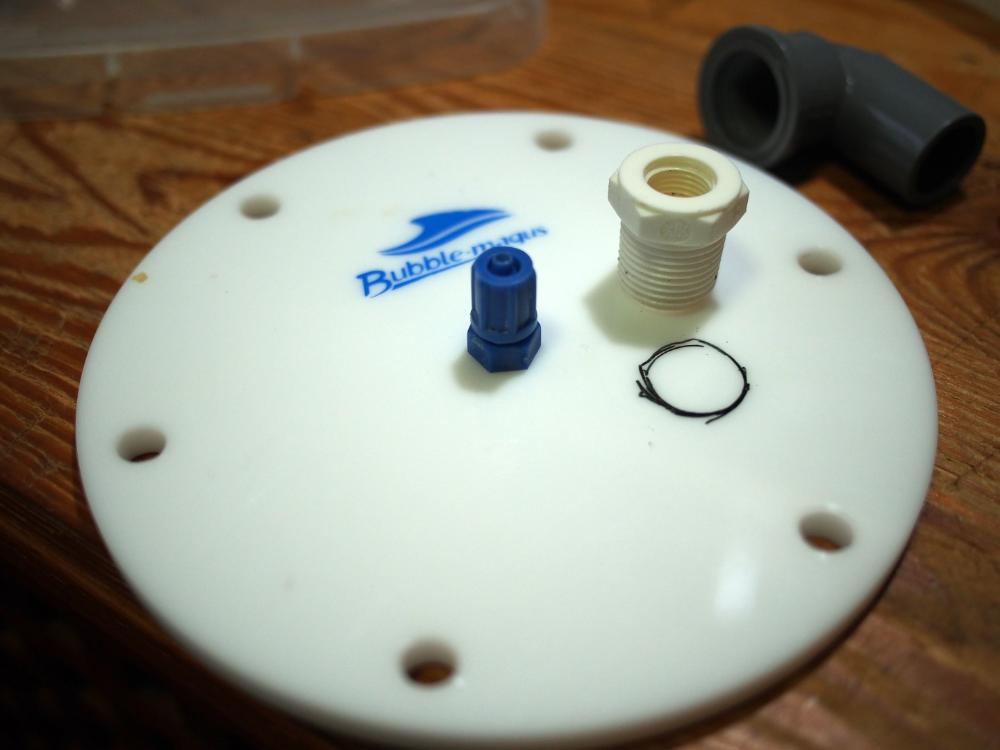
Making a Kalk Reactor
More broken things that needed to be fixed.
My old Kalk stirrer could not seal properly recently. O ring flattened & expanded. Reactor was given by Larry some time back (thanks!) Need a replacement O-ring which will take some time to arrive.
.JPG.afe1dfb156eca30ad9cb4442ad412487.JPG)
In the meantime, I decided to repurpose an old calcium reactor secondary chamber and whatever pipe fittings into a kalk stirrer. The Bubble Magus reactor has an outlet at the outside/bottom of the reactor. I didn't want to use this as the fresh water input. Wanted to seal the bottom inlet off so its more maneuverable. Plan to use the fitting at the top of the reactor as the water inlet & outlet.
Firstly, mark a hole & cut out with a dremel.
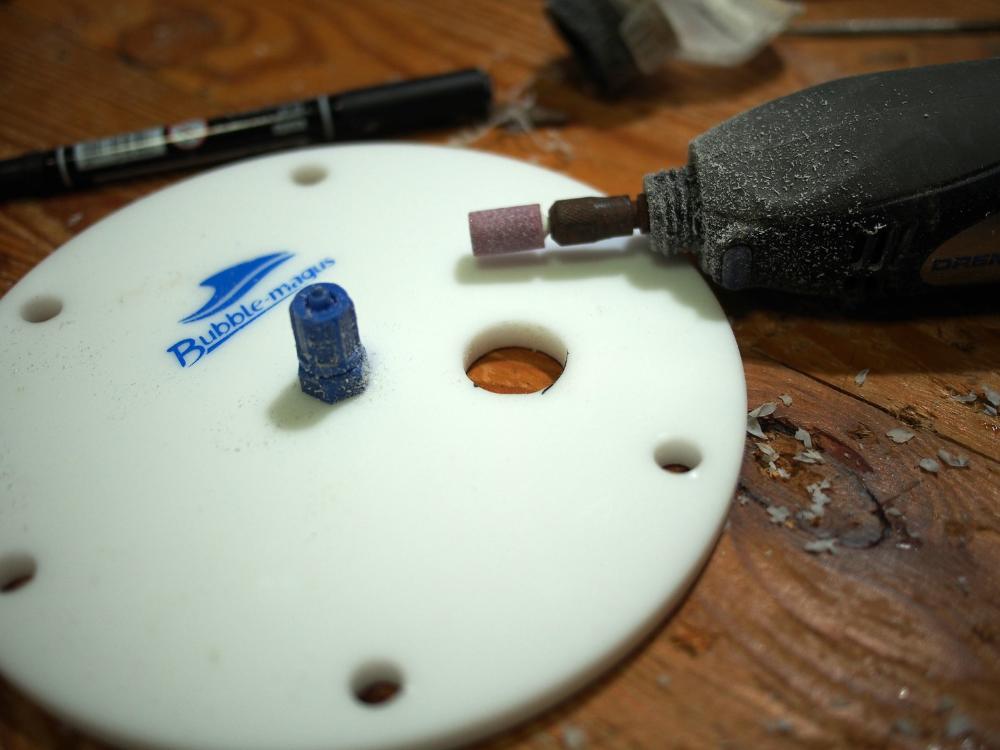
Then make a gasket for the elbow pipe. Center hole cut out using 50c coin as template.
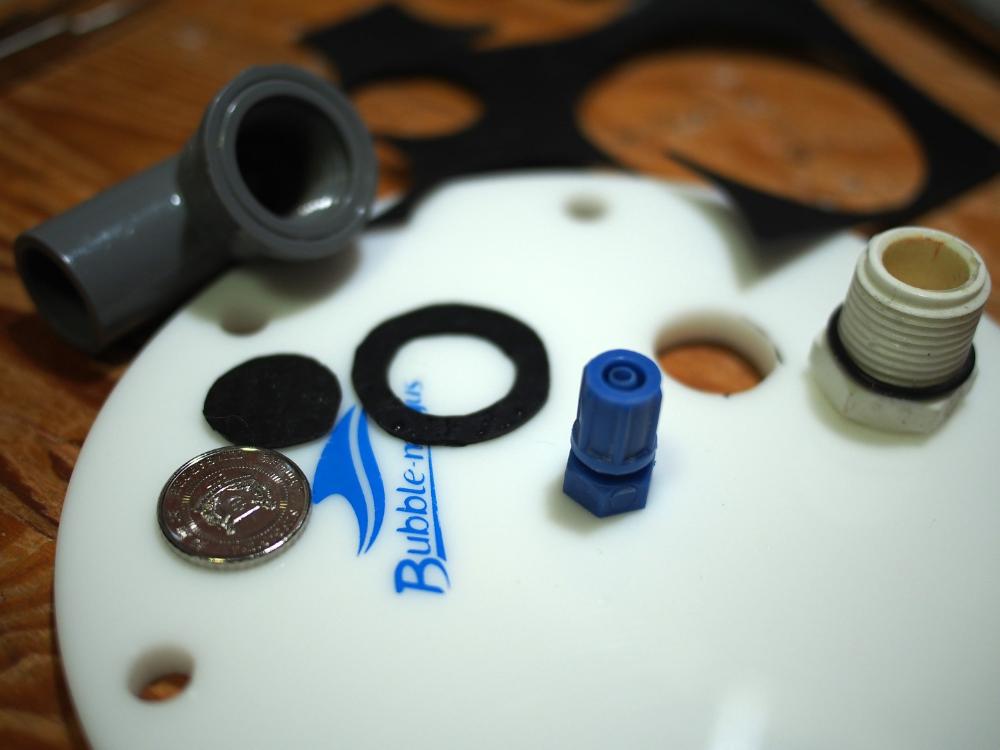
Water inlet through the center blue fitting. But i wanted the fresh water to be fed to the middle of the reactor (not just at the top). So I 3D printed a tube holder.
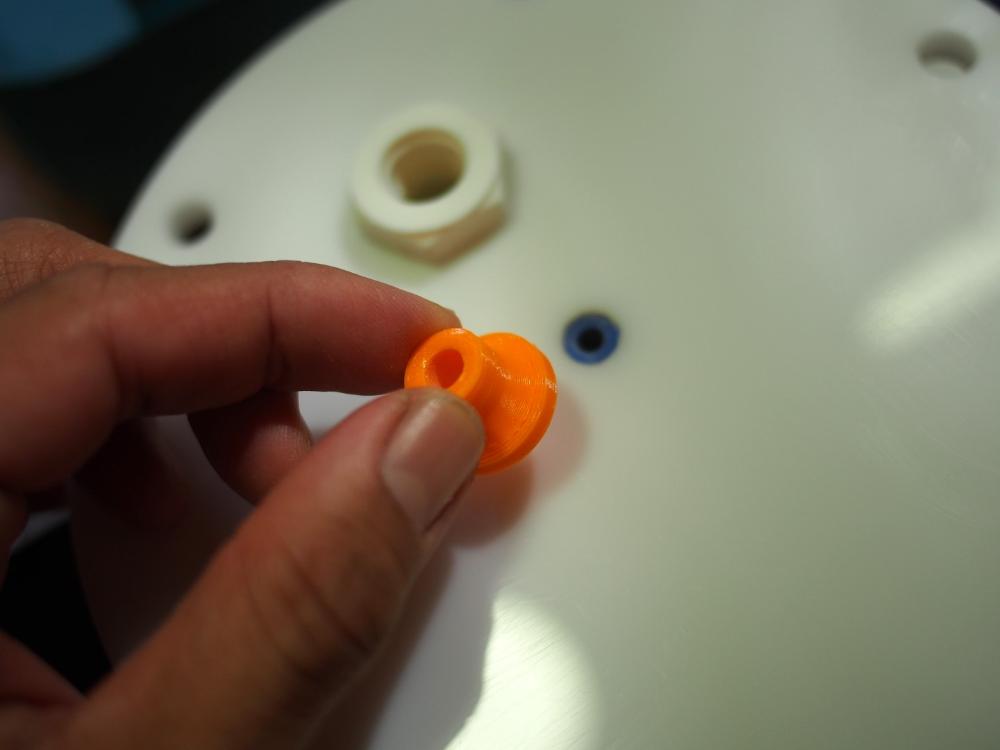
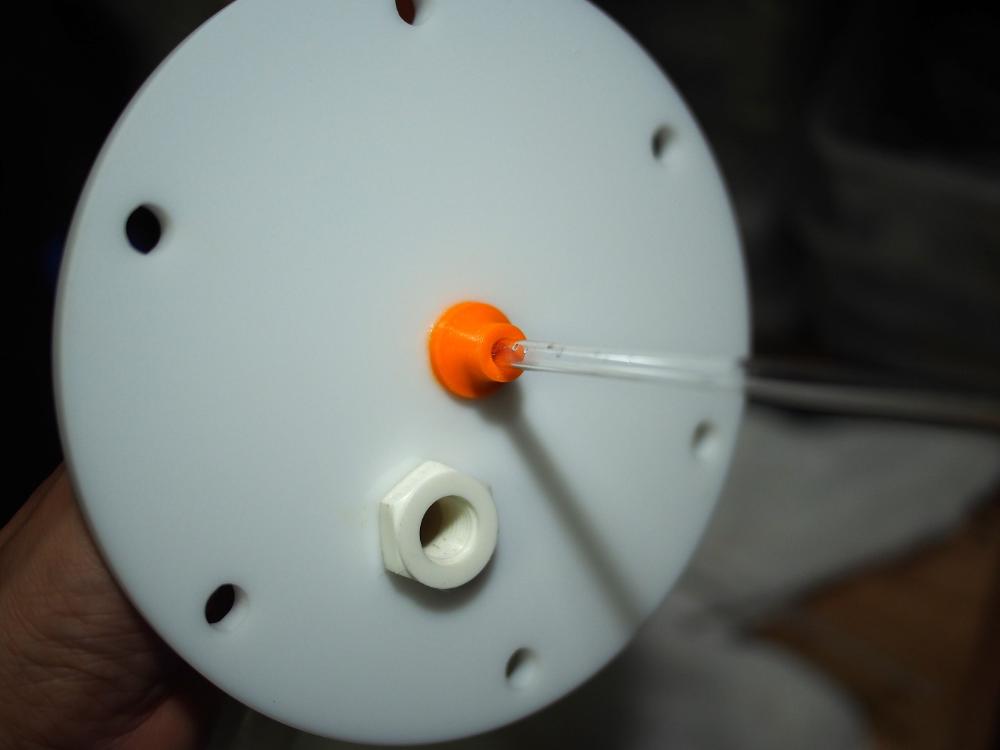
3D printed a rim for the glass.
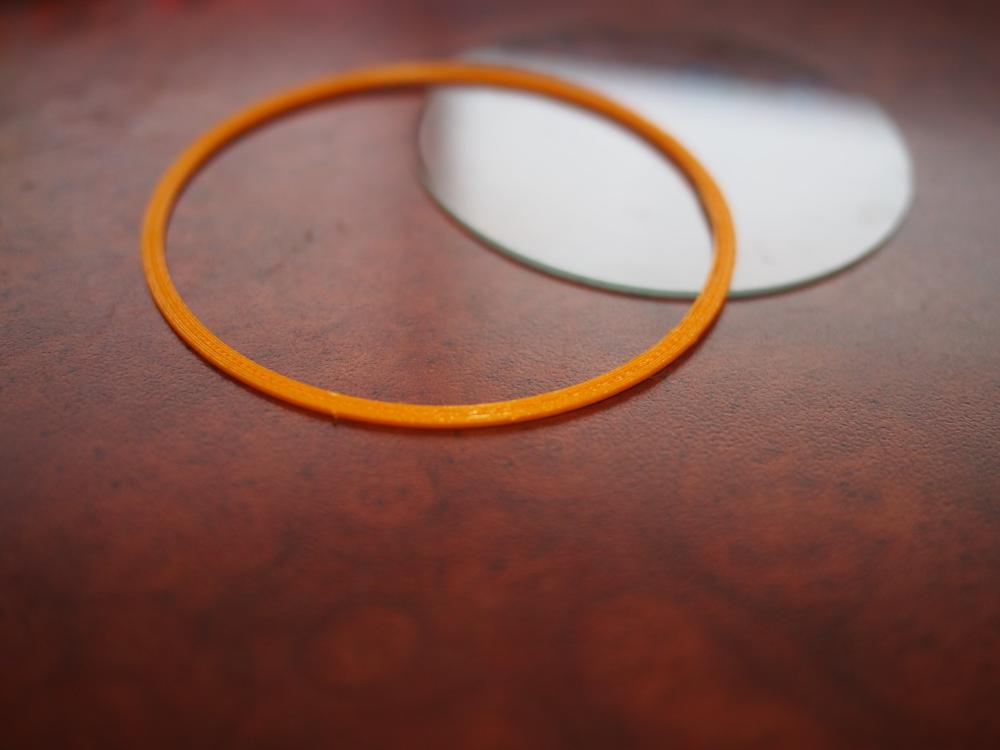
The rim is then glued to the base of the reactor.
The purpose of the glass is to prevent wear on the acrylic base when the stir bar spins.
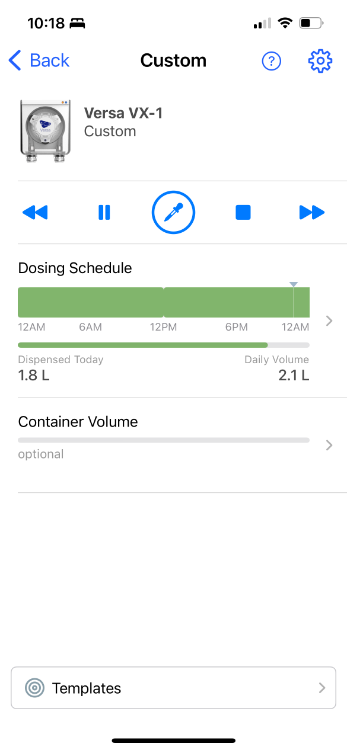
All hooked up. Water is fed via the Ecotech Versa. The magnetic stirrer is made from an old CPU fan with magnets attached to the base (refer to earlier post). Stirrer spins every 15 minutes for 15 seconds.
Stirrer starting up :
After 15s
Effluent outlet into the sump.
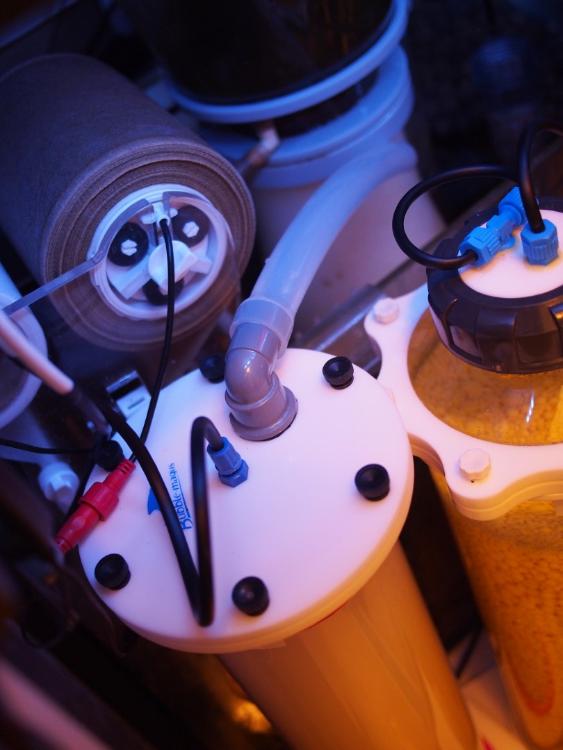
Versa setting. Total 2.1 L per day.
-
Replaced my old button assembly for the Apex made about 7 years ago. In the old days, a small project box was used with holes cut out (Below pic from July 2015)
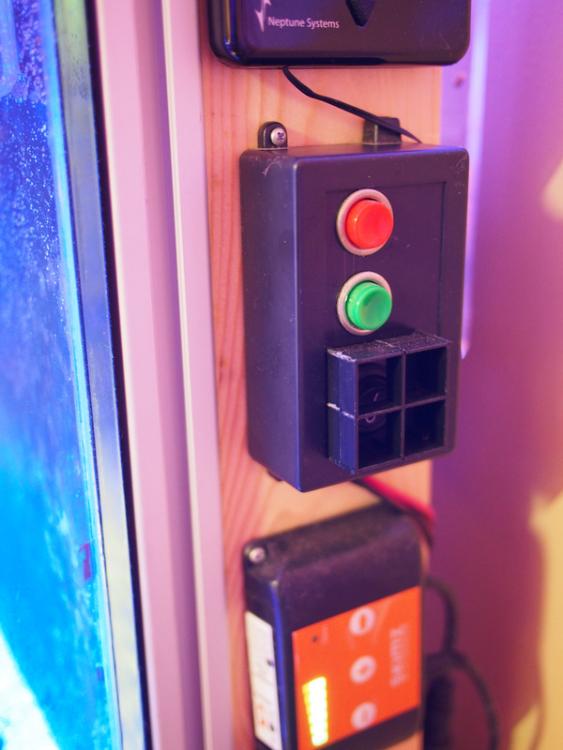
Fast forward to 2022, the case can be 3D printed now. One of the issues I had the past years was switching off the skimmer to drain/clean it but forget to switch it back on. Only to realise it a few days later.
This time, i got a trigger switch with a cover that you can visually see if ithe switch is off. I tried powering the LED on the switch but somehow it does not work properly when connected to the breakout box (lit up in both ON/OFF position).
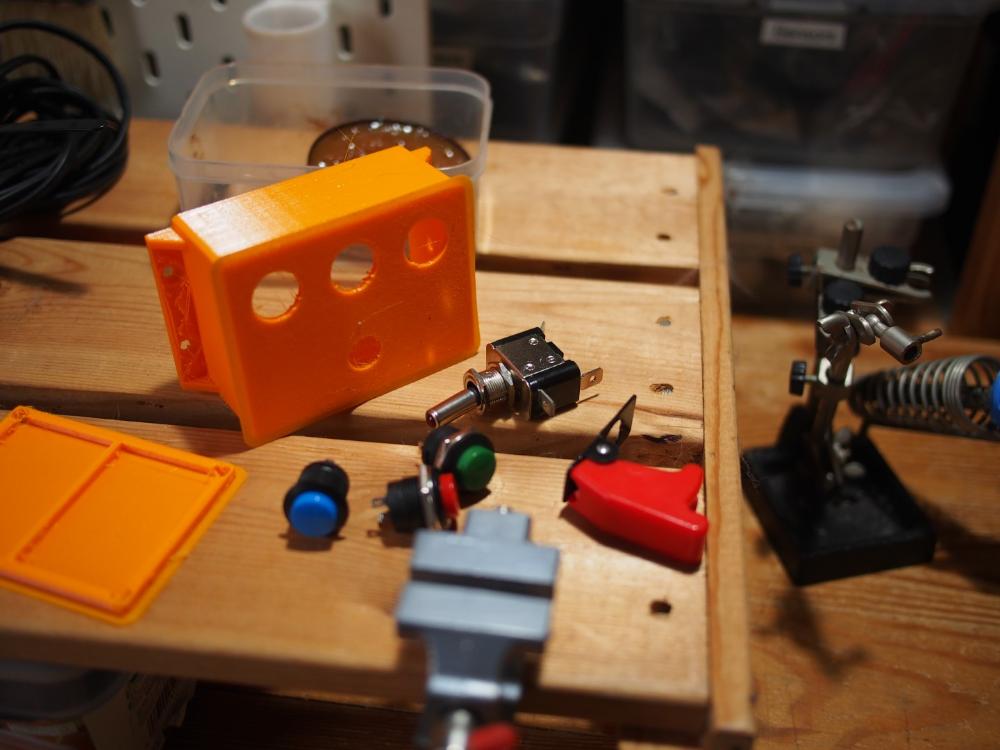
Internal view. The wires then connect to the breakout box.
.JPG.591bc60aadd7f64647d9d86385394ef9.JPG)
Installed near the door. Hmm....looks a bit bright. Perhaps it should have been printed in black.
.JPG.5c4cfd6df1d66872b1c566814e32efc4.JPG)
Switch cover is lifted whent the skimmer switch is in the off position. Using this as a visual que.
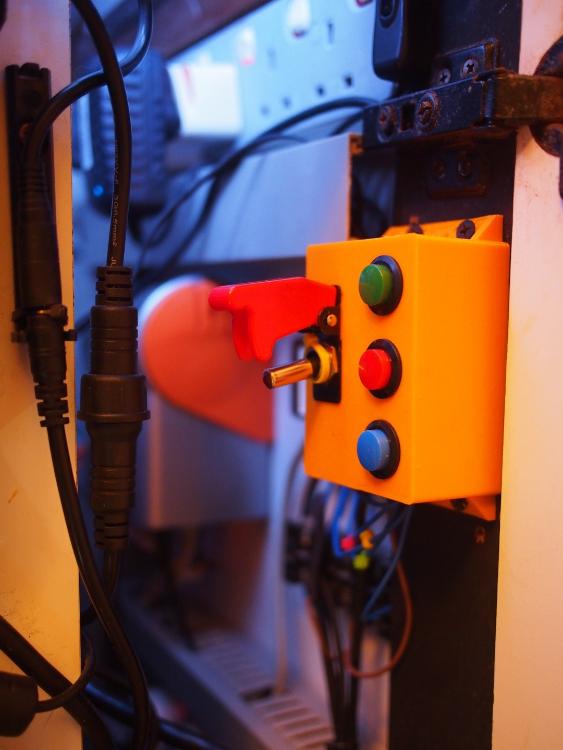
The momentary Green button is pressed when I dose things like bacteria & trace elements. Turns off the skimmer & UV for 2 hours in an effort for the stuff to do its thing when freshly dosed.
Set OFF
If SW_Gre CLOSED Then ON
Defer 120:00 Then OFFThe momentary Red button works similary when I feed the tank with phyto & reef roids - switch off the skimmer for 1 hour so it gets recirculated for a short while.
The Blue button is not programmed at the moment. Possibly for future purposes when there are more scripting features on the Apex.
-
UV maintenance weekend and to improve flow.
AquaUV's recommendation is to change the bulb every 14 months of continuous use. My last change was October 2020 - so that's about 1yr 9 months / 21 months.
.JPG.9f09eda73ff227c8ecf304d9a13e6f71.JPG)
The quartz sleeve is genarally OK. Some dried salt at the oustside top (because my unit is orientated vertically). A brownish tint on the outside.The inside of the sleeve is a little hazy.
(1).JPG.a1b889bcdbf845e8d1cebaebc61b26b7.JPG)
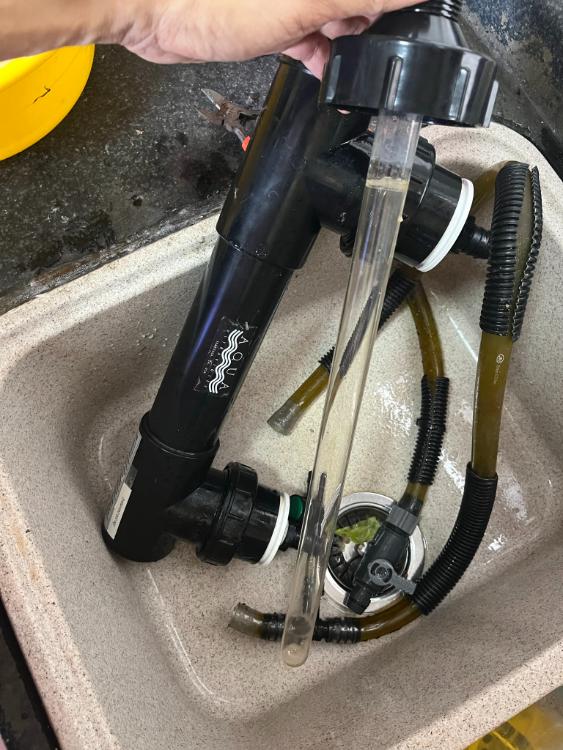
Washed both sides with some citric acid cleaner from AE.
.JPG.d508eca409929cd0aa0883882535351f.JPG)
In the earlier post, i mentioned about the slow flow rate of 117 G/hr (442L/hr). So I made some changes to eleminate some bottlenecks.

The 1st thing is the barb fittings that came with AquaUV.
Its a integrated 19m & 16mm barb. By right, one should cut off the 16mm section if using a 19mm hose else its really just running as 16mm diameter equivalent. In any case, i was using a 16/22mm hose. That's typically the largest available at Clementi fish shop (C328)
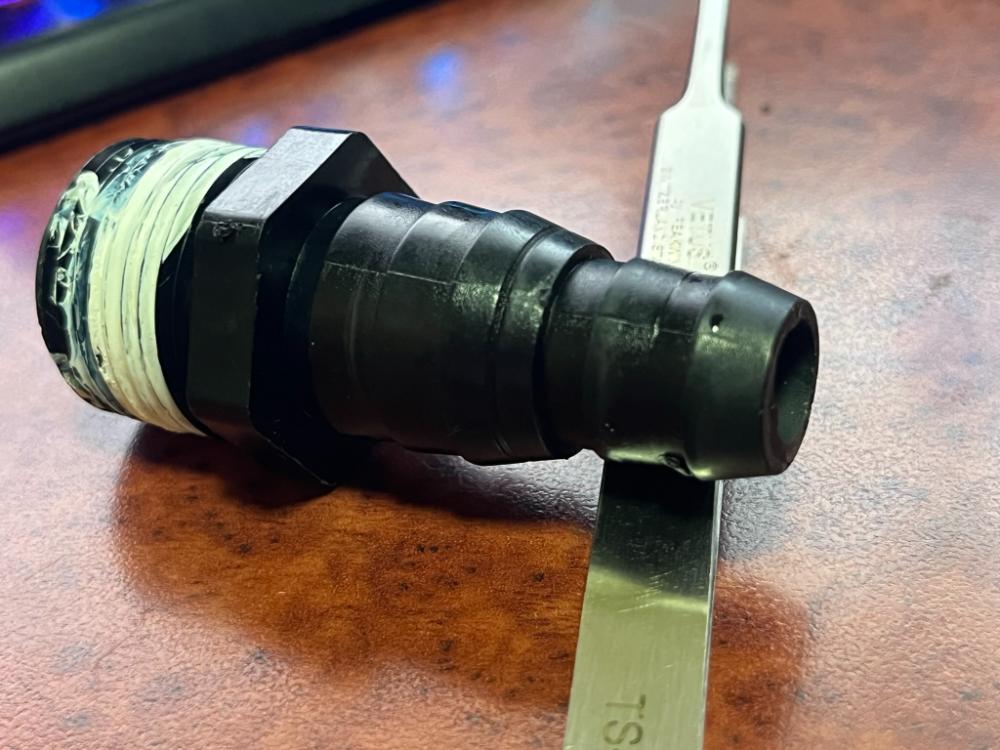
In any case, i changed mine to a Spears 3/4" to 20mm fitting (gray).
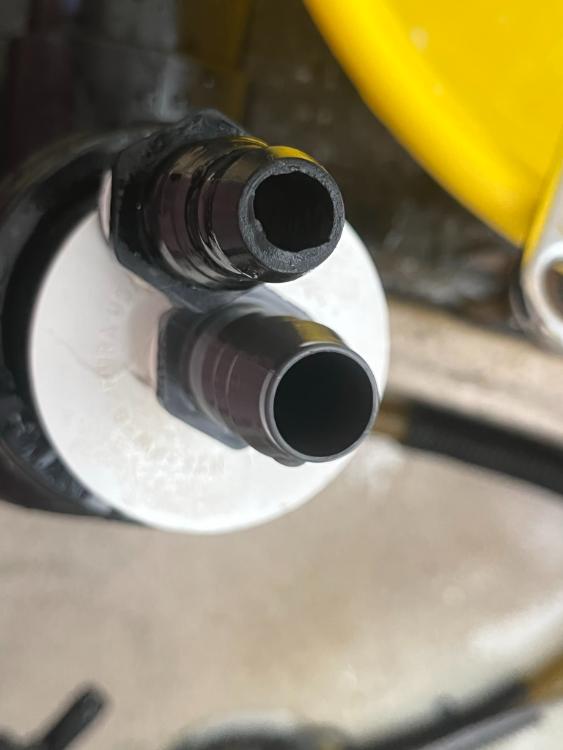
Also got rid of all the 16/22 hose and eheim joints. These are all serious flow restrictors.
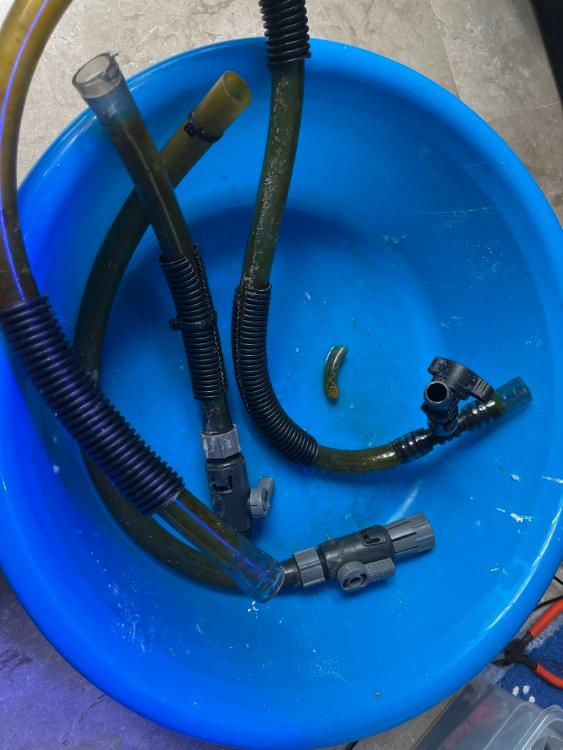
I found 19/25 mm silicone hoses at ReefmarketSG.
These are 3mm thick - won't kink easily. And they won't harden over time unlike PVC tubing. Good quality stuff.
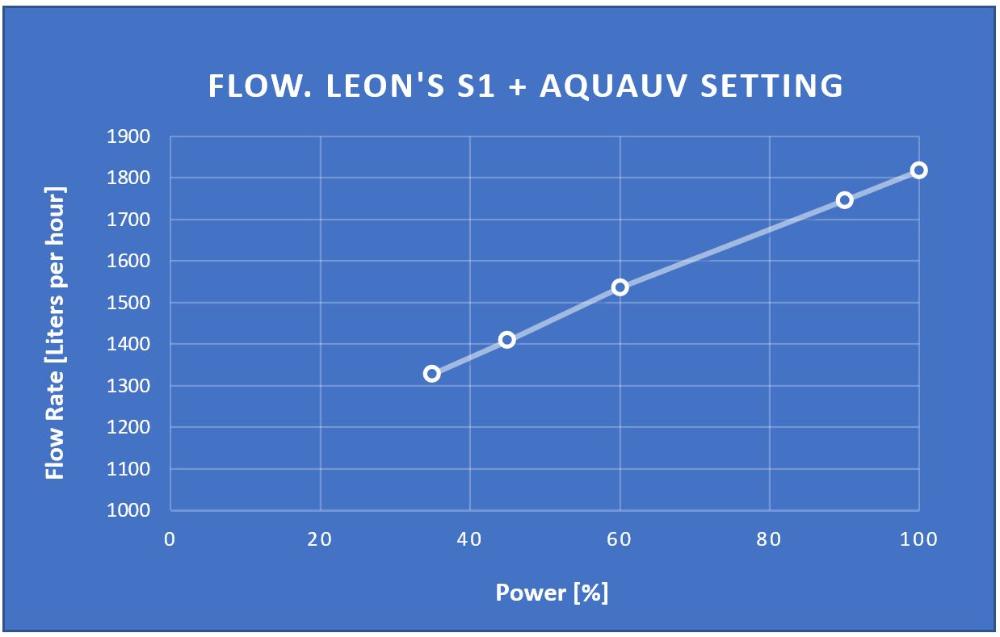
Original setting. 16mm tubing + Eheim quick fitting= 117 G/hr = 442 L/hr @ 25% power
Tune up power to get 156 G/hr = 601 L/hr @ 35% power
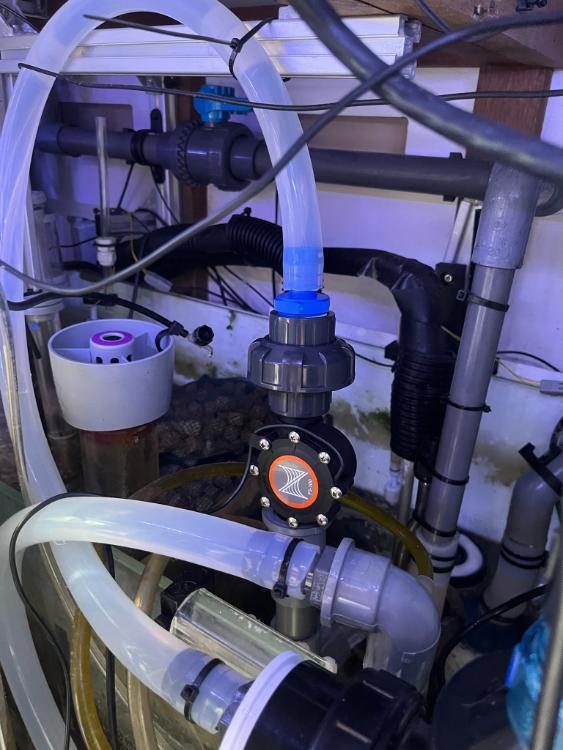
Change to 20mm fitting & 19mm hose
- 351 G/hr = 1328 L/hr @ 35% power
- 372 G/hr = 1408 L/hr @ 45% power
- 406 G/hr = 1536 L/hr @ 60% power
- 461 G/hr = 1745 L/hr @ 90% power
- 480 G/hr = 1817 L/hr @ 100% power
Putting this into a chart
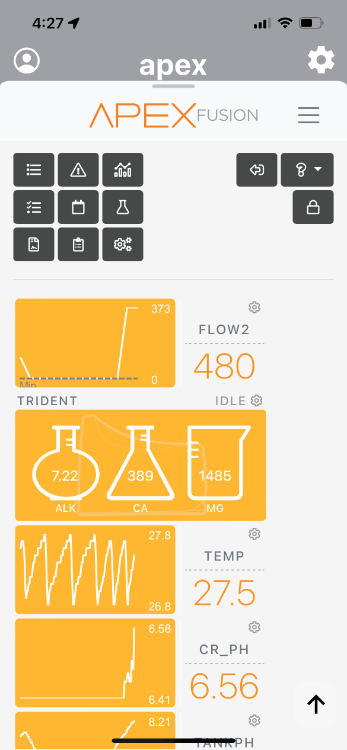
Screen shot of the dashboard. Hmmm... need to figure out how to set the display to L/hr intead of G/hr
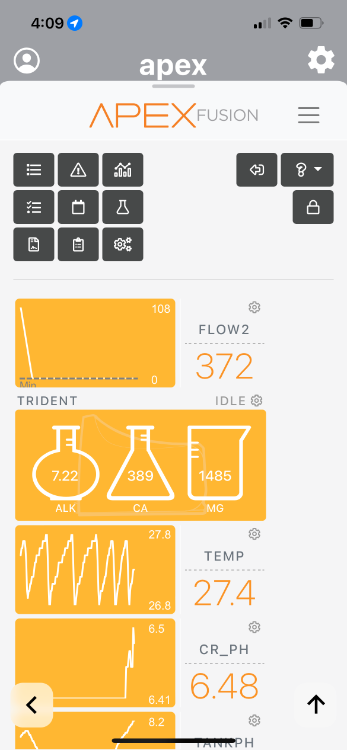

-
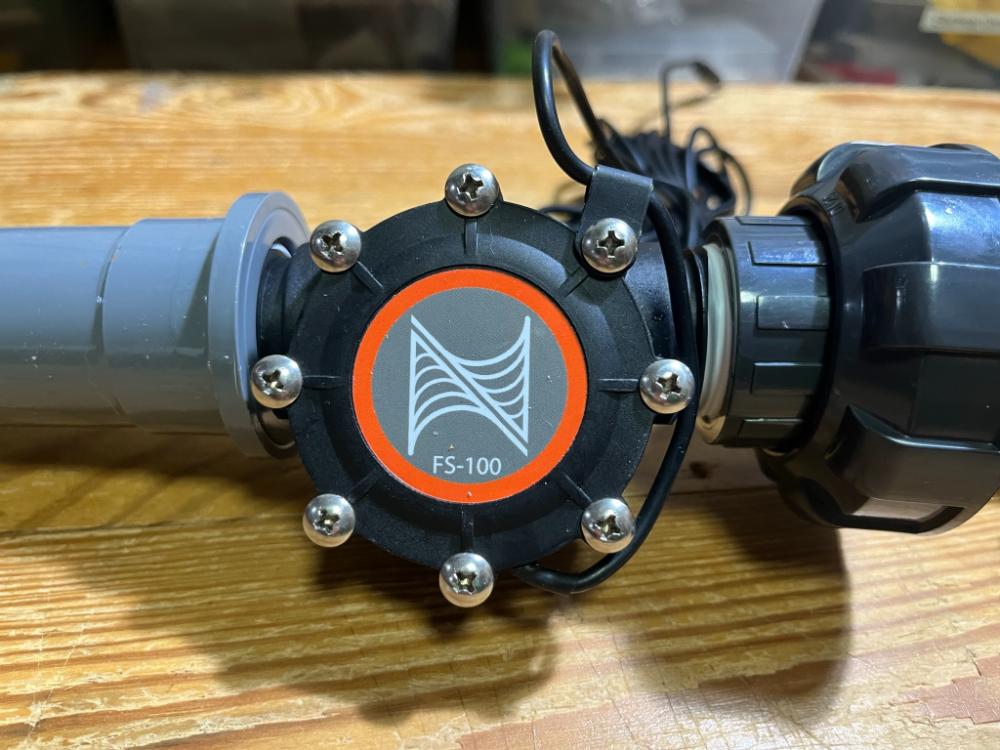
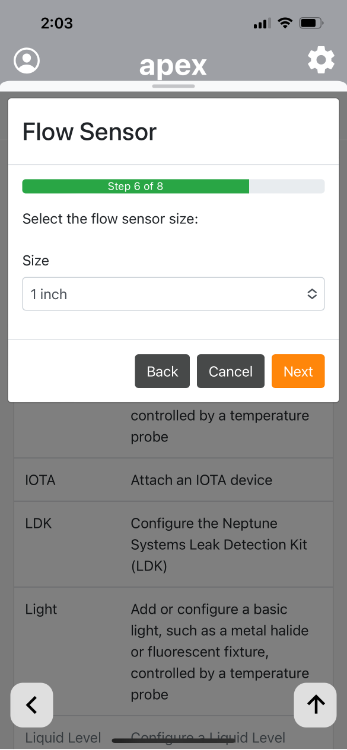
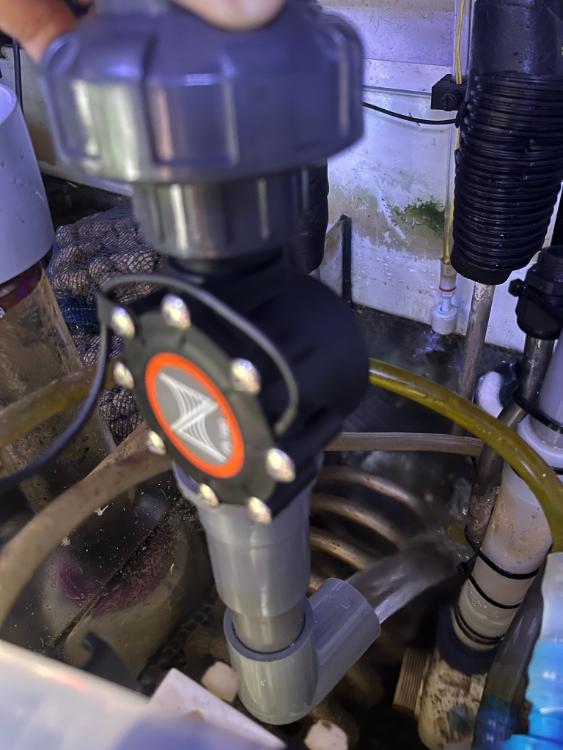
Very often, we wish to know the flow rate of our return pumps or more importantly, through the UV sterilizer. Recently I got an Apex flow sensor (1" size). Here are some thoughts that went into the piping retrofit. My AquaUV is located outside my sump but the space is quite tight.
A proper method of using the flow sensor is to set it up to measure flow only when needed. These flow sensors should not be run 24/7 and in-line with the main flow. Aside from excessive wear & tear, it'll be subject to clogs (eg chaeto or vermatid snail bits getting stuck on the paddle wheel). While its nice to know the flow rate at any point in time, or to be triggered when flow slows down, the trade off far outweights the benefits.
The initial plan was to set it up this way. This would be the way i'd have set it up during initial tank setup. Have a splitter and valves to direct the flow to the flow meter as necessary.
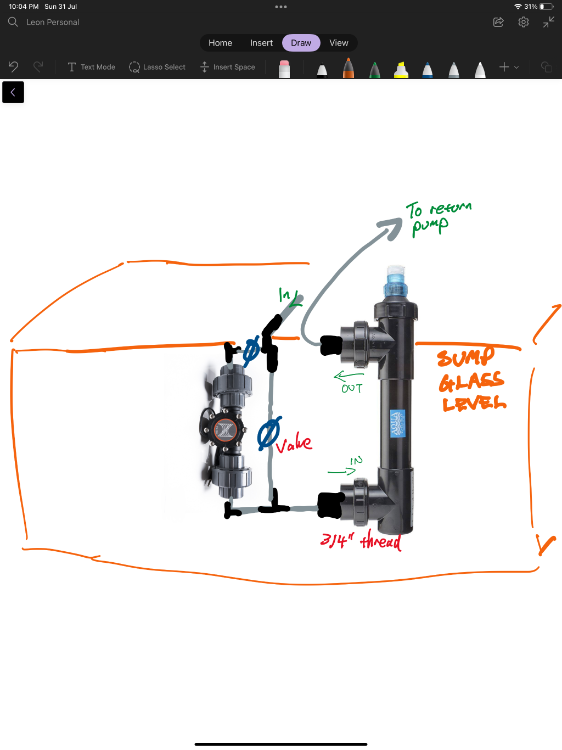
Bought the piping required.... but the assembly is too large.
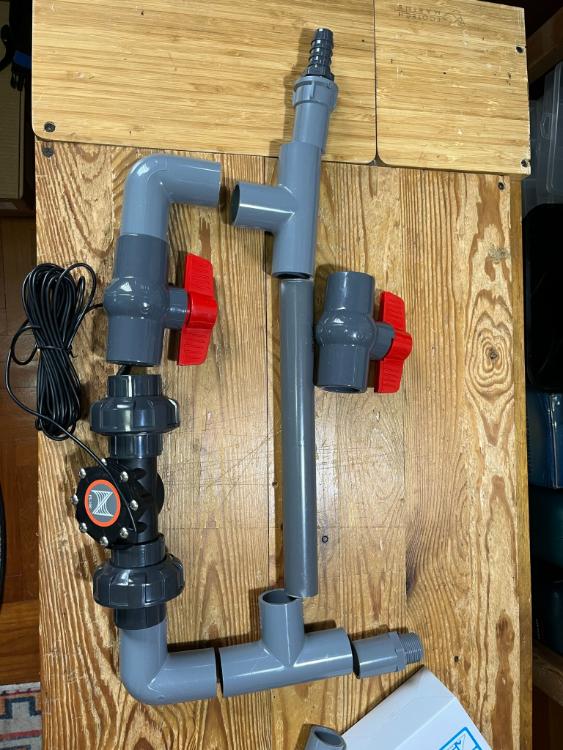
But finally decided to go with something simpler & more versatile -just plug directly into the hose to measure as and when needed. With the threaded fittings, I could change to different fittings for different setups.

Setting it up to Apex Fusion is simple.
Plug the flow sesnor the the FMM module.
From the task selection, select "Flow Sensor"
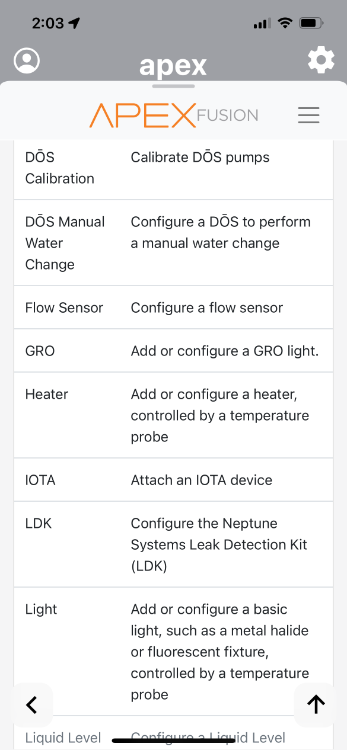
Select the FMM module
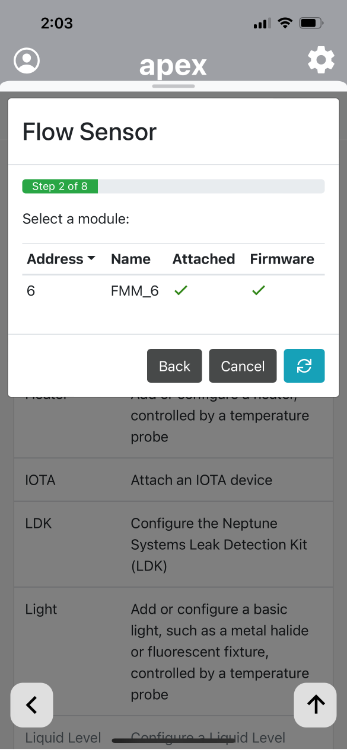
Select the port then rename it accordingly.
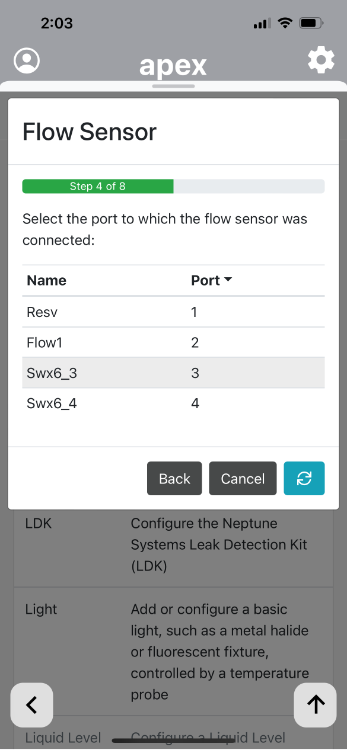
Select the size of the flow sensor.
Once done. new tiles will appear. Then drag onto the dashboard.
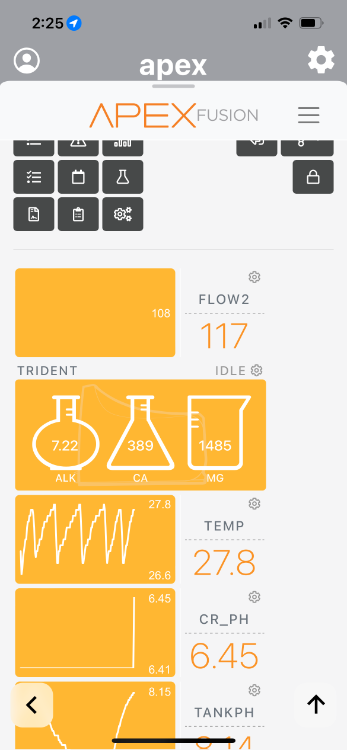
That is is the flow rate through my UV sterilizer. 117 G/hr = 442 L/hr. WHAT!! So low flow rate!! Absolutely not maximizing the UV effectiveness at all.
From here, I did some changes to the tubing and pump power to significantly improve the flow (will share more on this in the next post). Its so good to have a flow sensor handy to optimize the system and to know its possible to get up to 1817L/hr through the UV with my current plumbing & pump.
Checking flow through the UV sterilizer

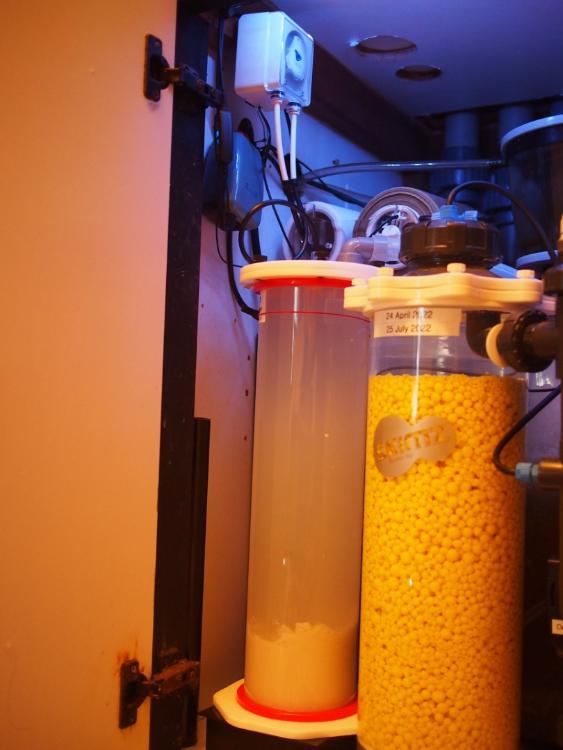
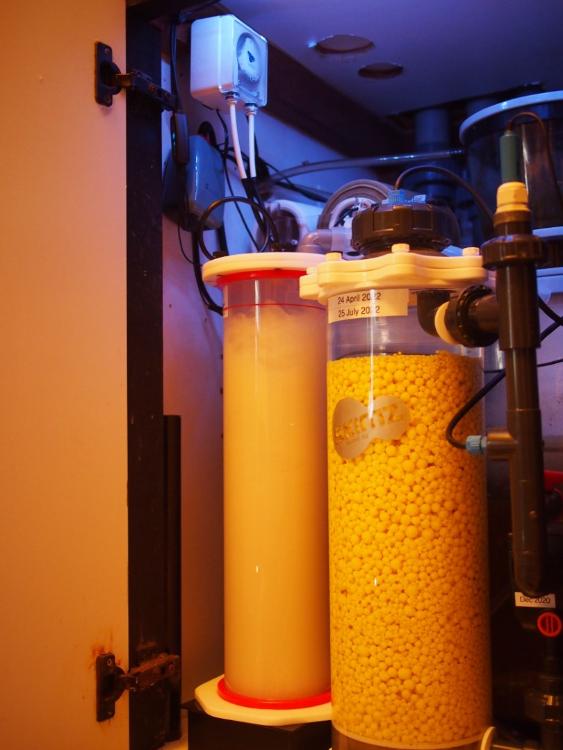
-
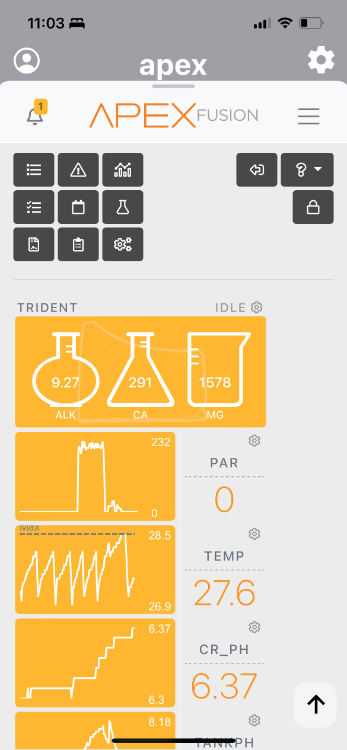
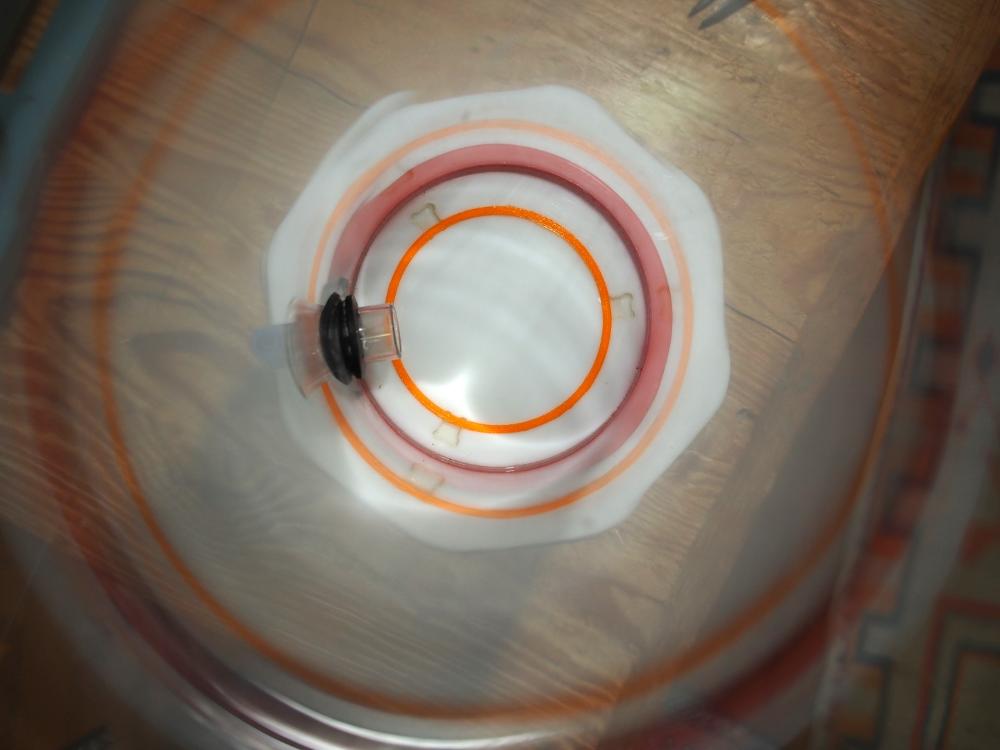
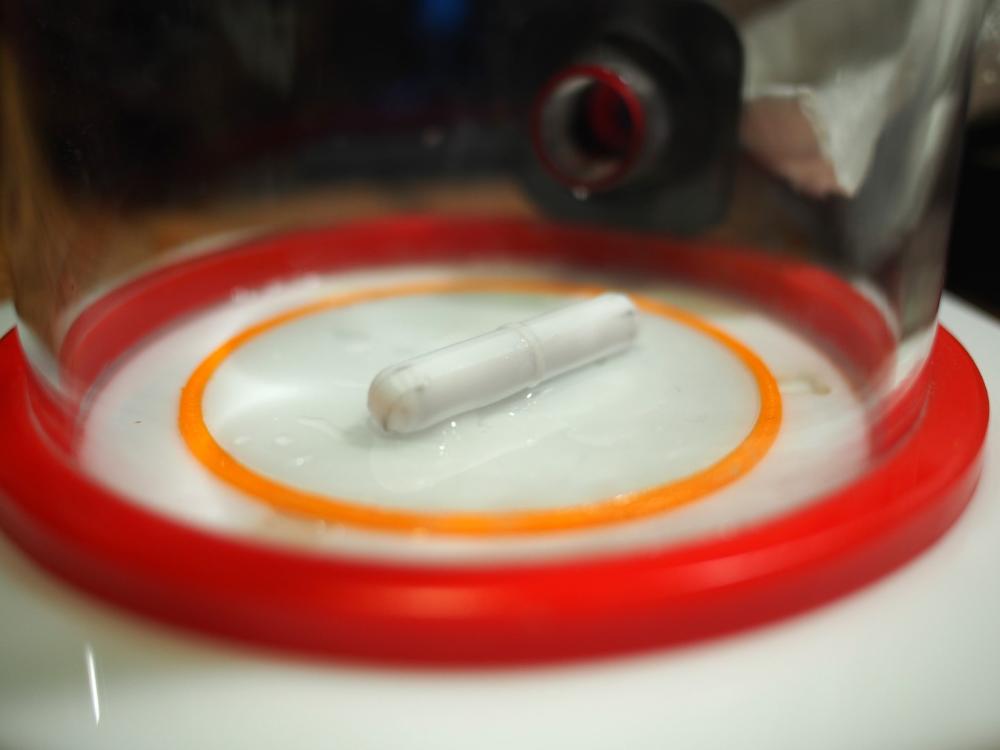
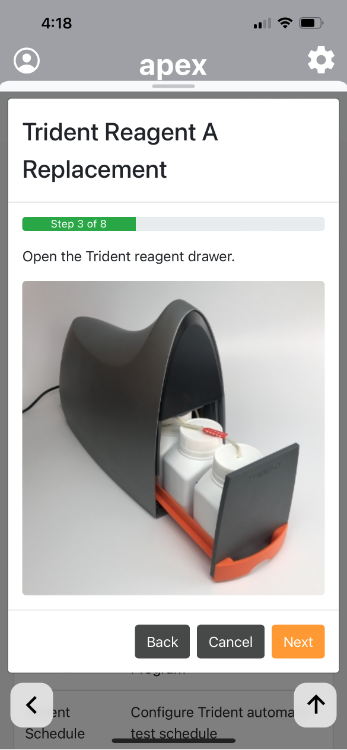
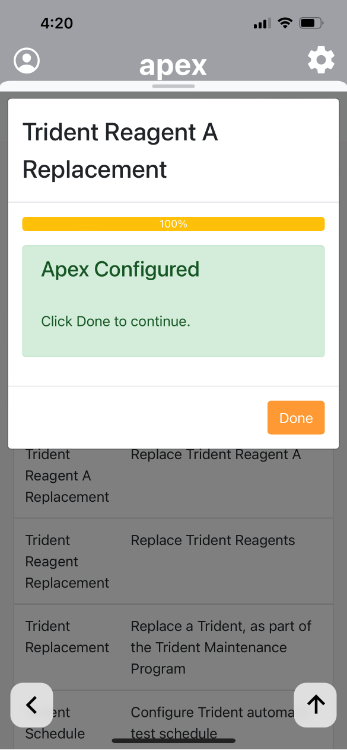
Trident's alkalinity reagent finished last week and i finally managed to find time to swap it out this weekend. Process is quite simple.
Just click on the task icon to triger the manual & process flow.
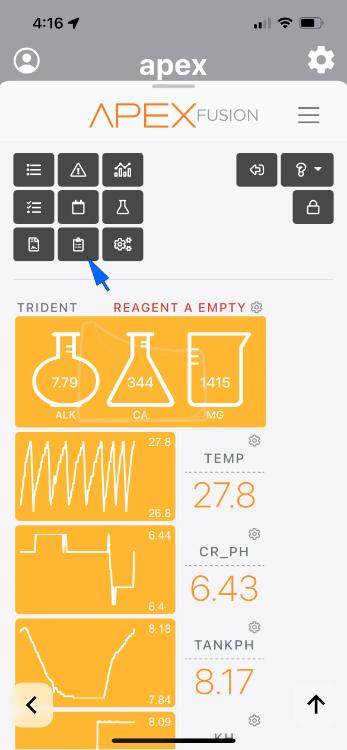
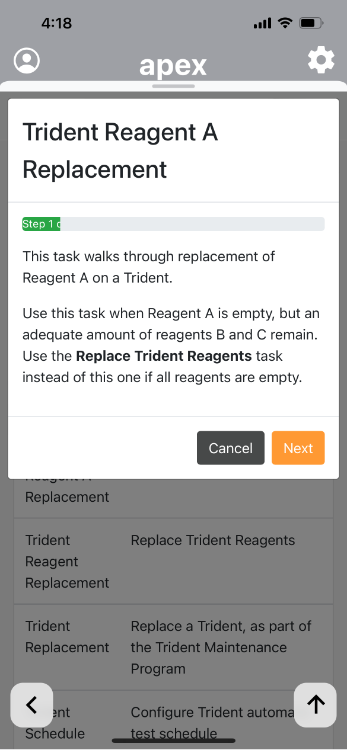
Step by step with instructions
-
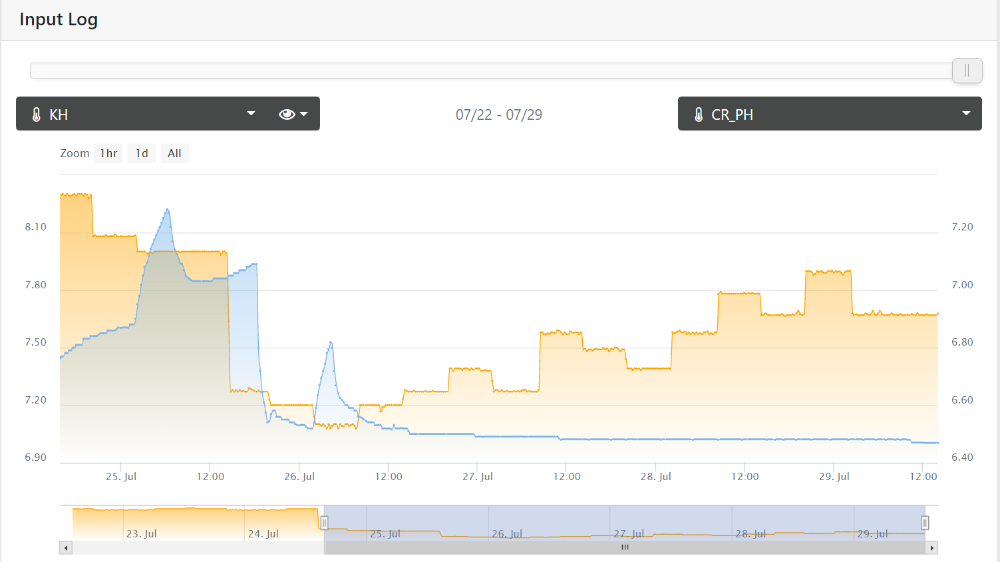
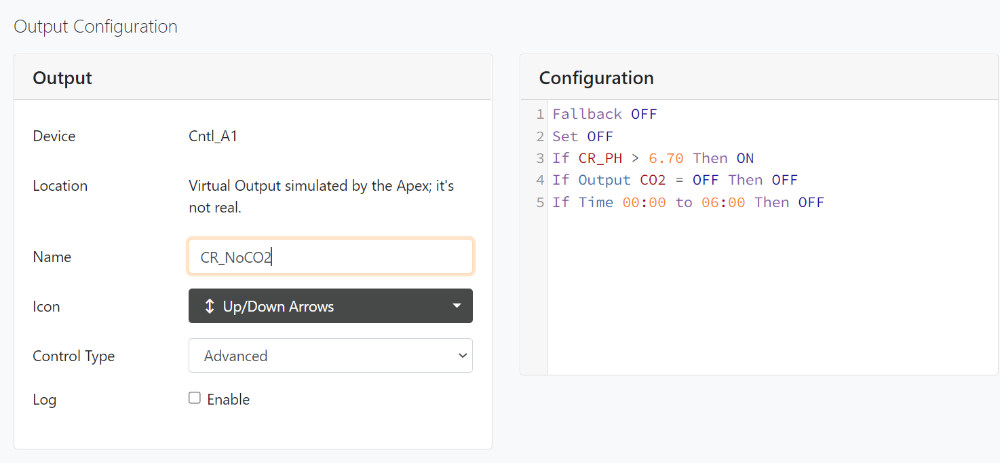
CO2 tank empty.
20th Feb -> 25th July => 5 months 5 days. Not bad.
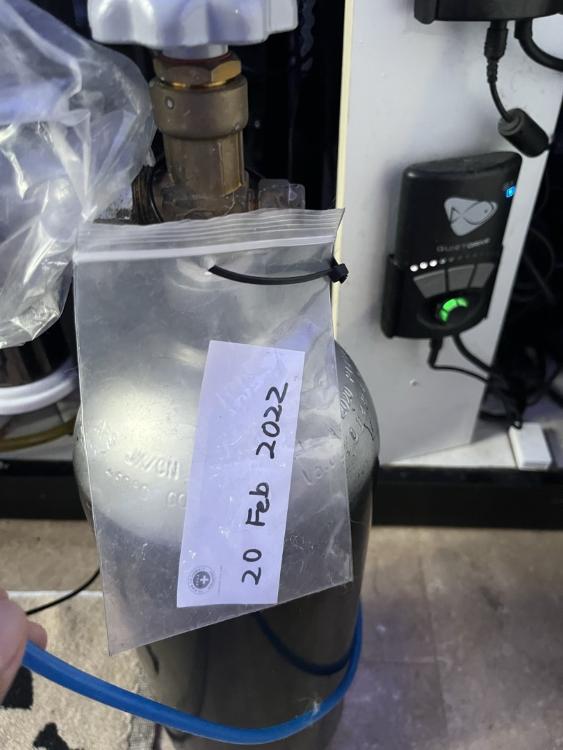
Actually the CO2 pressure started to reduce probably on 24th July but I didn't set the warning PH thresholds correct in the Apex programming. Probably a typo error during the old/new Apex transfer. I received the email warning at 7.6pH instead of 6.7pH.
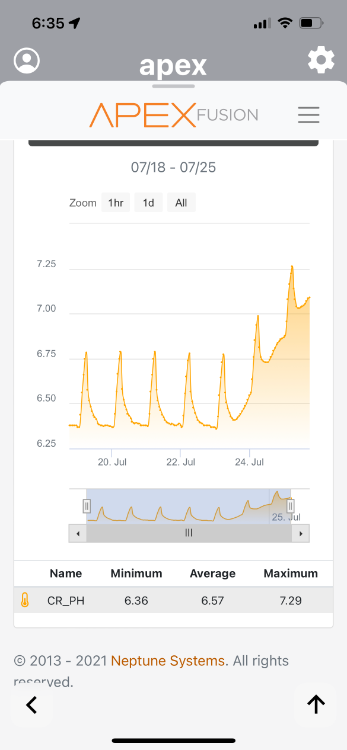
Because of this, KH dropped drastically on 25th July from ~ 8.3KH to 7KH in a day.
By the way, the CO2 Art regulator is very reliable so far. The O-ring is a hard plastic which does not squish or detiorirate so easily.
CO2 regulartor programming :
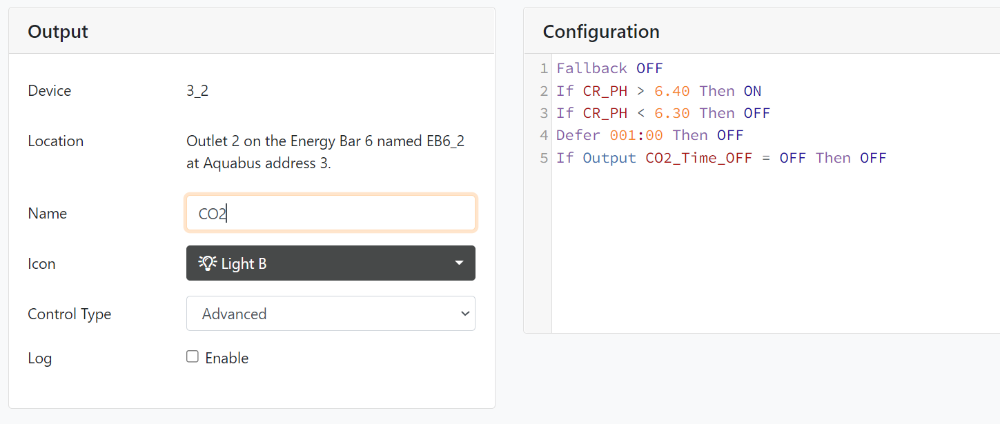
This virtual outlet is to fine tune the timing to switch off the CO2 in order to maintain the KH levels within a day.
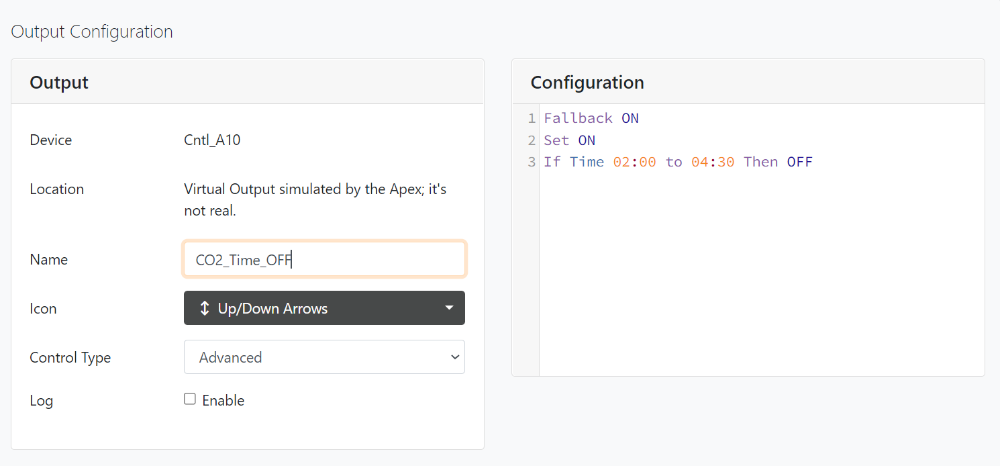
Virtual outlet to toggle notification when running out of CO2
-
Noticed the downflow slowing down. And more water flowing into the emergency drain. Probably time to clean the clarisea pipe.
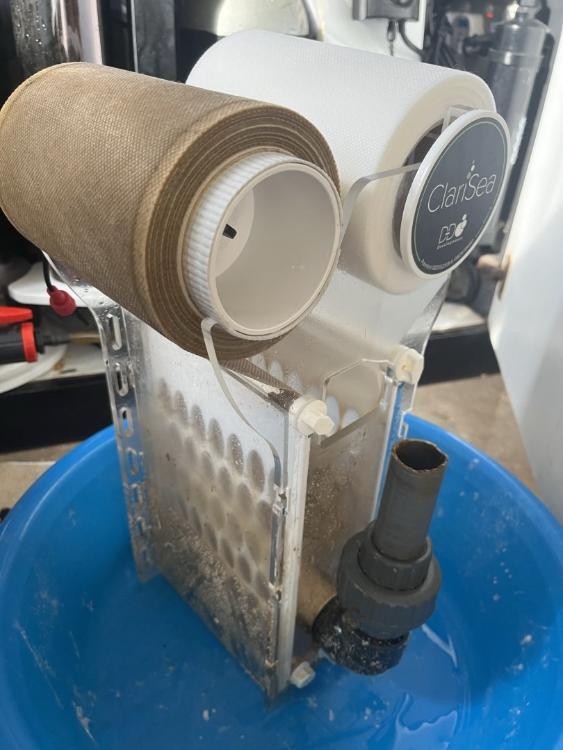
As expected the internal pipe is filled with debris. This extra work could have been avoided by having a finer grill over the down pipe in the overflow area.

Trimmed one of the pink birdsnest colony and had to use rubber band to stabilize it while the glue dried.
.jpeg.97b4caf7292431e923652de981713d02.jpeg)
View of the other half of the tank.
-
On 6/30/2022 at 8:09 AM, ben loh said:
Agree on the availability of regents.. but why you dun use alkalinity function on trident to use on CR instead of having 2 machine. Coz I’m thinking if can use 1 machine on CR and also measure CA n MG.
I think both ways work.
In any case, I think the Alkatronic is very practical for Calcium Reactor since alkalinity is a good reference for the effluent and also a good closed loop check if something goes wrong with the CR system.
My Slice of Nature (Part 3)
in Members Tank & Specs
Posted
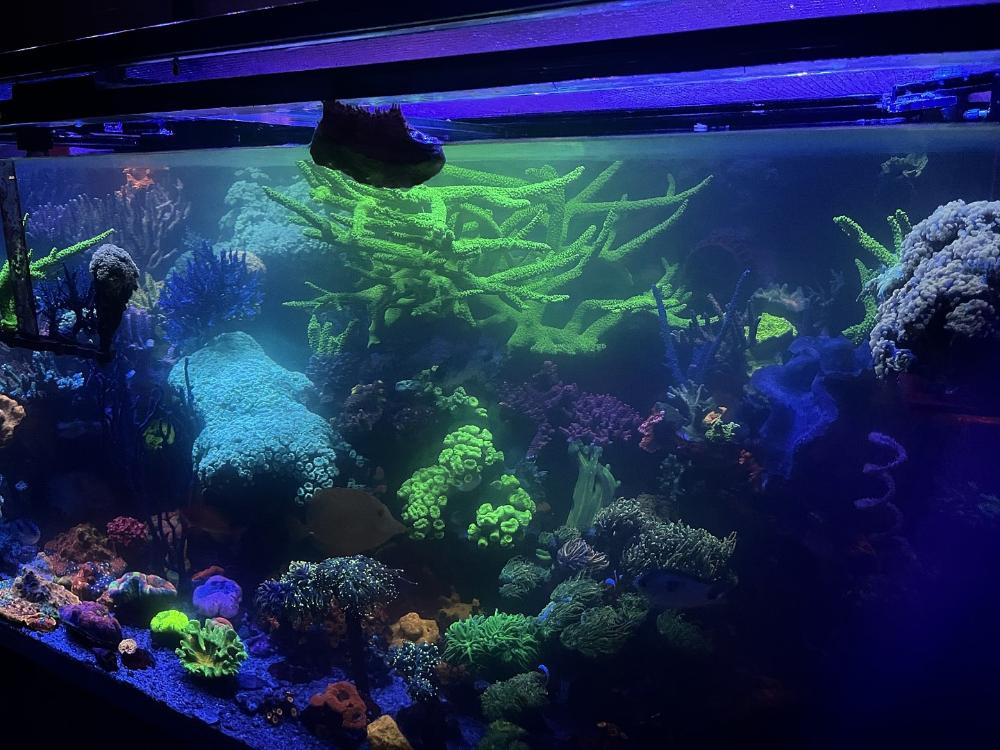
Have been focussed on managing water parameters & water quality the past months.
My go-to source for managing bacteria. Since stepping up on Biodigest, Biotim & Probiotix, nitrates have fallen to a healthier 5-10ppm levels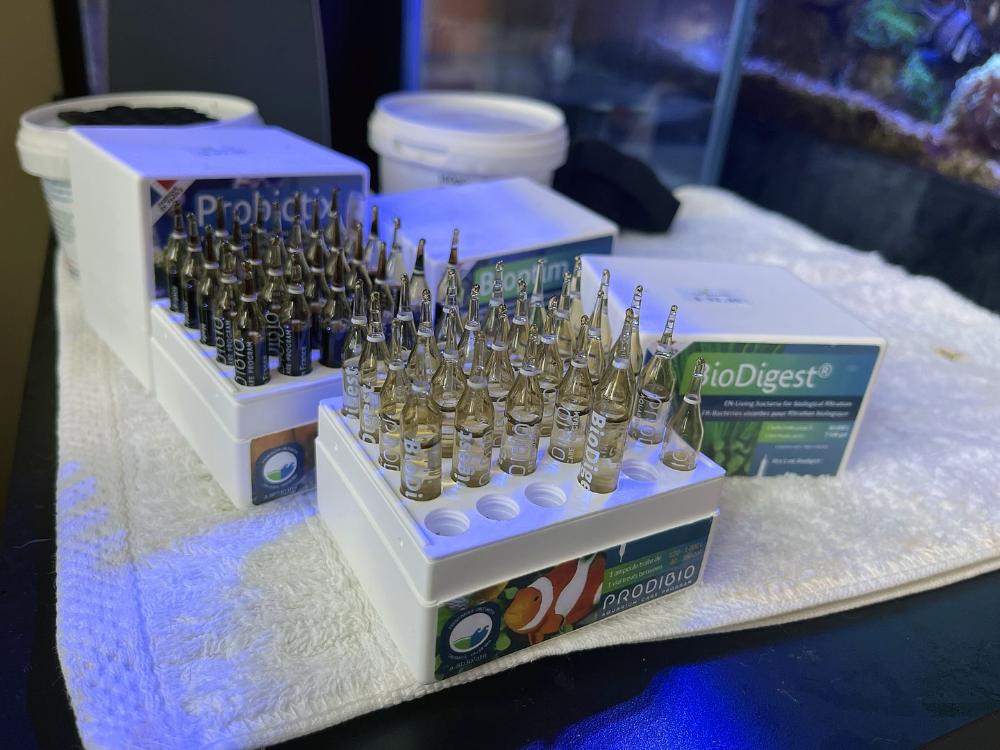
Nicely wound up. Clarisea fleece roller for mechanical filtration.
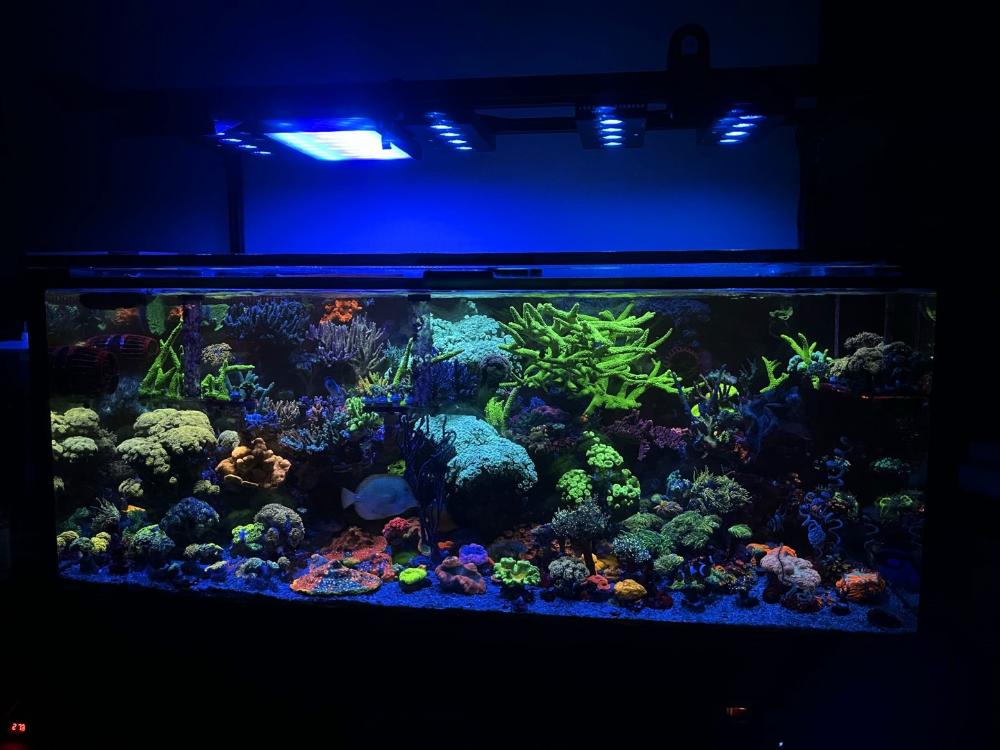
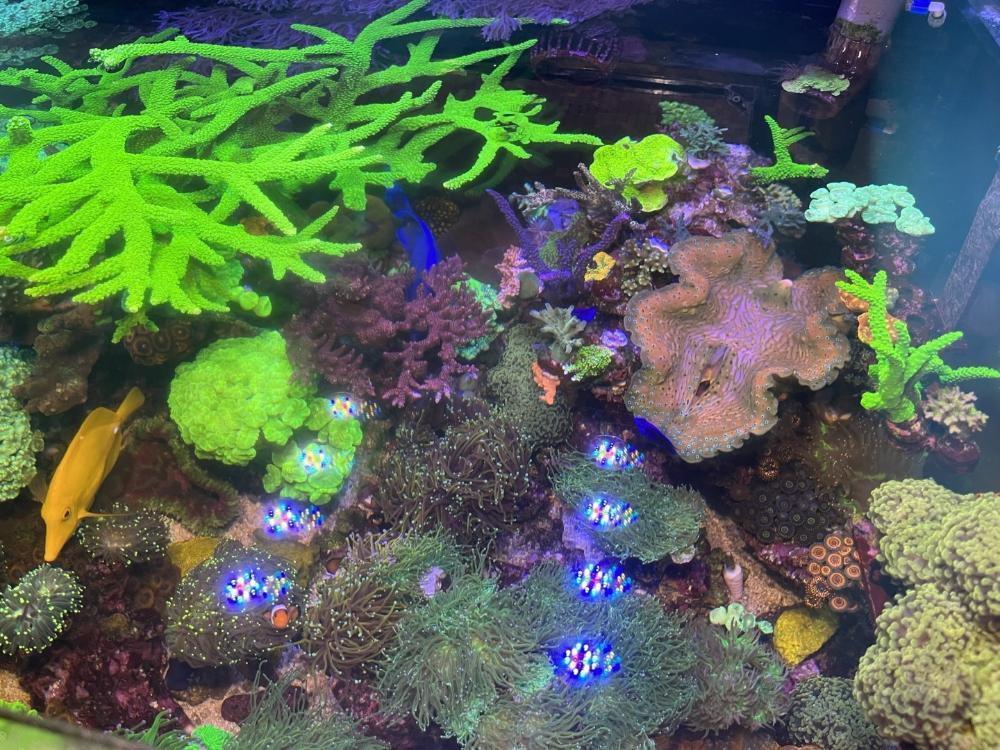
Left side of the tank.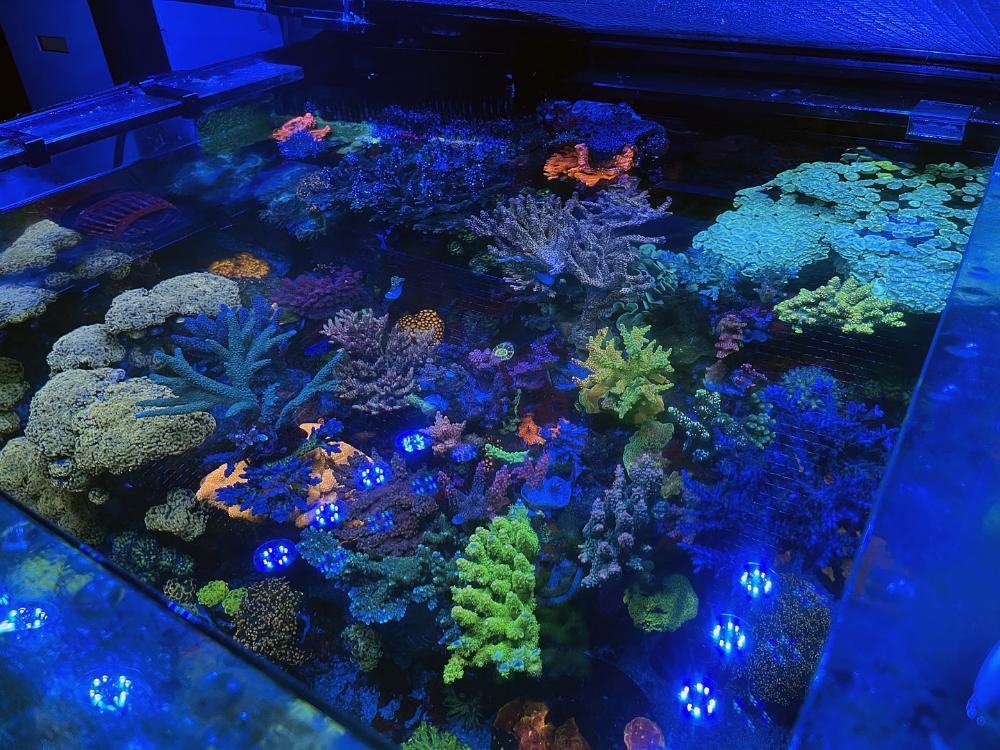
Right side of the tank
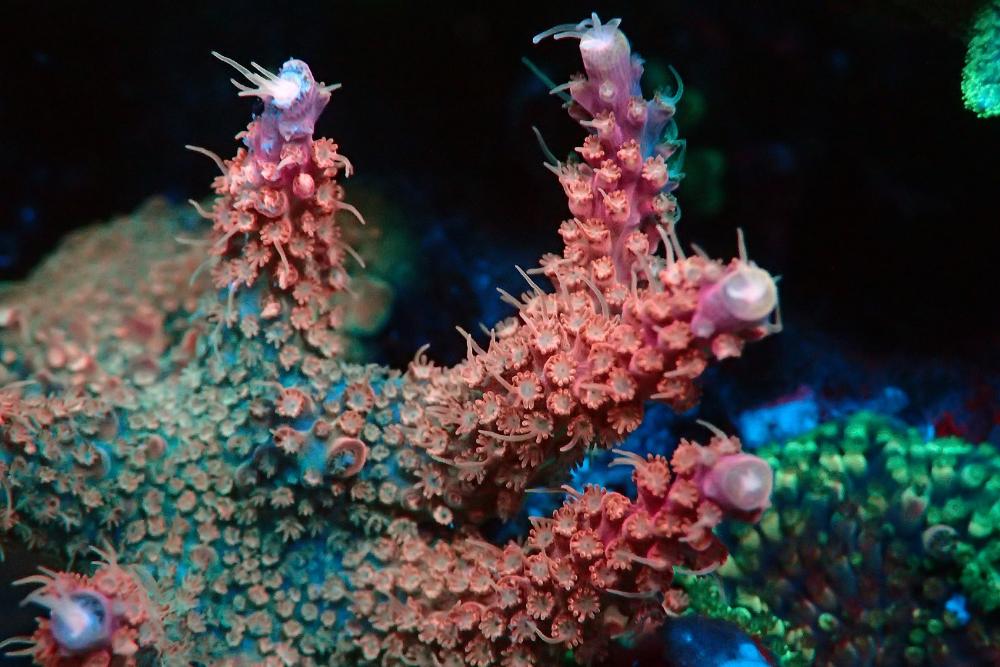
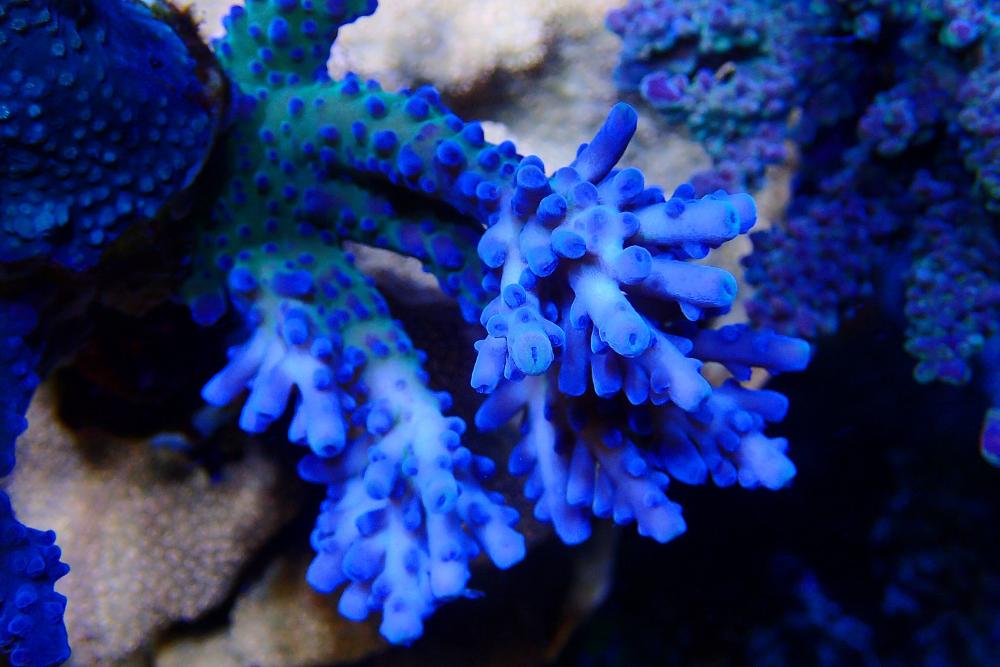
Love for deepwater acropora. Purplish tip showing up recently
Tenius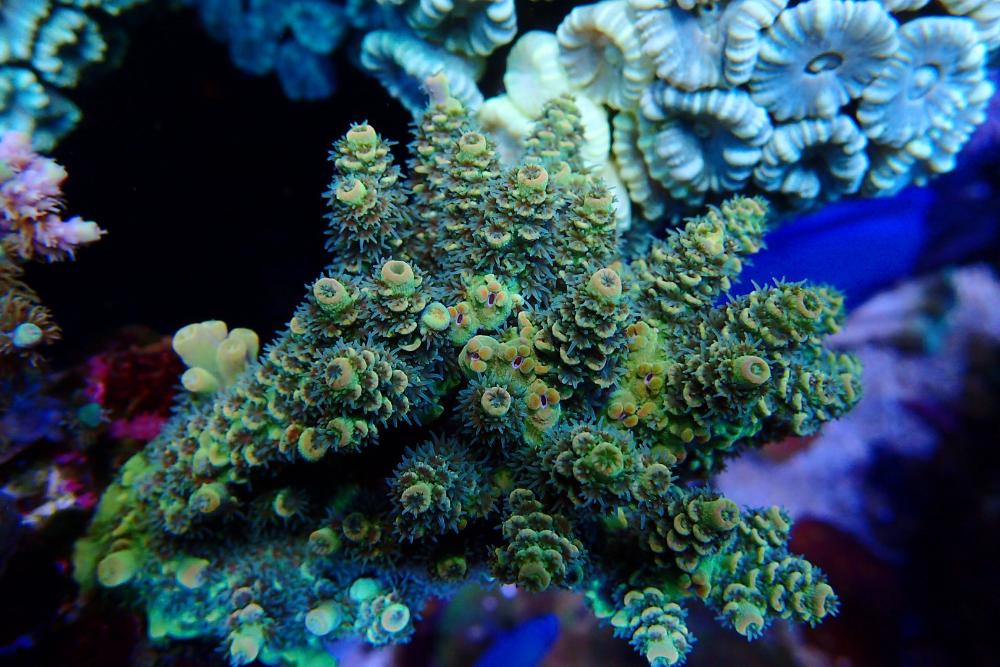
Another Tenius (pic with yellow filter)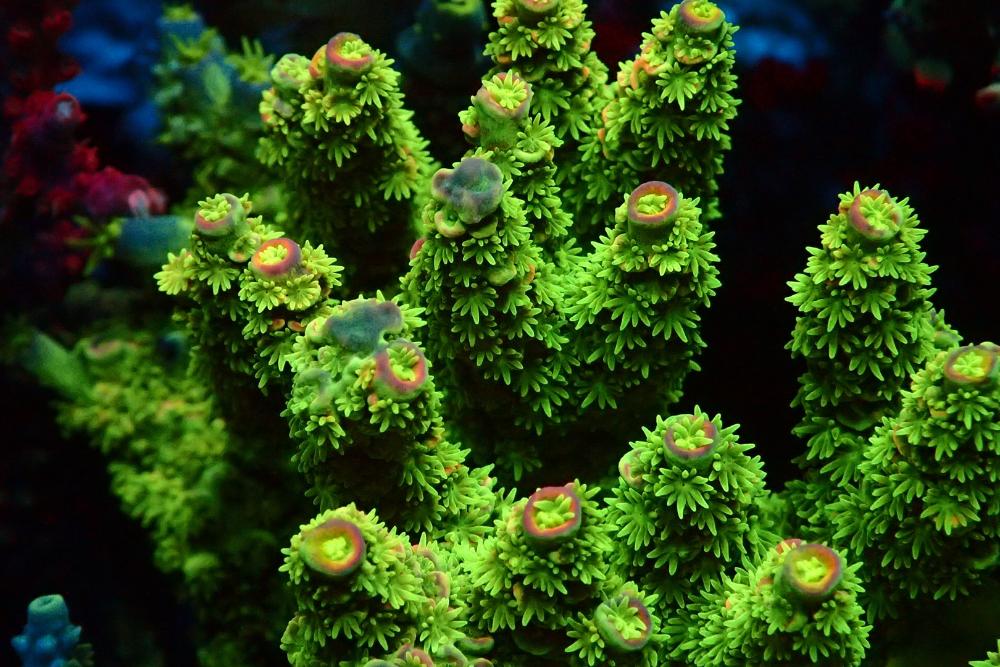
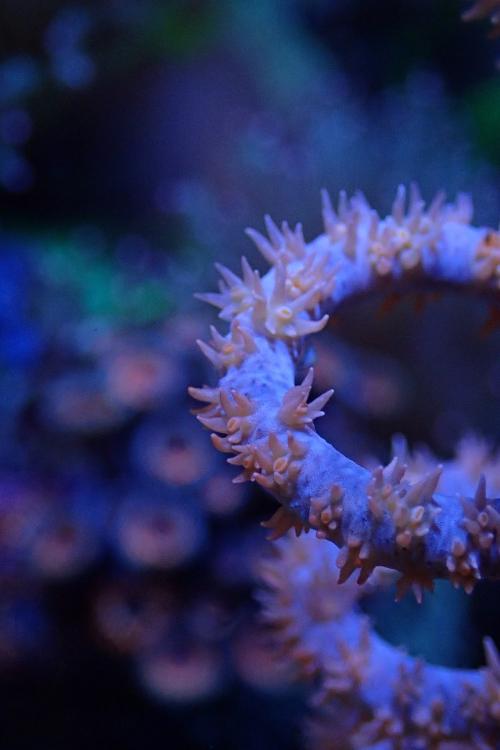
Nauti Spiral Montipora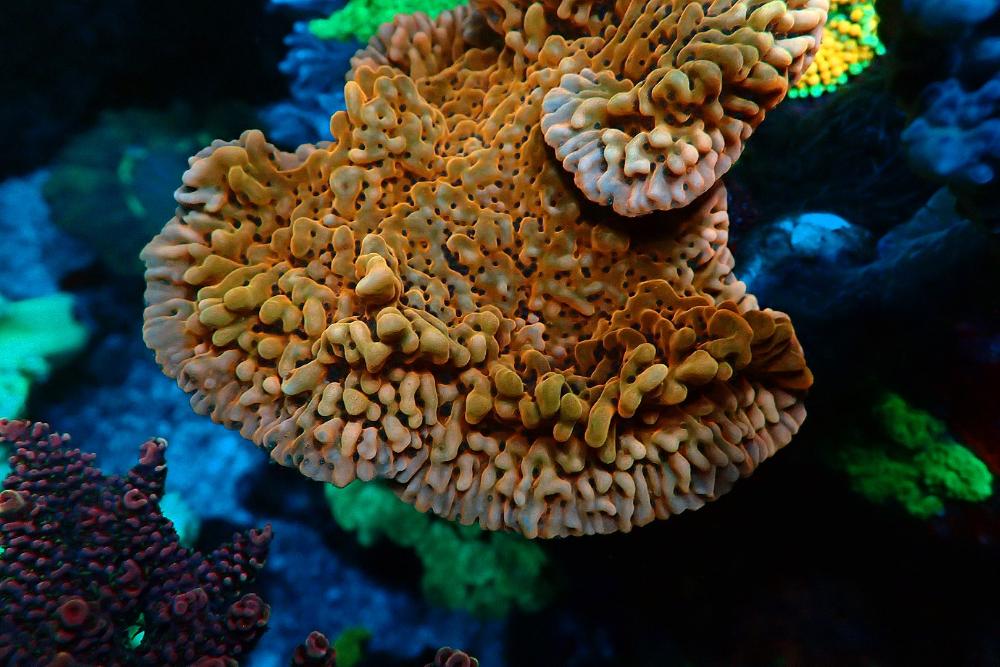
Branching Hammer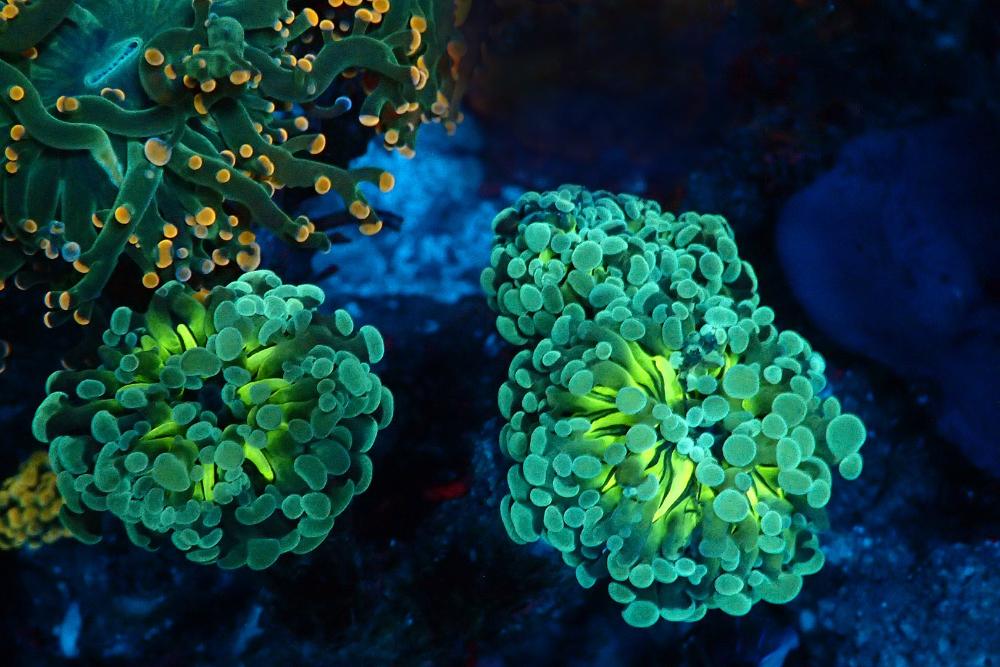
Red Ferrari Acropora (with yellow filter)
Red Ferrari Acropora (without yellow filter)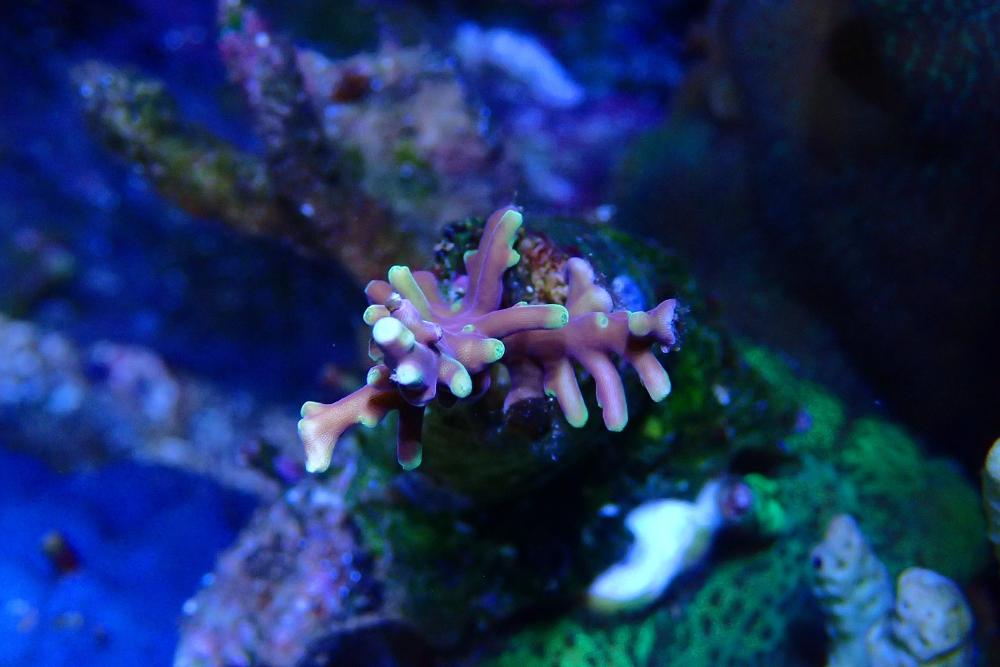
Surprised the trachy is not stung by the max mini carpet anemone.