

.jpg.6ff77eabb205146e13b742b0340b97ef.jpg)
SubzeroLT
-
Posts
2,330 -
Joined
-
Last visited
-
Days Won
119
Content Type
Profiles
Forums
Gallery
Posts posted by SubzeroLT
-
-
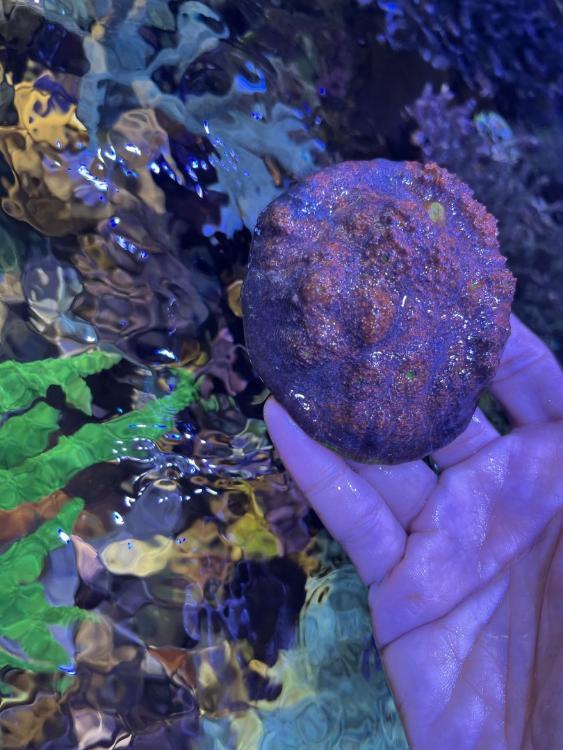
This UFO chalice over grew the original frag plug.
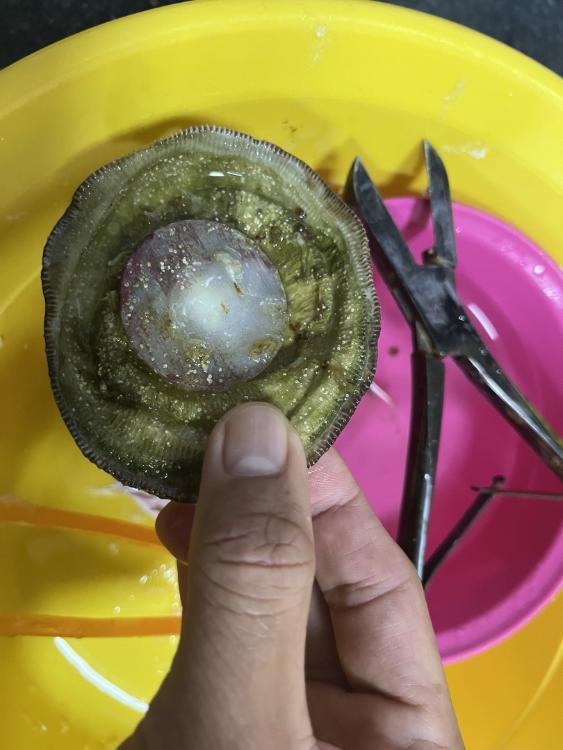
Cleaned up the underneath. That's the original frag plug.
In the background is a plasma coated frag cutter from ReefMarketSG. Quite good.
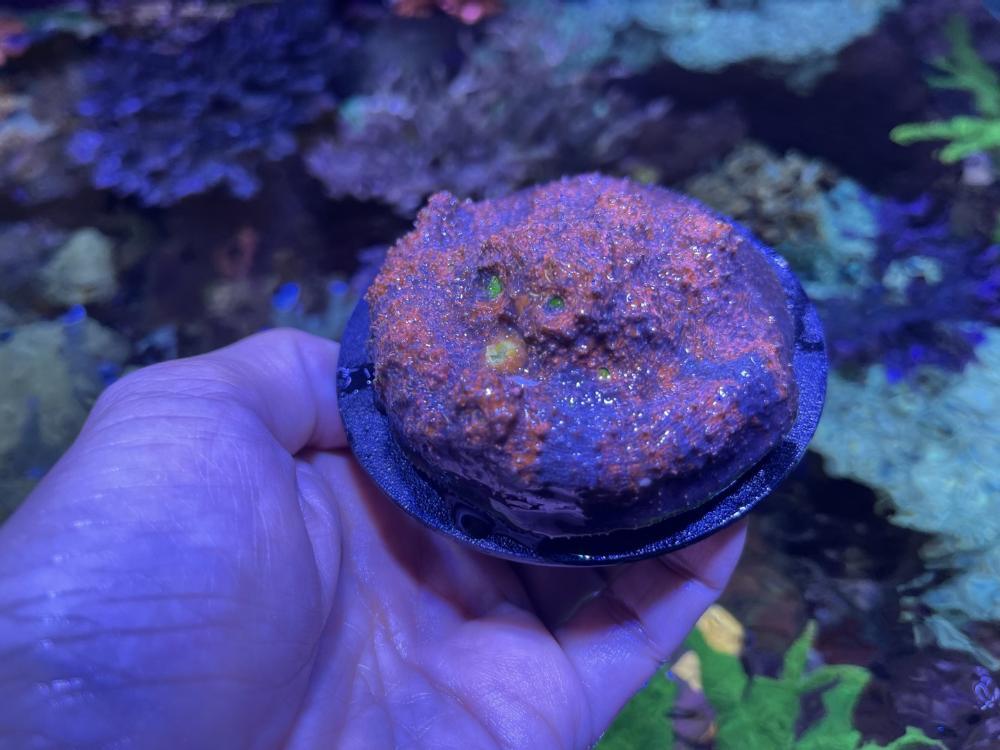
3D printed a frag plug. The curved hollow section digs into the sand bed. Made plenty of holes for pods to live in. Probably does not really matter anyway.
.jpeg.99628d81a27ca890f385ac9916a006c8.jpeg)
9cm frag plug. Will add on an outer ring as it grows.
-
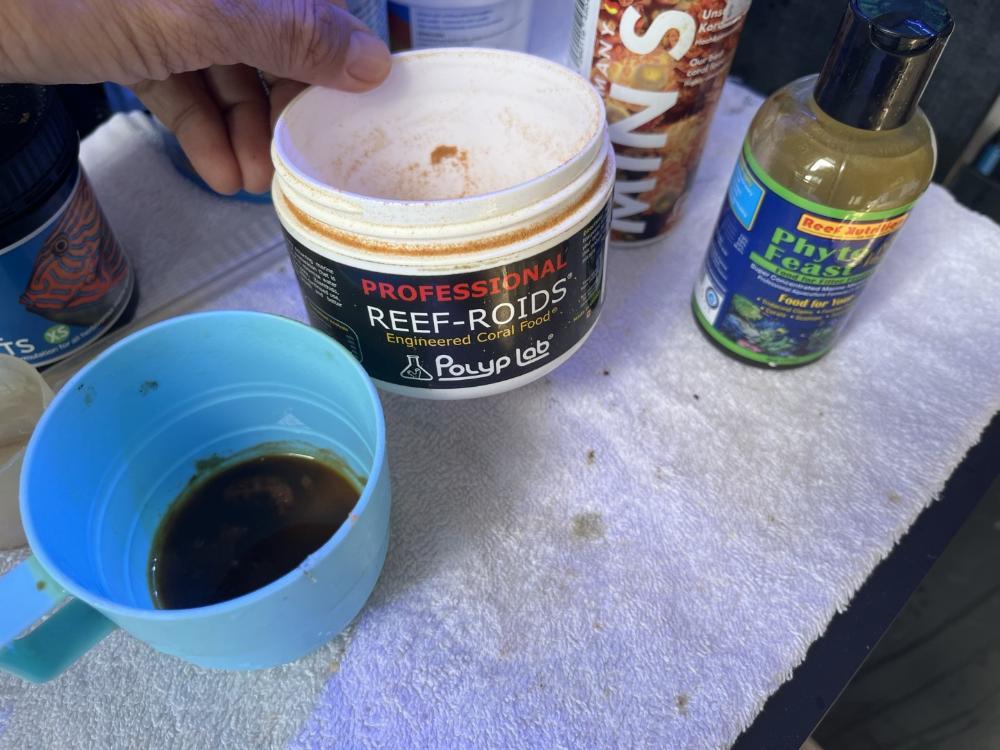
I've been increasing the tank's feeding regime the past month+.
Now feeding reef roids twice a day. About 1/2 flat teaspoon per feeding. Mixed with about 5 drops of Fauna Marin MinS & 2 squirts of Reef Nutrition Phyto Feast.
A couple of reefers asked if i spot feed or broadcast feed :
Wavemaker & return pump is set for 20min Feed Mode (wavemaker ~ 1% speed while return pumps are running but not pushing any water from sump to display tank, so the small bits remain in the display tank as long as possible). So in a way, its broadcast feeding on a daily basis. But if time permits (perhaps once or twice a week), i'll turn off the pumps entirely to target feed the corals.
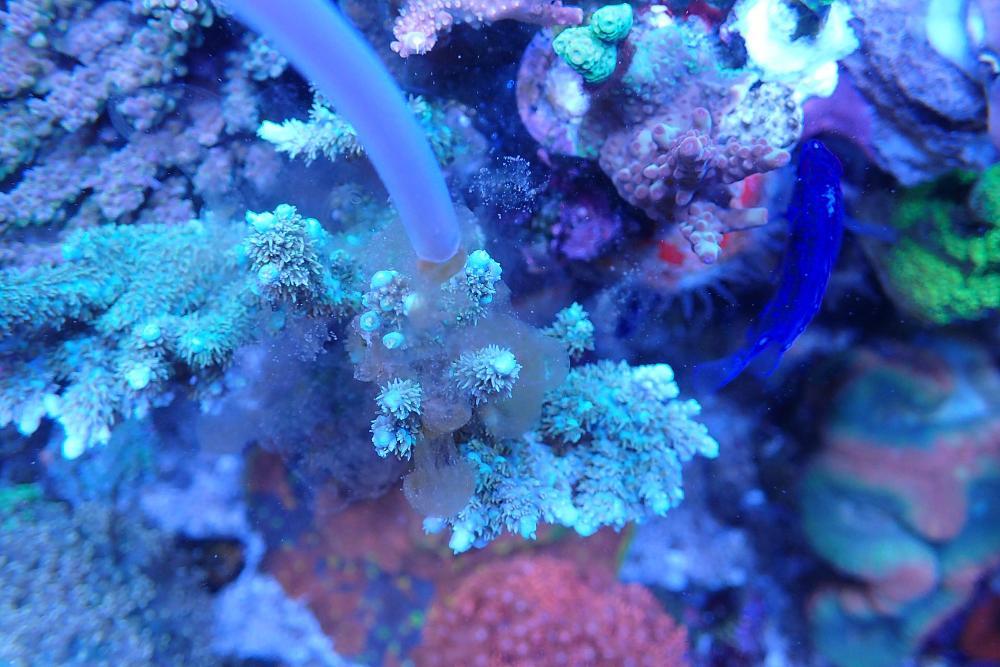
Quick feeding response from this trachy

Also from the micromussa.
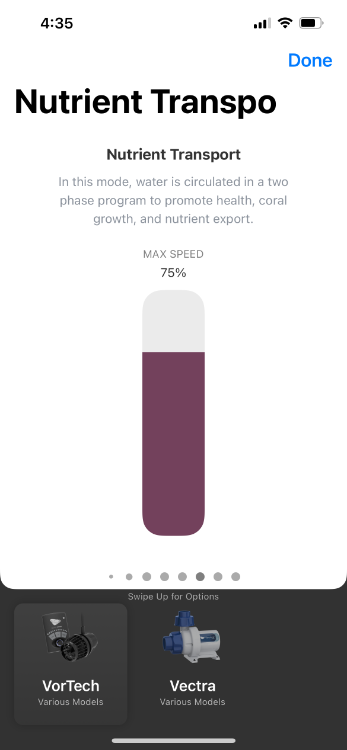
Ocassionally after heavy feeding, especially of minced fish/prawn meat, I'll manually trigger Nutrient Export mode on Mobius which pulses the Vortech at 75% to lift left over food from the sand bed to recirculate around or flushed down to filter fleece.
-
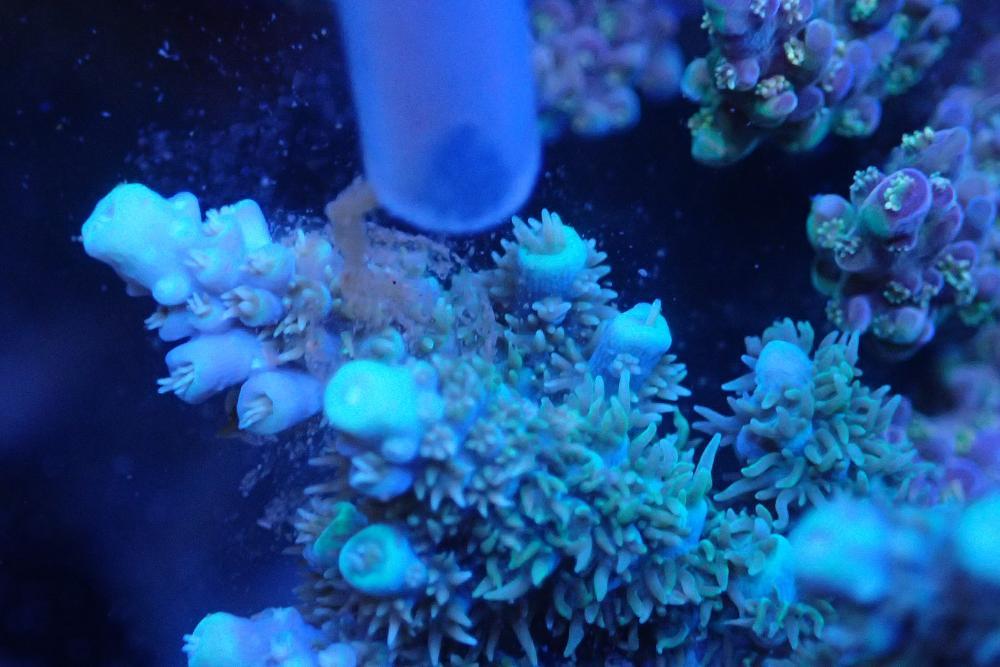
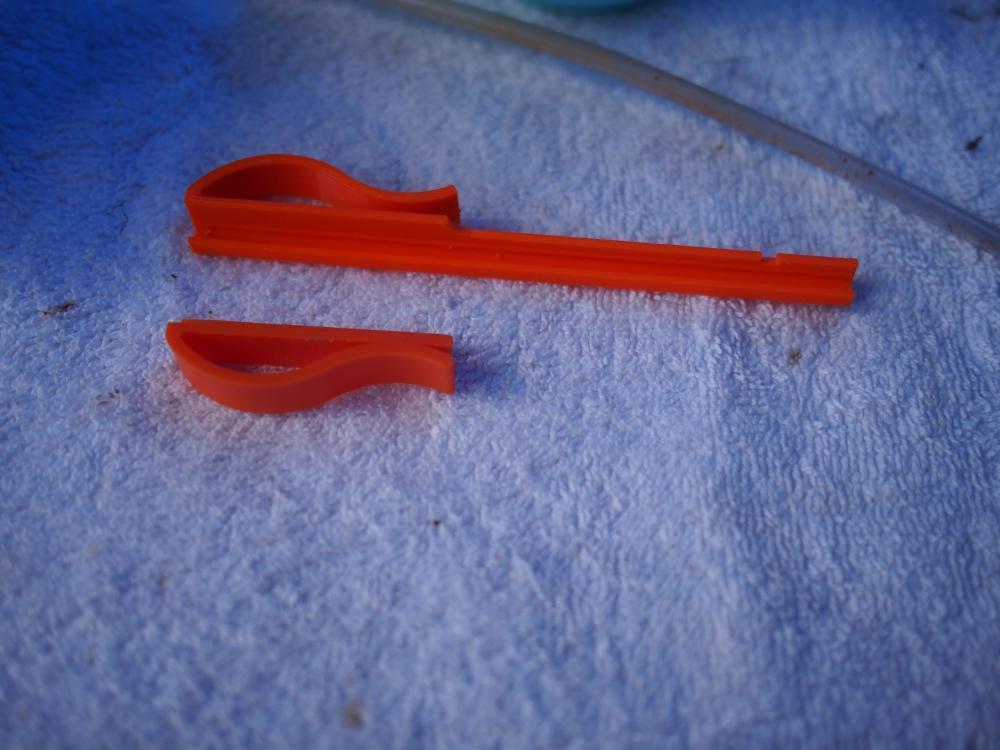
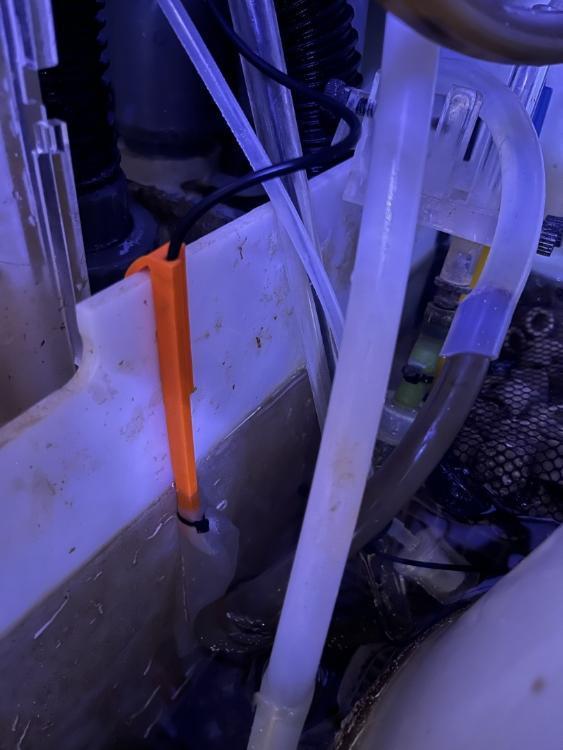
Regarding sample inlet, 3D printed a longer tube holder and designed in a notch near the bottom.
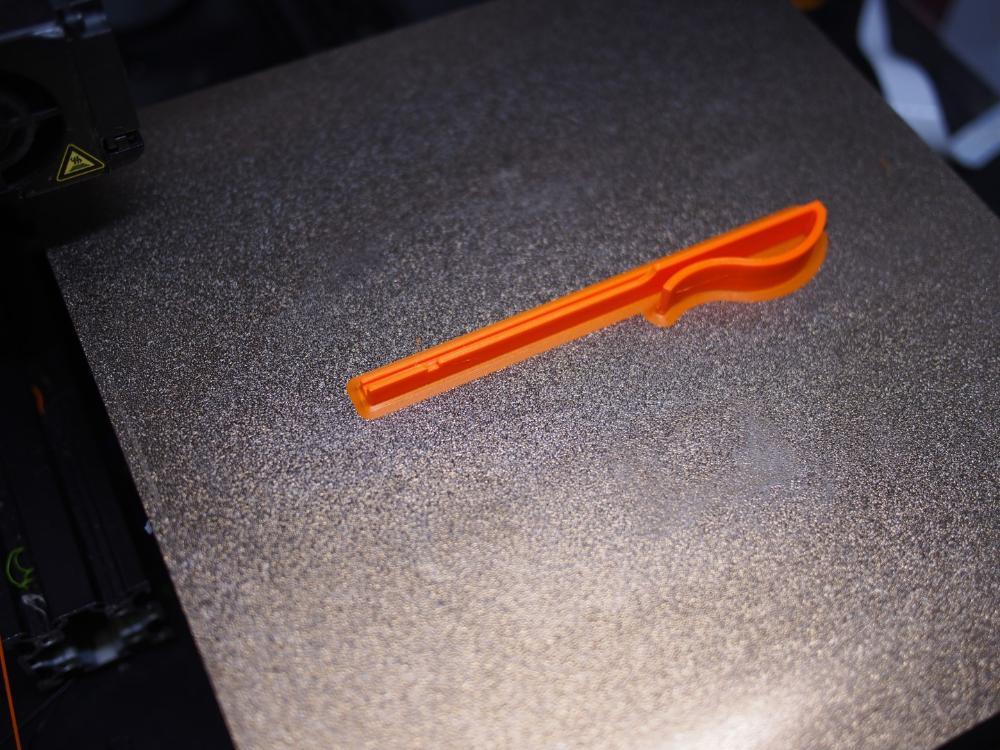
Longer tube holder (top pic) vs original tube holder (bottom pic)
At the same time, DIY a 200 micron mesh bag by cutting out some old nylon mesh on hand.
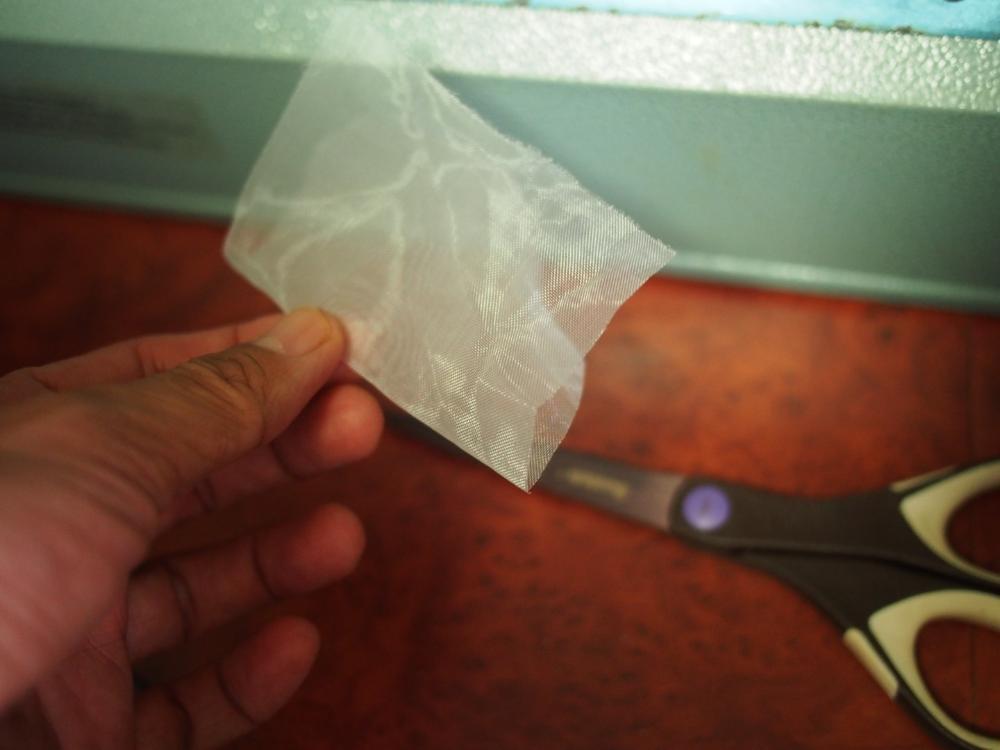
Then seal with an impact sealer
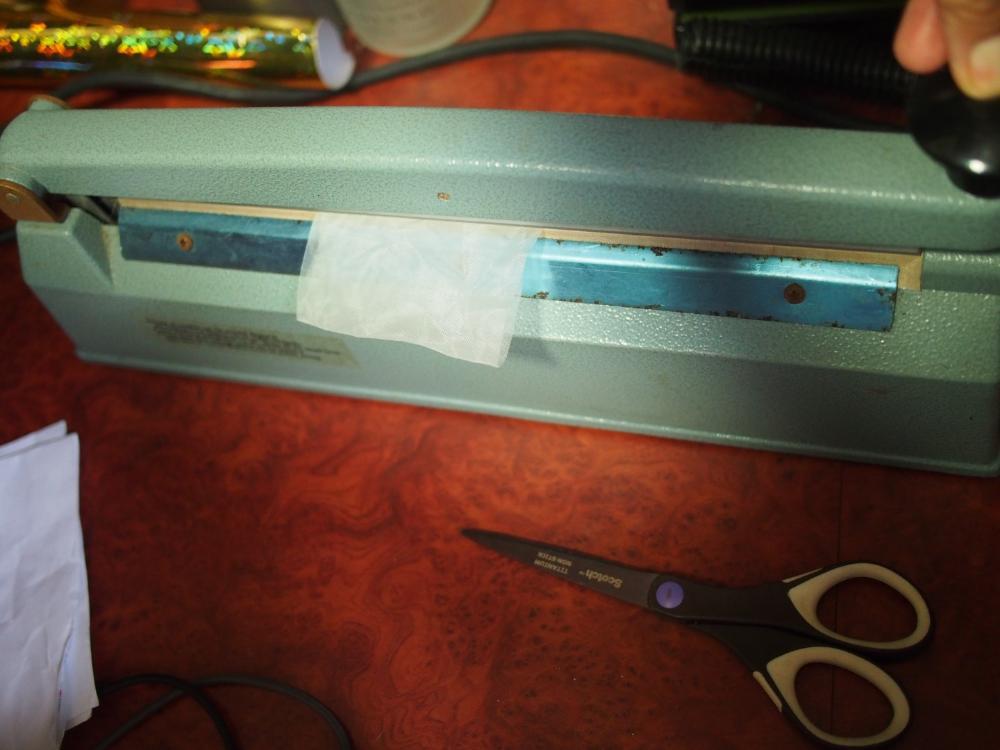
Mini filter sock
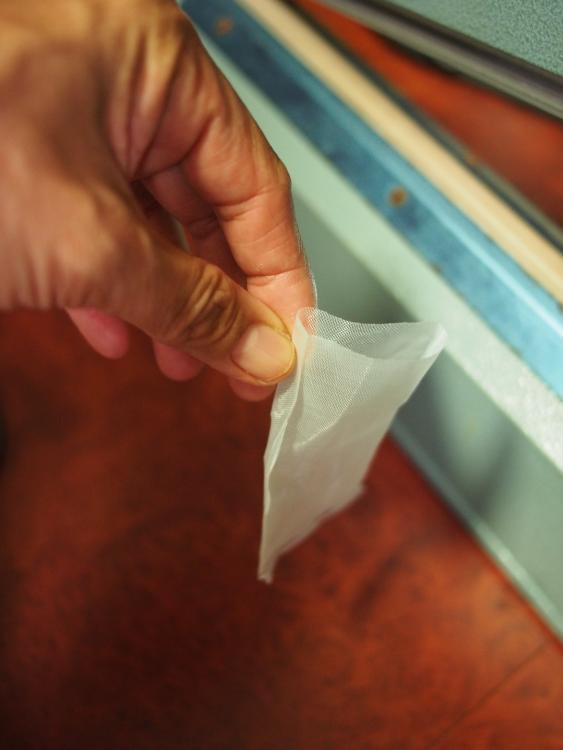
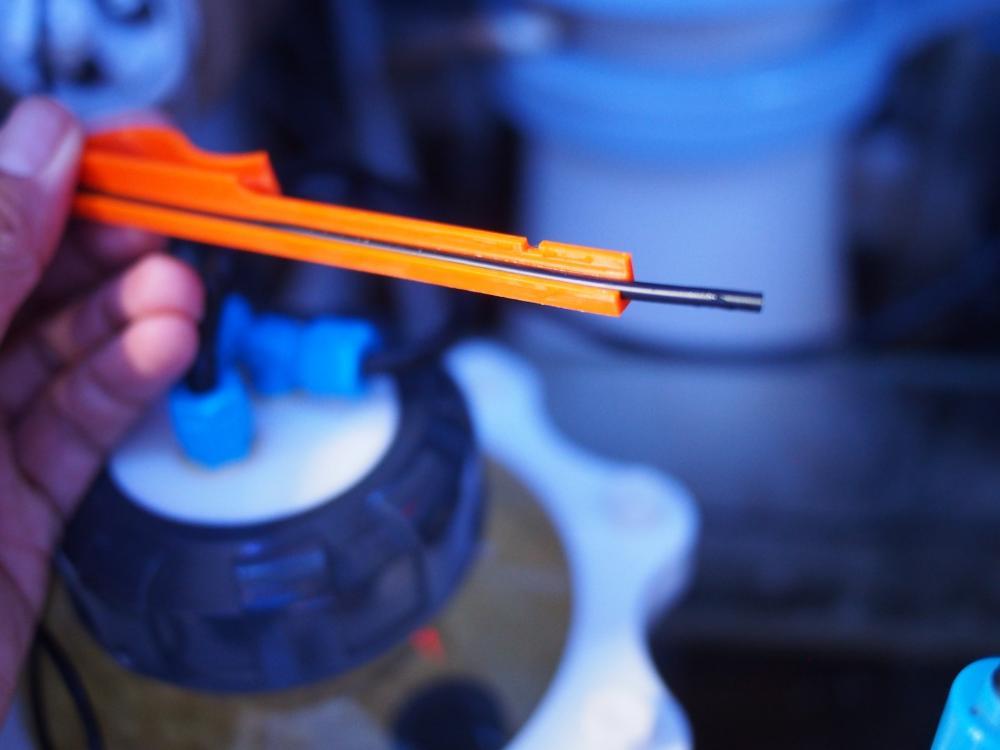
Cable tie to tube holder. The notch helps ensure its does not slip out easily.

This is what the final setup is like. Dipped under water & 'filtered'. The plan is to rinse the bag ocassionally. Don't expect it to clog or affect flow pressure at all.
-
Some coral pics (with yellow lens) from today :
Left side of the tank
.jpg.2e645eed364427cc7523801863490e2a.jpg)
Space Invader Pectinia (orignally from Coral Fanatics)
.jpg.e59eb1cb5686d7f6acfdd887cdbbc735.jpg)
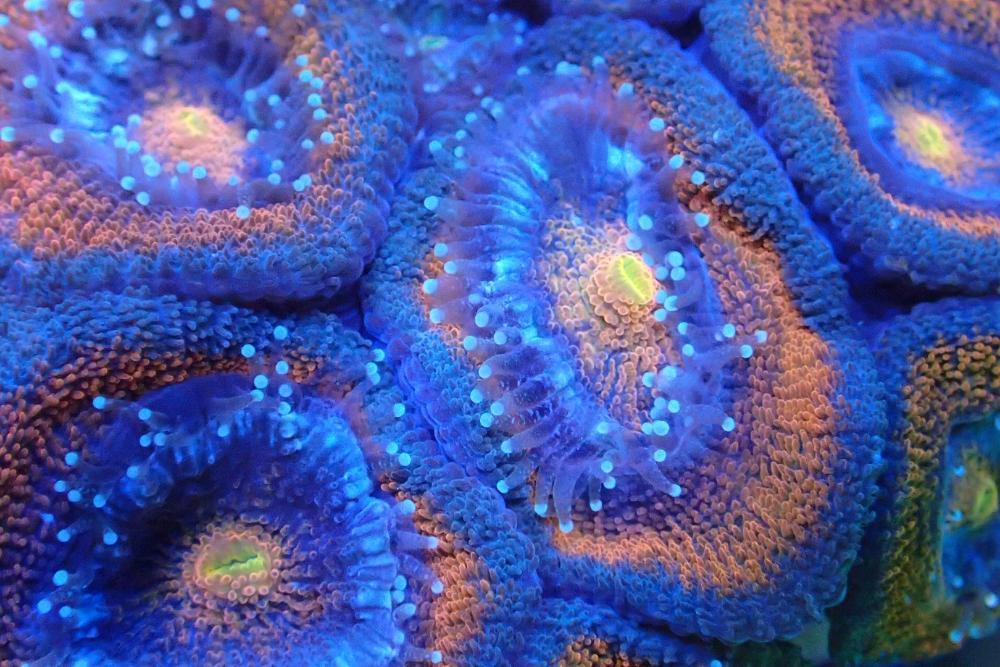
Chalice corner
.jpg.f1007a85a57e74acf553a40acfa35f3b.jpg)
-
Installed an Apex Trident recently. Its not exactly an apple to apple comparison with the Alkatronic/Mastertronic setup. Each has its pros & cons - running cost, integration with the eco-system, whether you are using dosing or using a calcium reactor etc.
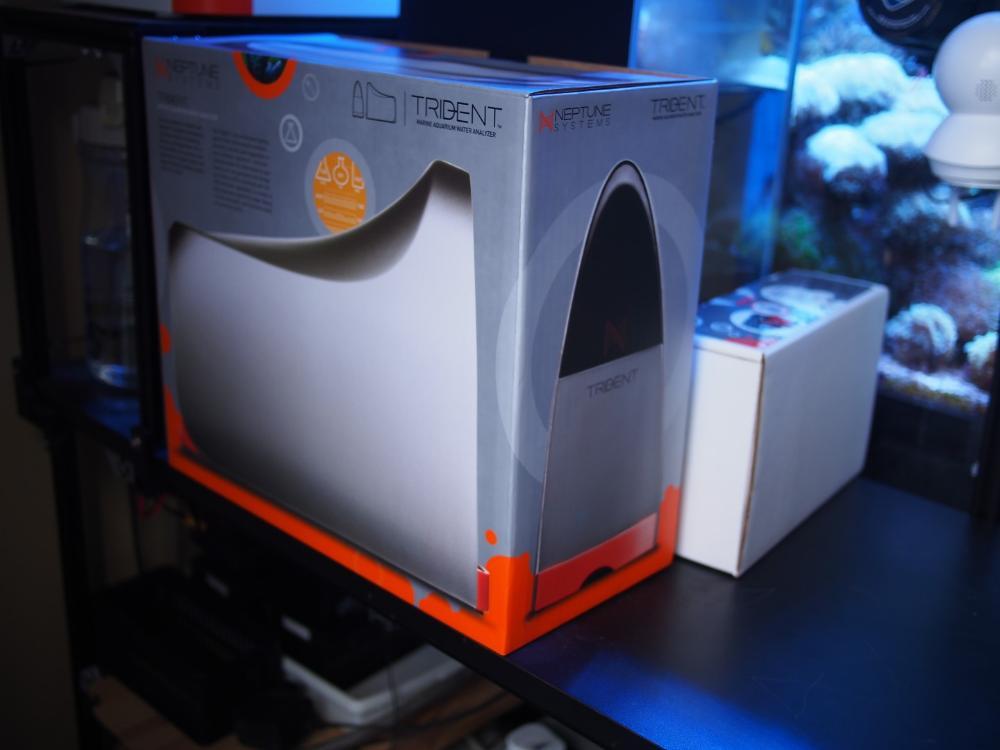
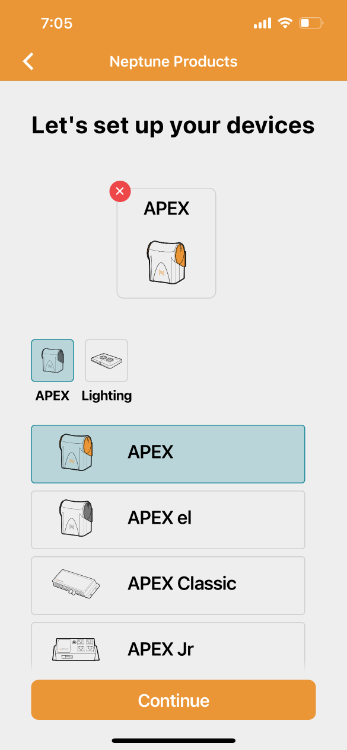
Setup of the Trident was surprisingly easy & quick. Here i share some key highlights of the setup.
There is a laminated card inside that tells you NOT to plug in the Trident to the main Apex system yet. And to use the Apex Fusion mobile app to start the process.
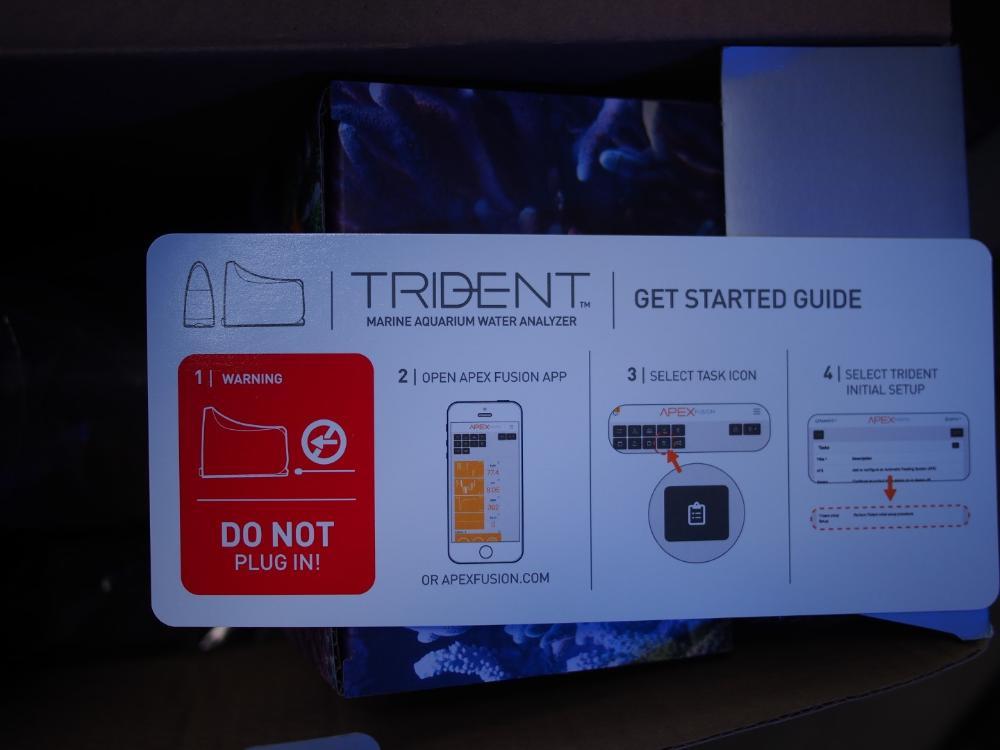
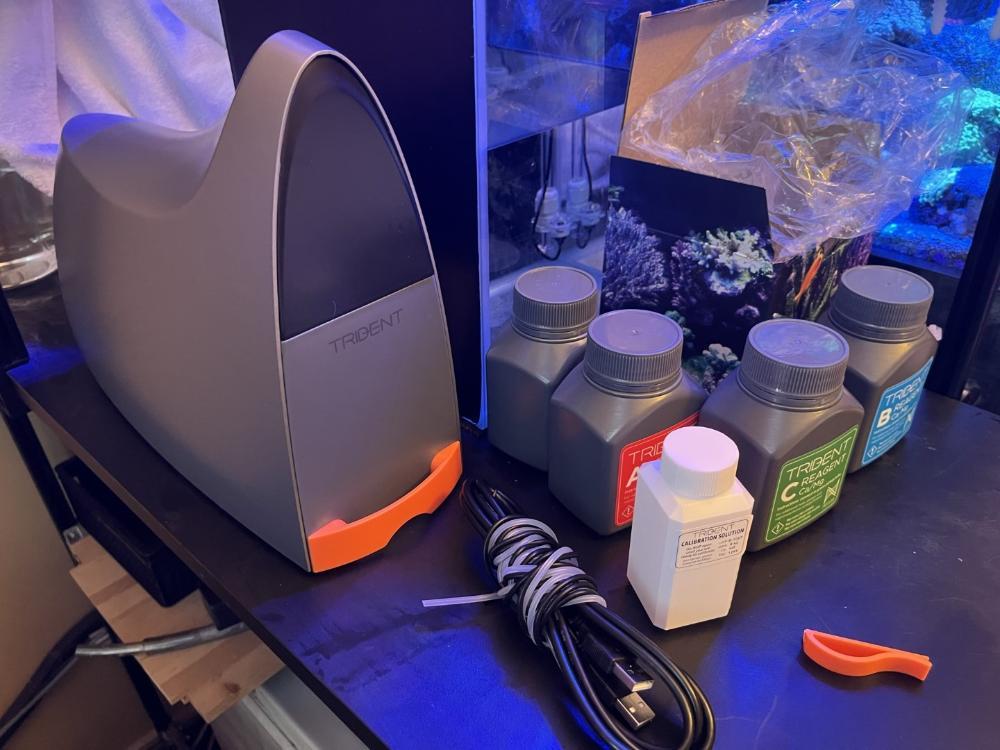
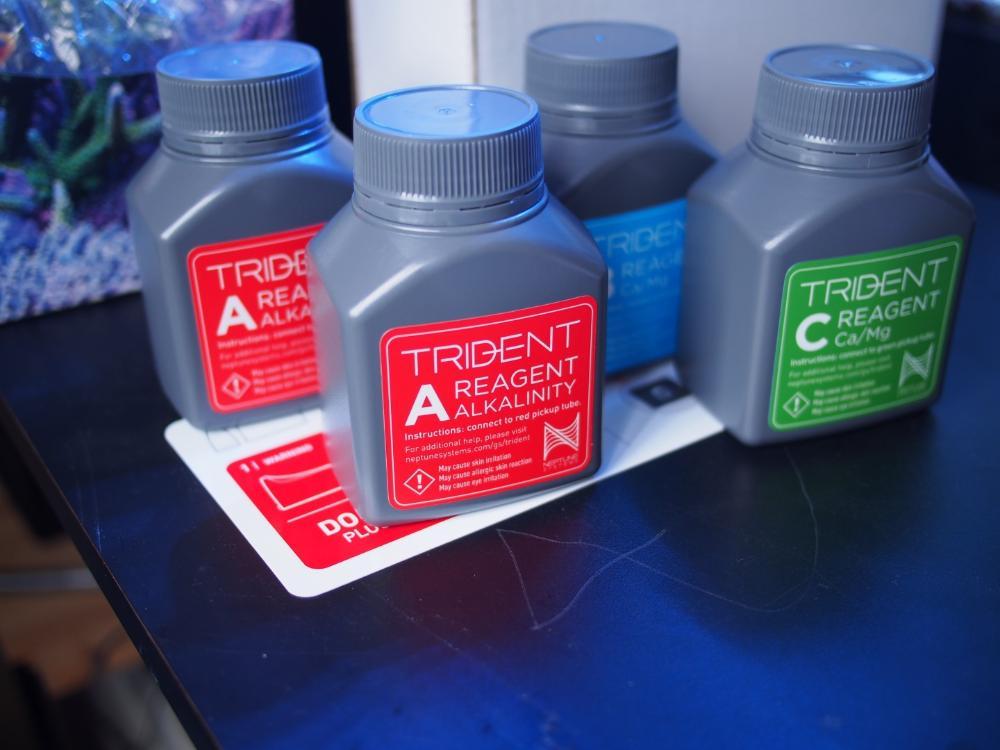
Some of the items in the box.
From the mobile app, choose the initial setup option
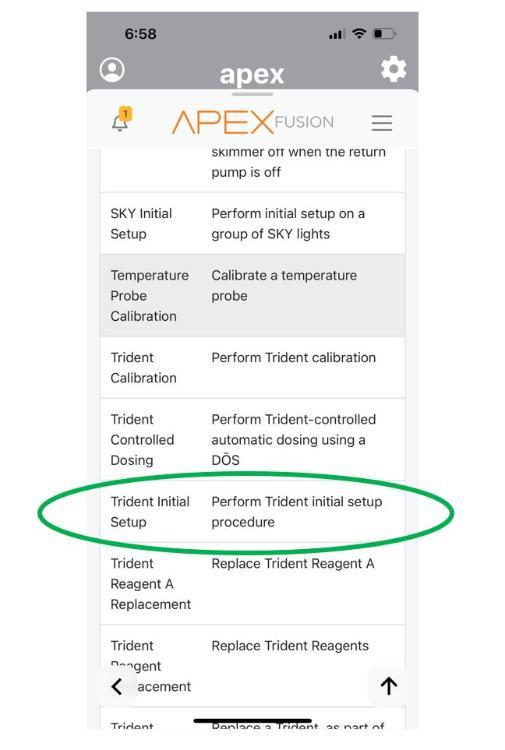
As you step through the process, there are short video tutorials to guide you through. No need to read through long & confusing user manuals anymore.
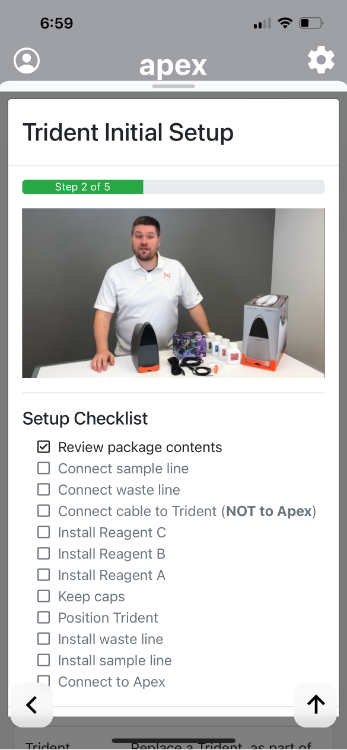
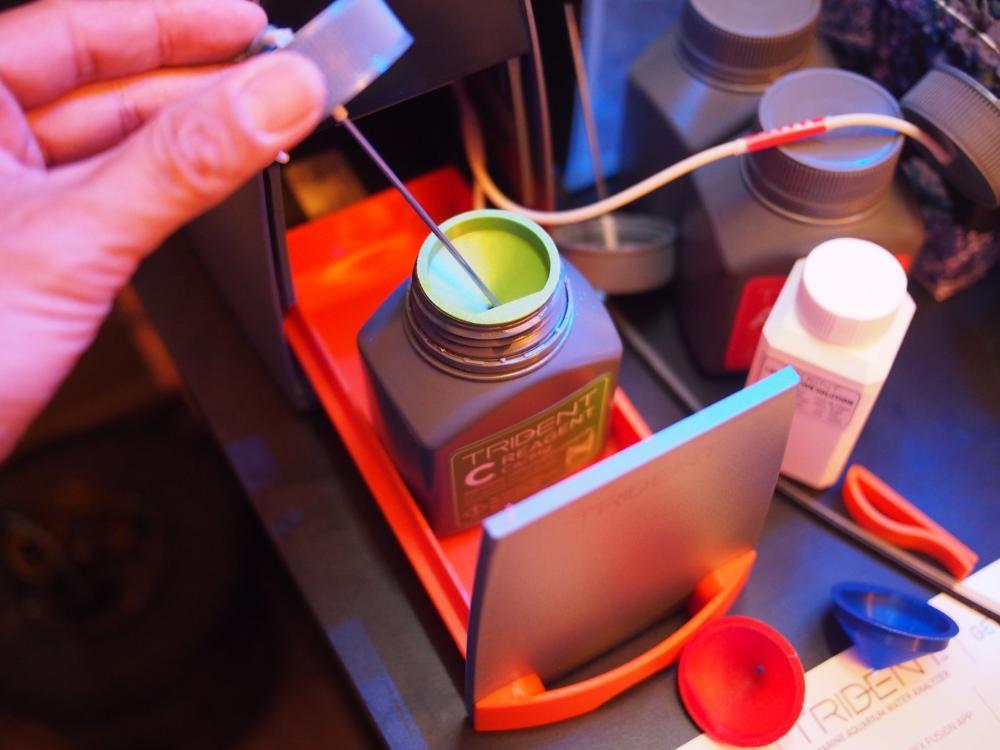
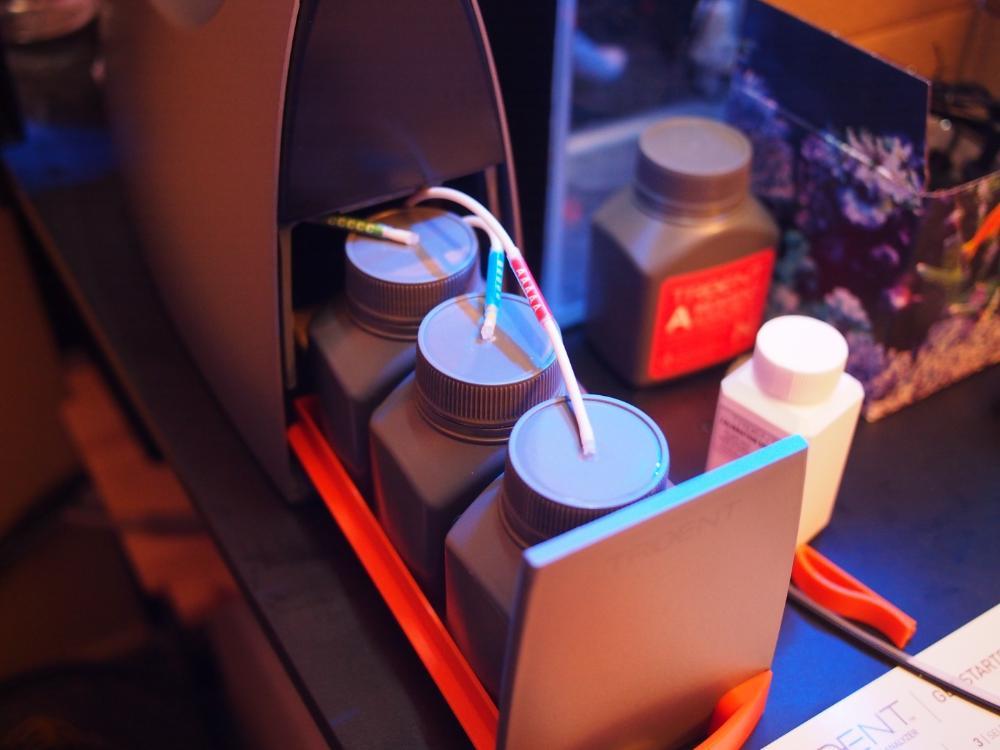
It'll get you through step by step (with video) on connecting tubes & reagent bottles.
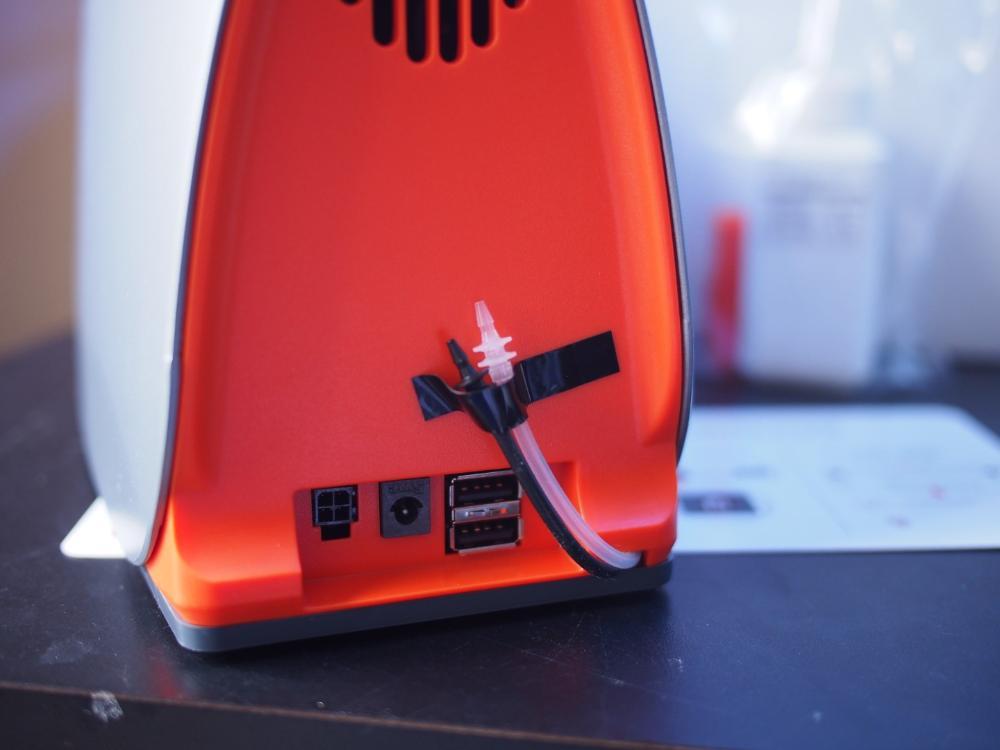
The black tube is for tank water. White tube for waste water. The corresponding colored long tubes are provided. Instructions state to leave the inlet tube legth as it is. Don't cut it.
The addiitonal color coded needle guide helps position the needle vertically to the bottom of the bottle (to ensure that all the reagent is used up). Without it, it may not reach the bottom as the needle tilts to the side.
Color coded
Once the Trident is connected (in my case, using the USB aquabus cable), the Trident is recognized immediately. There is an option to use a single 1-link cable as well (and elimate the Aquabus + DC power adapter)

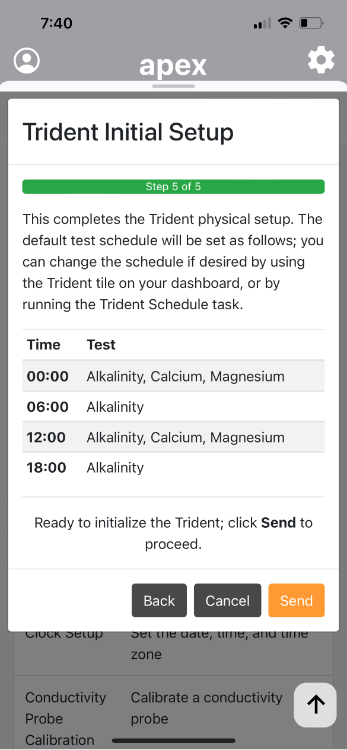
The default test schedule. Alkalinity 4x per day, Calcium & Magnesium 2x per day.
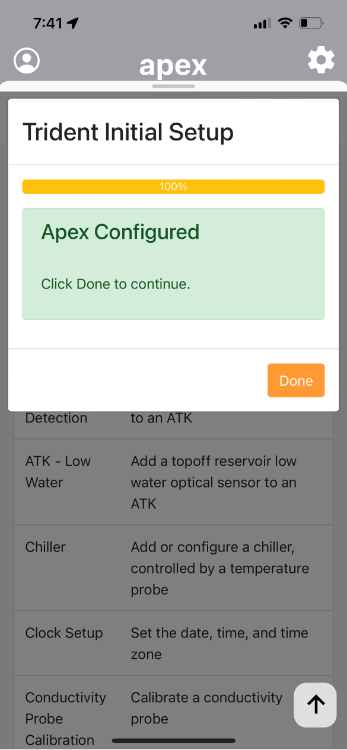
All done. Its actually very quick Ignore the timing as I had my dinner in between
")
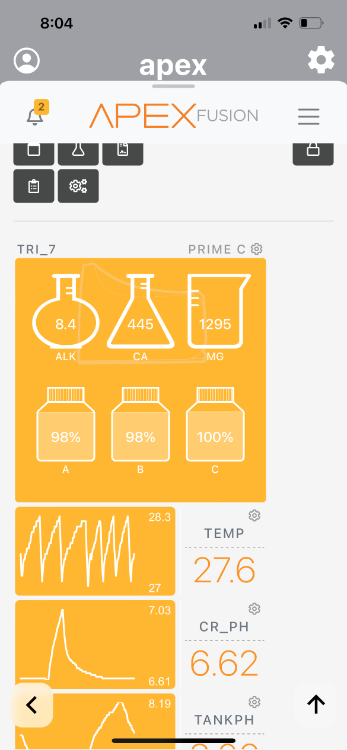
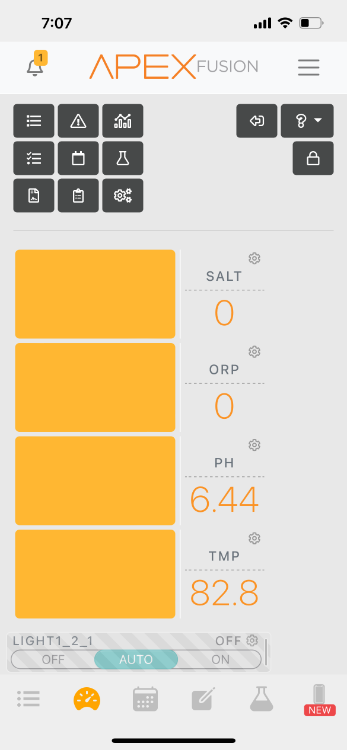
Clicking on the flask icons will show a graph of the tests. Clicking it a 2nd time will show the amount of reagent left.
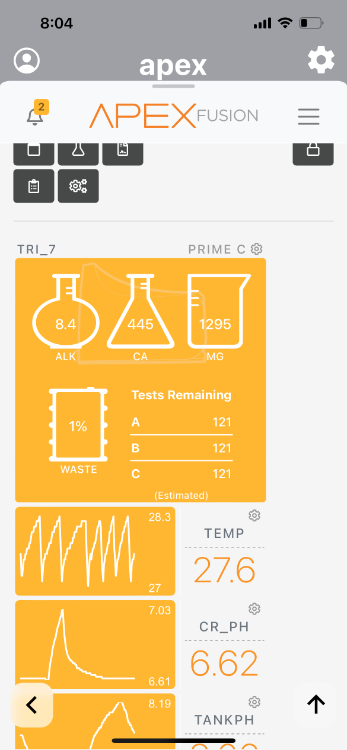
And clicking it a 3rd time will show the estimated number of tests left. And also the volume left in the waste container.
Locally, reagents are $99 for a set. Lasts 2 months. So about $50 a month for good control over Ca, Mg, KH is alright.
I encountered one issue so far in the past week. The water inlet tube was accidentally tugged out of the water (my human error) and I had this "No Water Sample" error.
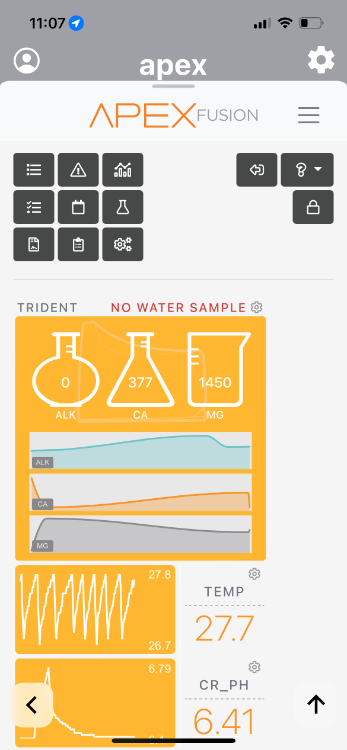
It runs quite silent. Slight motor whirring sound when its running. You won't hear the machine in the next room.The alkalinity number is offset from what's measured by other test methods (Apex reads 8.6. Salifert reads 9.41 and the Alkatronic is tuned to Salifert via the baseline calibration process). I will keep going with this difference. Its really not an issue - the important thing is to have a stable KH over time.
Trident readings in the box with the flask icons. Alkatronc is connected to the Apex via a BNC cable (refer to KH chart)

So far, I'm generally quite pleased with the Trident. The plan is to continue using the Trident & consider the possibility of further dosing integration. Though I'm running on a calcium reactor, I'm looking at redundancy/backup especially when travelling for extended period of time (i.e. dosing as a backup).
-
Received many queries about my experience with Coral Essential additives. I suppose user inputs on coral health, resilience to water parameter swings & more importantly ICP testing will give some insights.
As a recap, this is what i've been using since November 2021.
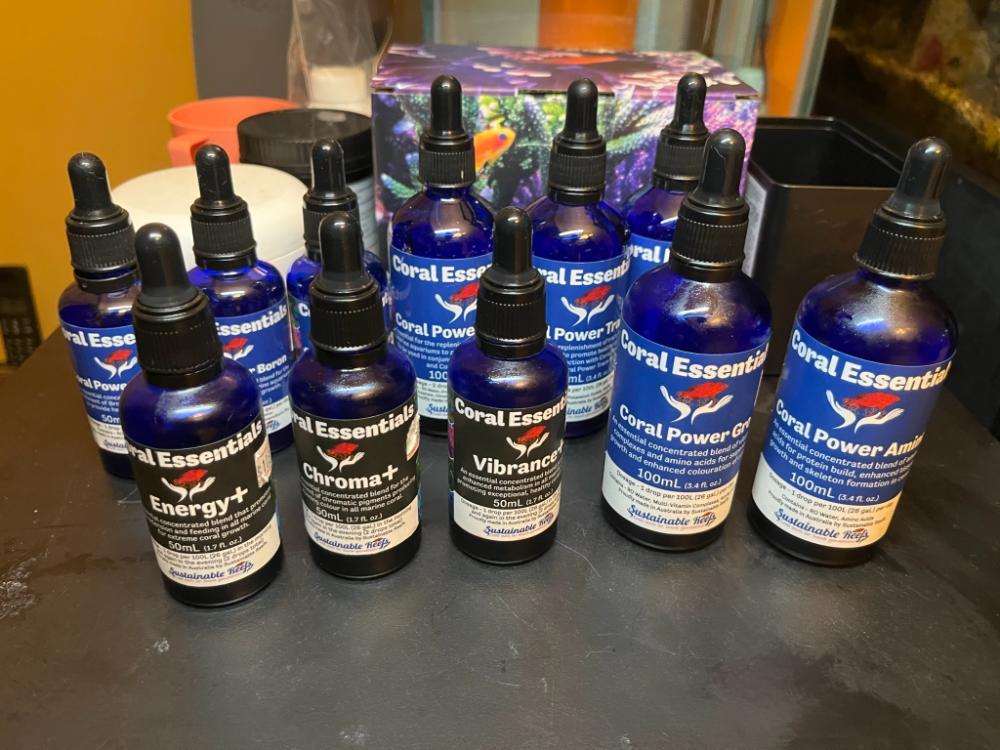
Coral Power Trace A, B, C
Coral Power Potassium, Bromide, Boron
Coral Power Amino
Coral Power Gro
Black Label : Chroma+, Vibrance +, Energy +
https://www.coralessentials.com.au/how-to-start.html
Seems like many bottles but its actually not troublesome at all. Power Trace is 2 drops per 100L while the rest are 1 drop per 100L. I started with about 50% dose initially. Corals were growing quite a bit so I increased to 75% dose after 3 months.
Growth & colors : Generally happy with it. Coral growth has been very good. Tank is too crowded now. Colors on SPS & LPS are quite deep. Some golden branching hammers now look more like yellow branching hammers
. Even the clam is growing at a crazy fast rate.
Price : Most of the items like trace elements, Potassium/Bromide/Bromine, Amino, Gro etc are very reasonably priced. The black label may seem a little pricey but in the past years, i've not seen the golden branching hammers (with me since 2015) turn yellowish before....so the promise of improved coloration & vibrancy look to be true. Reefers who have had chats with me about trace elements always hear me emphasize on dosing additives. Corals are expensive. What we spend on these additives are small compared to the potential losses when they die. For 850L tank volume, these bottles last a very long time. Its been about 6 months & i'm still on the 1st set (of course i've missed a few days of dosing during this time)
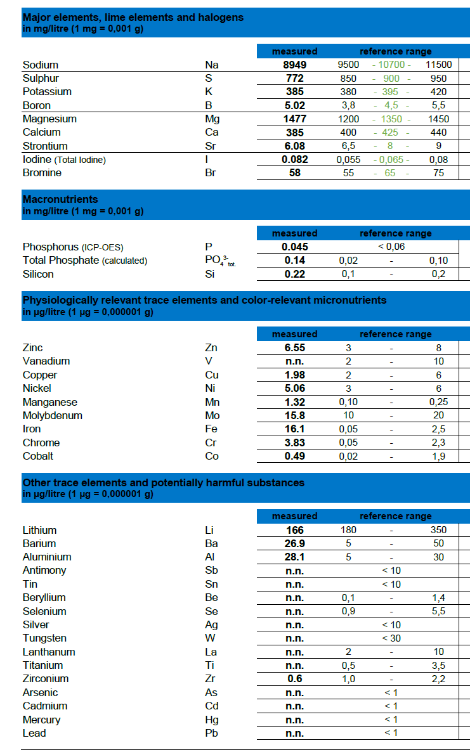
ICP results from May test shows its generally OK. My parameters not perfect but acceptable. Overall, i'm very happy with the balance of key elements provided by the Coral Essential line of additives & salt used (DD H2 Ocean). Some tweaks are needed.
- Elements related Power Trace B is a little on the high side, so perhaps i'll reduce Trace B dose a little to about 50-60% while keeping the rest at 75%.
- Vanadium is not detected. So ideally this be recovered by using single element additives. Coral Essentials has many single element additives but not this particular one. Will look around.
As a calcium reactor user, i've been trying to figure out a solution to dose trace elements when away on extended periods. Linked up with Coral Fanatics who then checked with Coral Essentials - One simple solution is to dilute the trace elements needed for that period with RODI water and just dose the ratio accordingly.
** BTW, as mentioned earlier, these supplements are self paid.
-
Most corals look brownish in whitish light. How does it look in blue light? Most shops display corals with blue light.
Ah Beng Aquarium is a good shop & run by trustworthy folks.
-
Finally got down to swapping out the Apex classic base unit to the 2016 base unit (also known as Apex Base Unit - ABU)
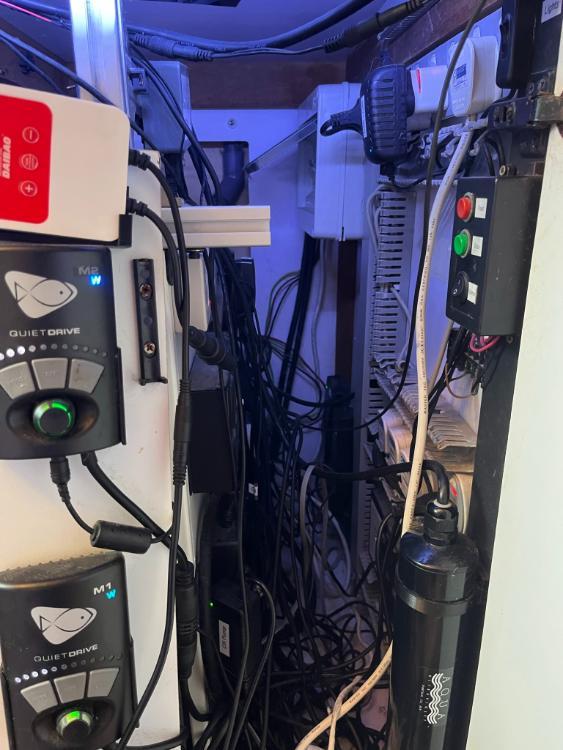
Its not possible to 'import' the programming over so it needs to be manually created. That's not difficult. The most daunting task is actually navigating through the cable mess. On hind sight, i'm actually quite glad to have done the upgrade. The 2016 base unit has better features. And also a very good opporunity to do some cable husbandary & labelling. Its been 6 years.
The basic principal is
- Back up the old programming as reference.
- Remove plugs of essential equipment & plug them into a normal power extension temporarily (eg. return pumps, chiller etc)
- Disconnect the old base unit. Correct up the new base unit
- Add the modules 1 by 1 so you know the module numbers as its added
- Reprogram
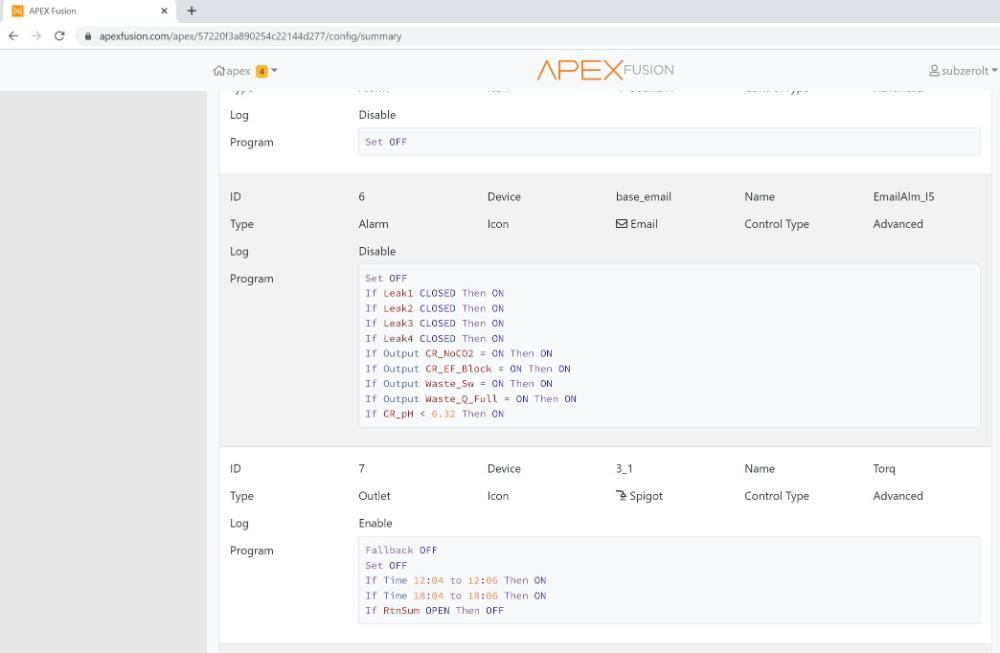
To get a pdf copy of the old programming, go to the top left corner & select "Summary".
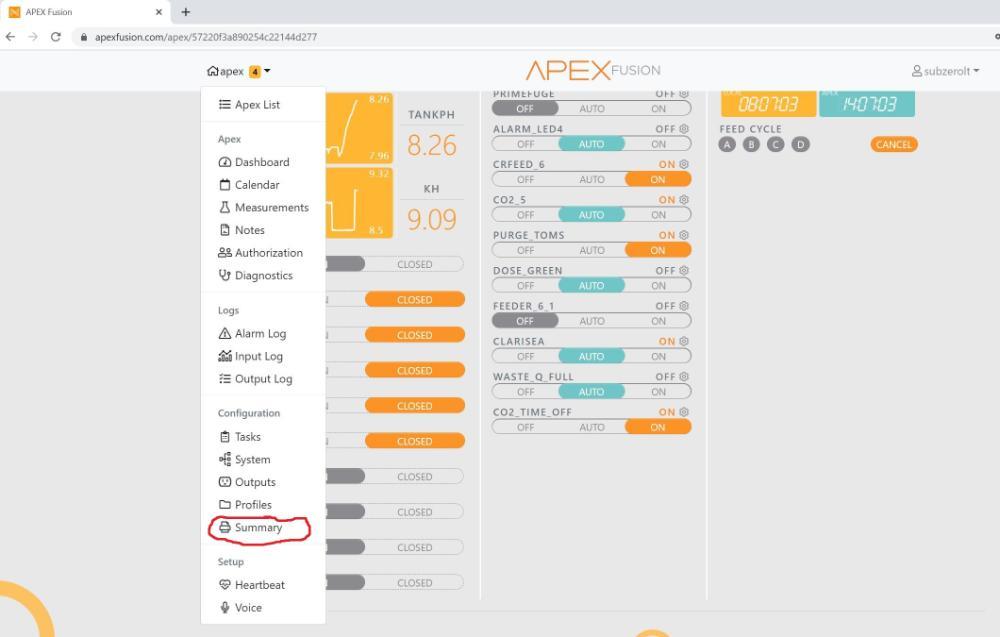
Looks like this :
For the physical changeover, firstly, label the plugs as you unplug them from the original energy bar.
Took out the old base unit. Marked the new holes for screw insertion.

All hooked up
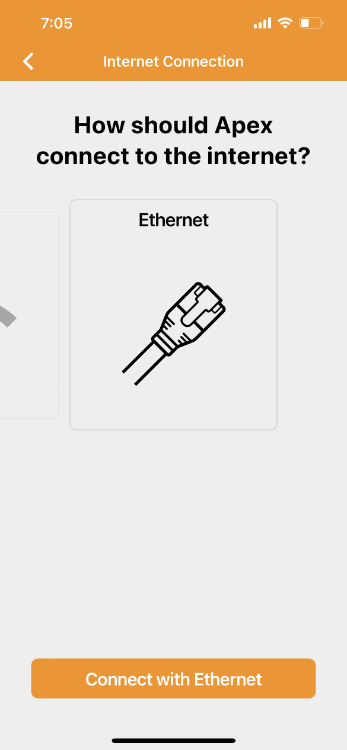
Settting up is so much easier than the previous version. For the new Apex base unit, just startup the Apex Fusion mobile app, then search for a base unit.
For the initial setup, I used an ethernet. A wireless setup works well as well.
Then link to account.

So easy now.
For those who had the old Apex classic, you will undertstand the pain back then.
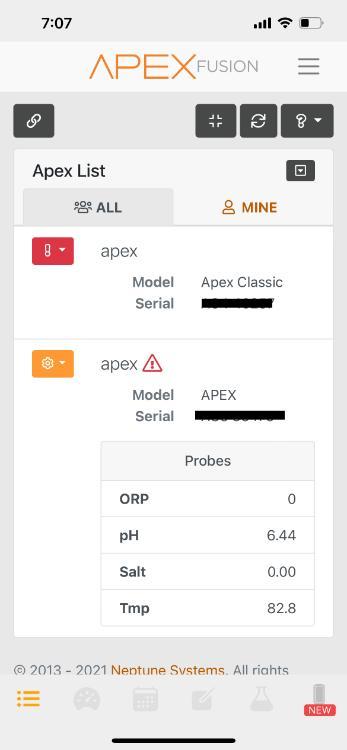
Starting page on the fusion page. Now to start adding back the various modules 1 by 1.
-
Just got back from an overseas work trip. A couple of things were done in prep for the week away.
The tank wil generally be self sufficient (20L ATO enough for a week, auto feeder filled & monitoring done mainly by Apex & Alkatronic).
As the Apex auto feeder has not been used for the past 2 years, it was found to be a bit noisy during operation. Opened it up to take a look at the gears.

As seen from the yellow arrows, the grease had been pushed away. And seems to have dried out a little. There is no grease left on the worm gear drive - the one that pushes out the food container & makes it rotate (refer to red arrow)
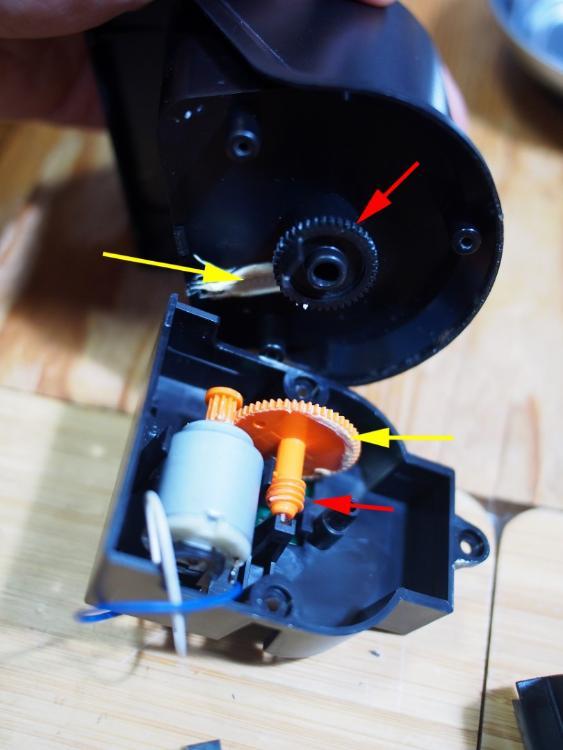
I cleaned out the old grease & applied some new grease.
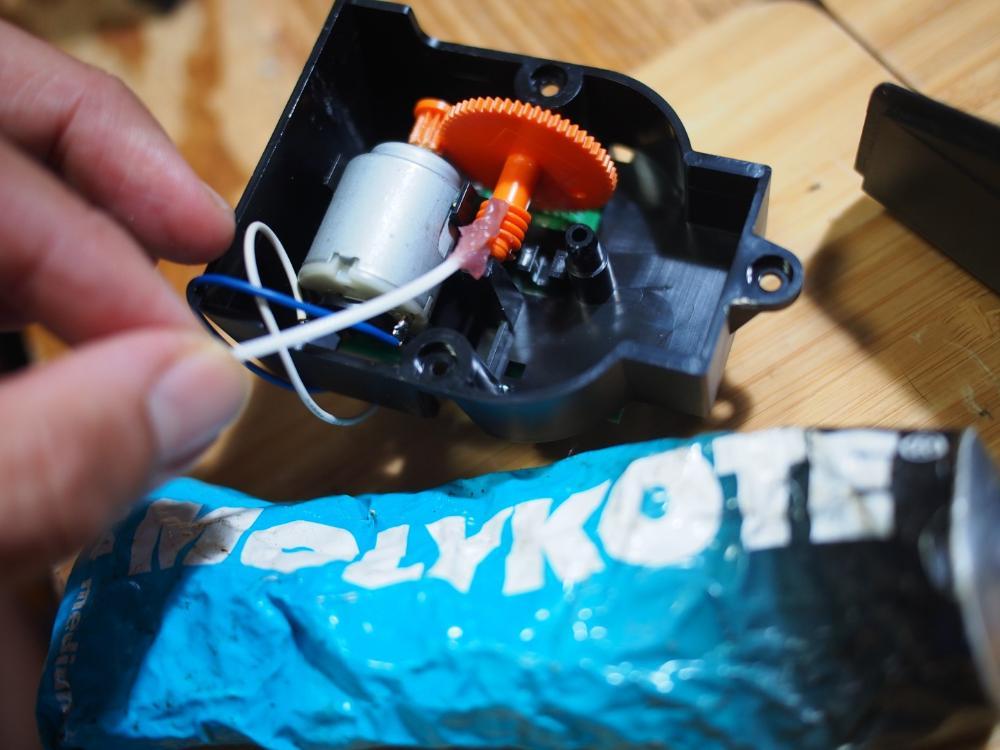
In reality, you don't need to dismantle the entire feeder. You can access the gear from a user removable cover at the bottom of the unit. It drastically reduced the sound (still quite loud) but I have no complaints as this feeder is about 6 yrs old & still going strong. Using it when travelling.

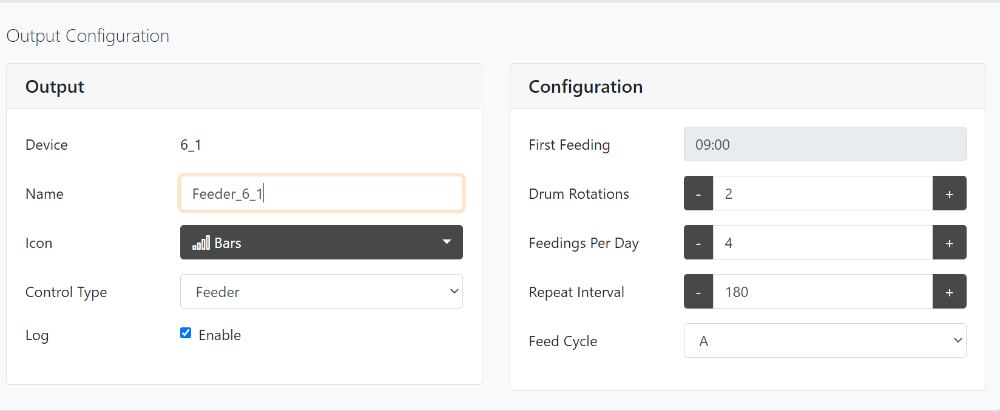
Feeder programming. :
1st feeding at 9am. 2 rotations each time. Then repeat again 3 hours later. Repeat a total of 4 feedings per day.
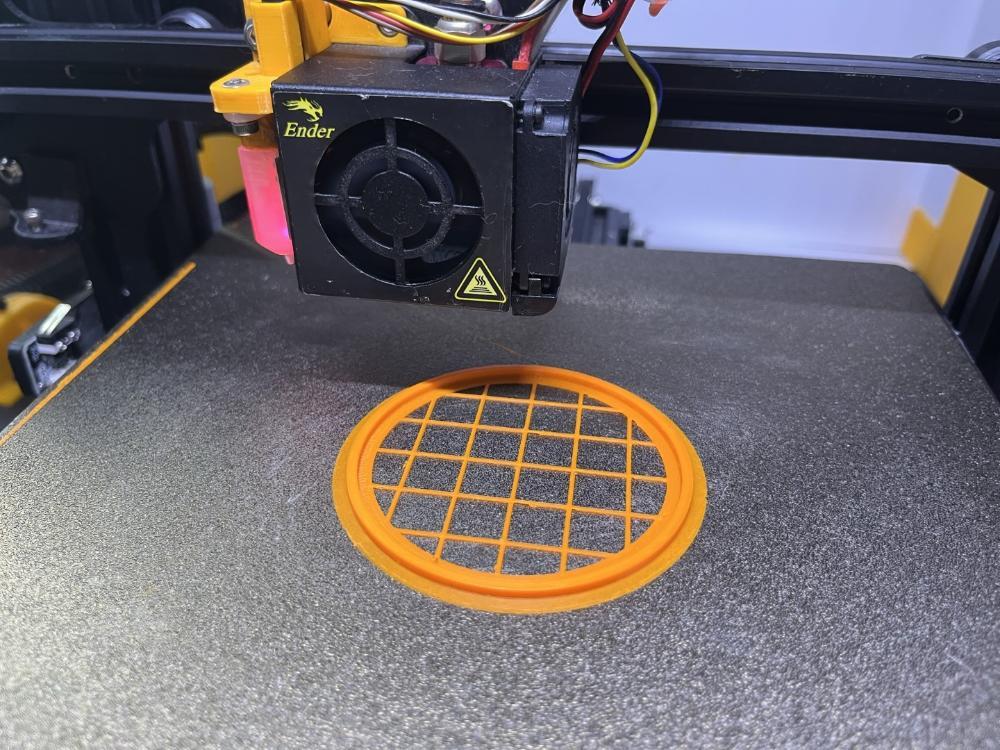
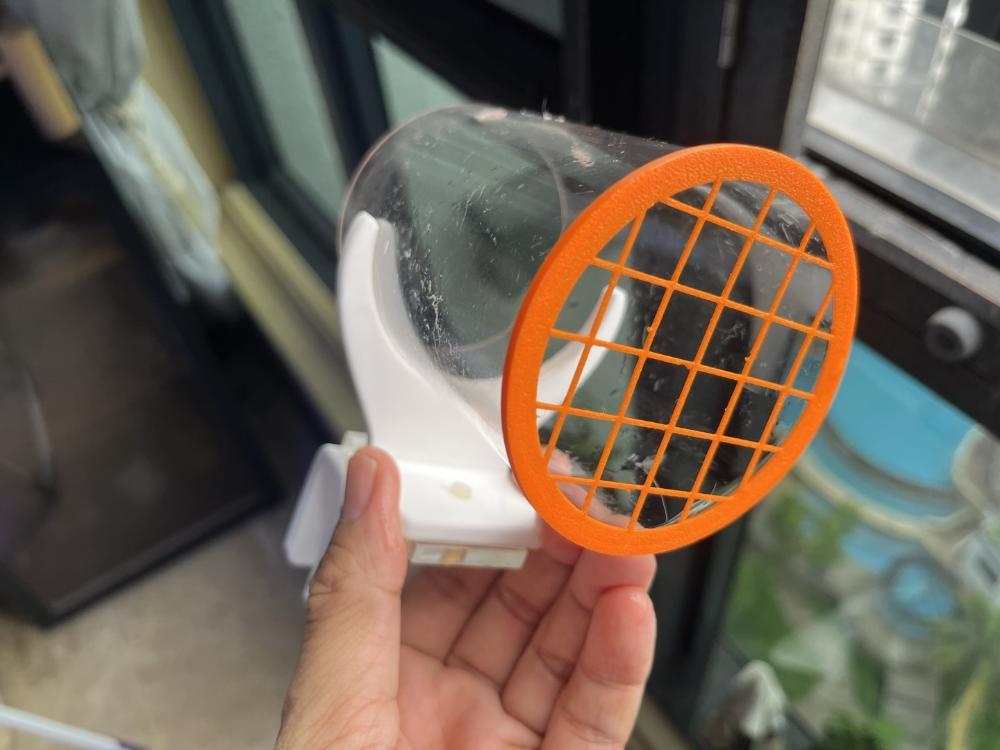
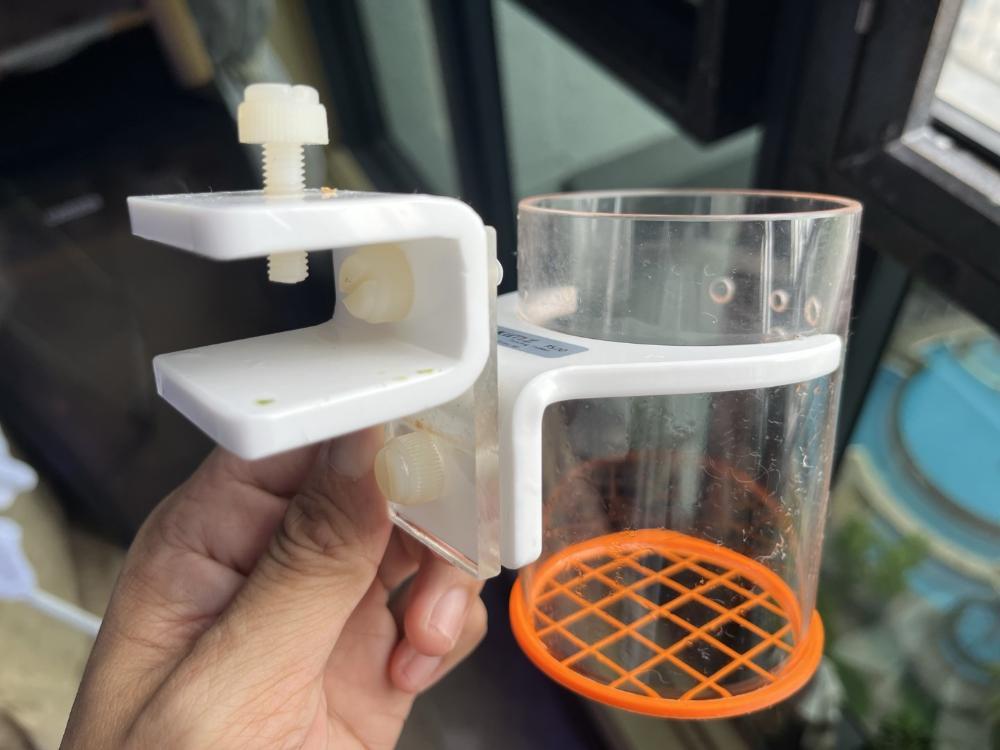
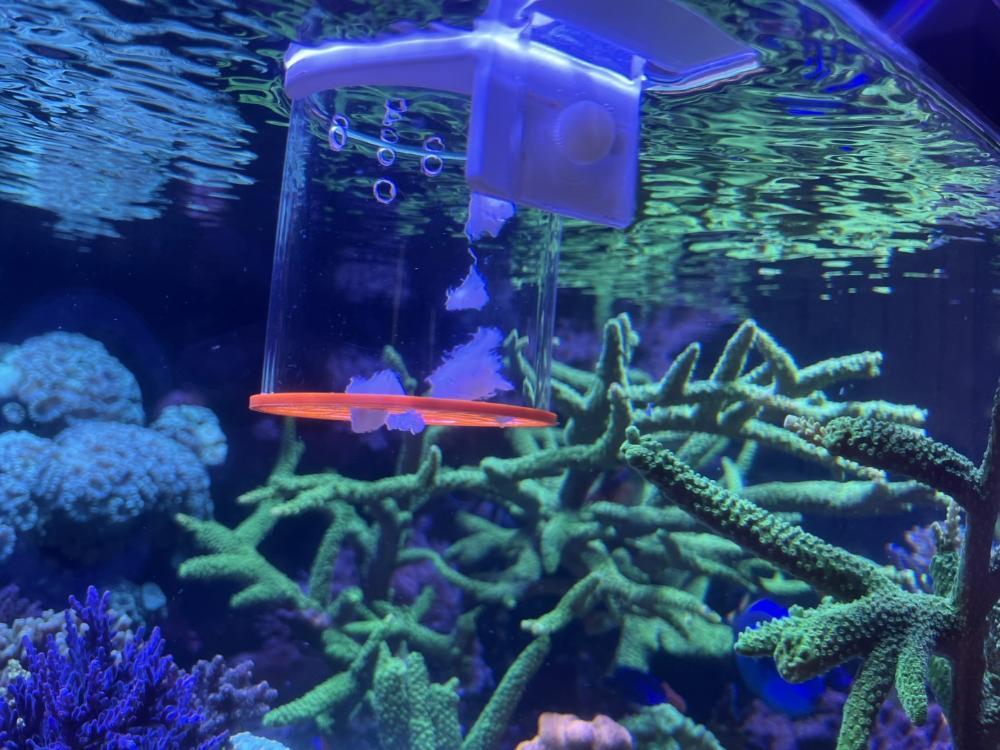
My wife will help with feeding frozen food ocassionally. To prevent the food from dropping down entirely, I modified a Skimz feeder to be able to clamp onto a euro brace. Drilled a couple of holes so that some flow gets into the tube to move the frozen cube of food. And 3D printed a large grill so that bits of food fall out slowly. Some pics :
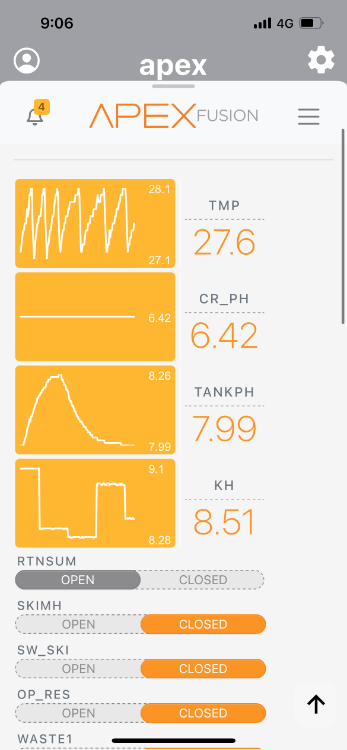
Remote monitoring. Everything ran smoothly during this trip
One thing new from this trip vs my pre-covid travel was the larger Aquatic Exclusiv calcium reactor. The PH remains rock solid stable. Peace of mind.
The plan for the coming week is to complete the migration from Apex Classic to Apex 2016 'brain'.
More on this in the next post.
-
Was looking at some old photos of the original design of the electrical panel..... so neat. Pic taken back around Nov 2016

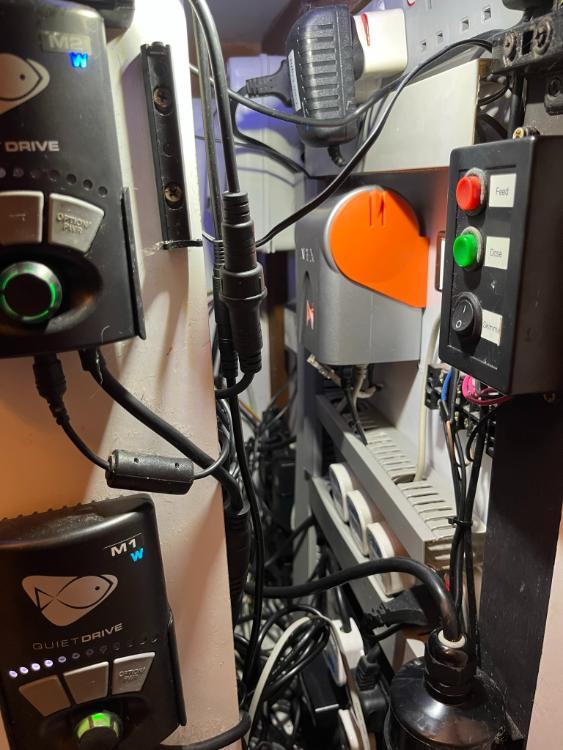
5.5yrs later, it looks like this

.JPG.37d351a2f6d4fb3d6799cf244540caf6.JPG)
Its probably time to change out the Apex Neptune 'Brain' and do massive cable house keeping. Want to incoprate more buttons to the breakout box to trigger some automation, perhaps some flow sensors etc. Still in the brainstorming phase.
A quick tank pic. Pardon the dirty glass (not cleaned for a week)
Also time to print a larger frag disc extension for the chalice.
.jpg.5110daec34ff8a8b8b9e1b18514e05ef.jpg)
-
14 hours ago, Sherilyn91 said:
Latest addition to my fish collection..

Sent from my iPhone using TapatalkVery nice. Got a school of it?
-
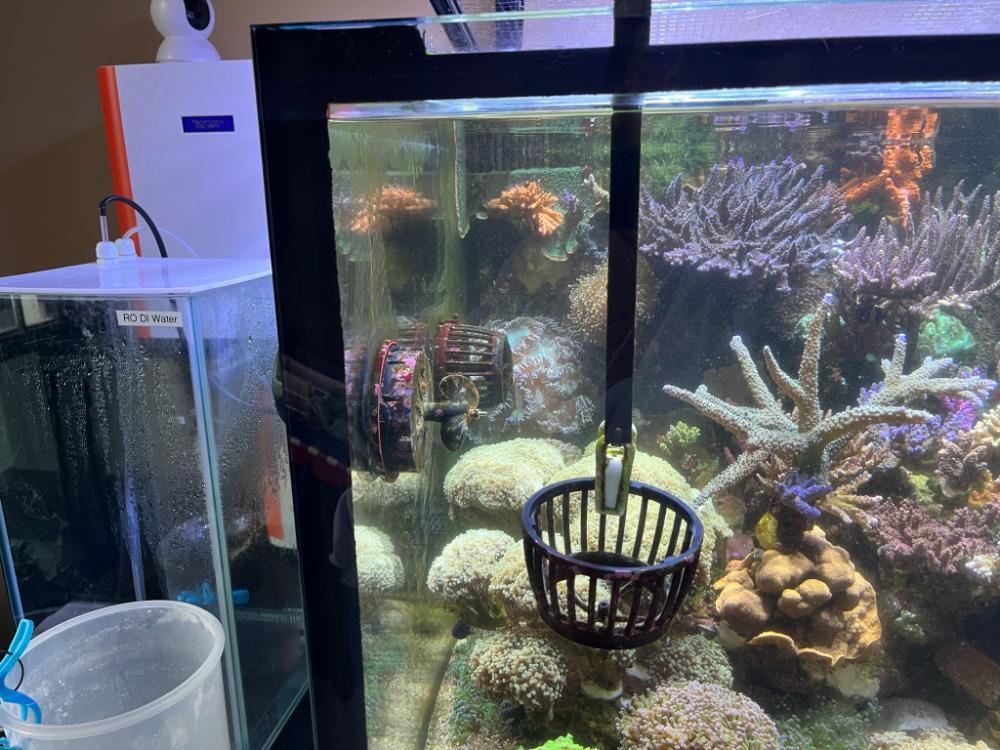
Sometimes I just do this to 'clean' the wavemaker. Power off, remove the cage & clip it onto a seaweed holder.
Then just let the tangs and algae blenny do the cleaning up.
In this pic, you can see loads of algae growing in the wavemaker.
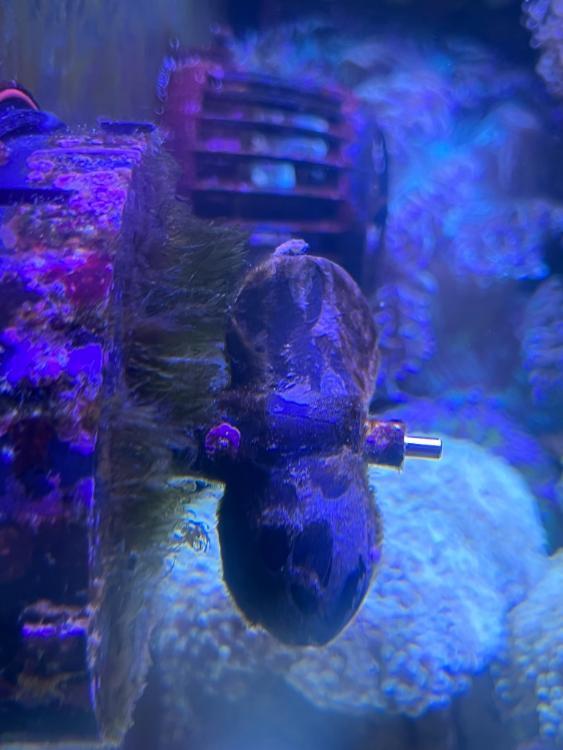
After about an hour, its all cleaned up.
.jpeg.b1cc73c1f2d581f87fea787ab218936d.jpeg)
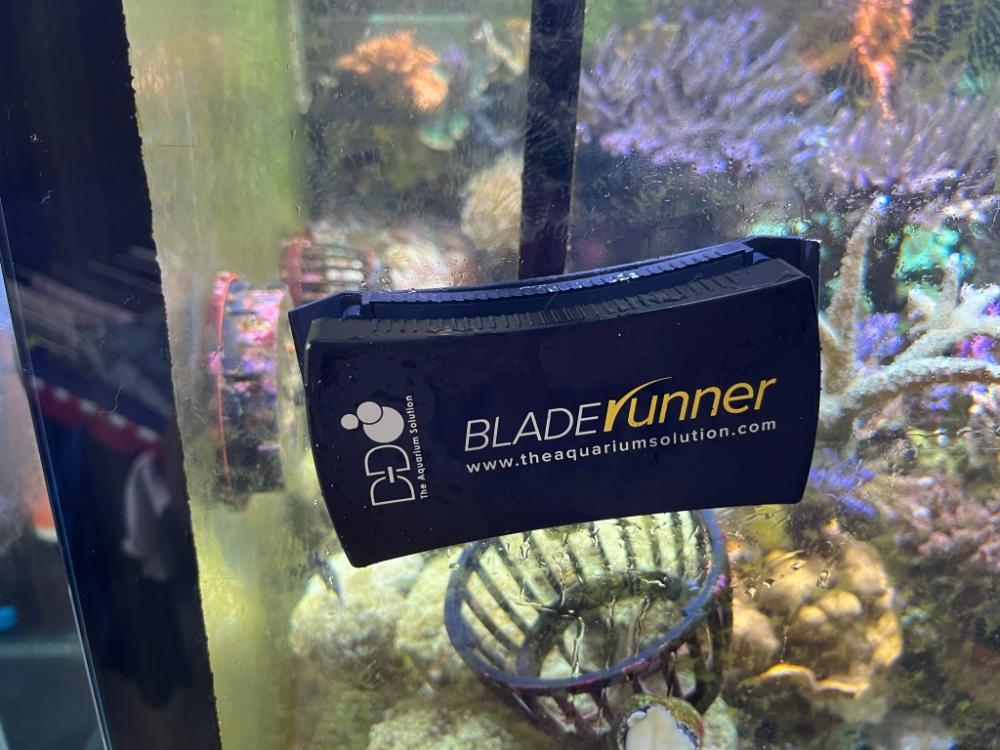
On the topc of cleaning up - I went to reefer's place the other day & used his glass cleaner (not sure of the brand). Magnet not strong & required many many strokes to clean the glass.
Just wanted to appreciate how good this Blade Runner glass cleaner I'm using is. Magnet very strong. Just 1 to 3 strokes to get a week's worth of algae off. Also because it does not have a scrub pad on the inside, there is almost no risk of getting sand trapped (which can scratch the glass). Though It does not float, it is is buoyant (falls down very slowly). In the past year, its never disconnected and fallen to the sandbed before.
-
Gave my sulfur reactor a good clean last week. The pump was making funny noises & the effluent output tended to clog quite often.
This is what the pump looked like inside
I think it was last washed in Jan 2021
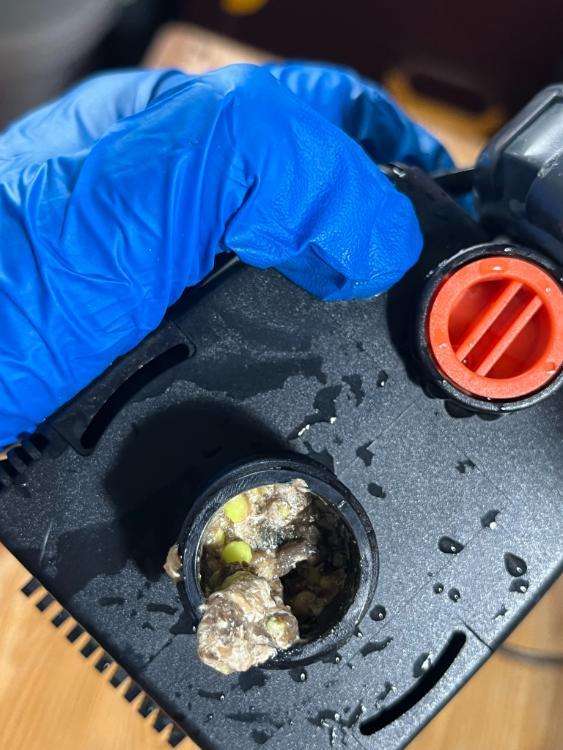
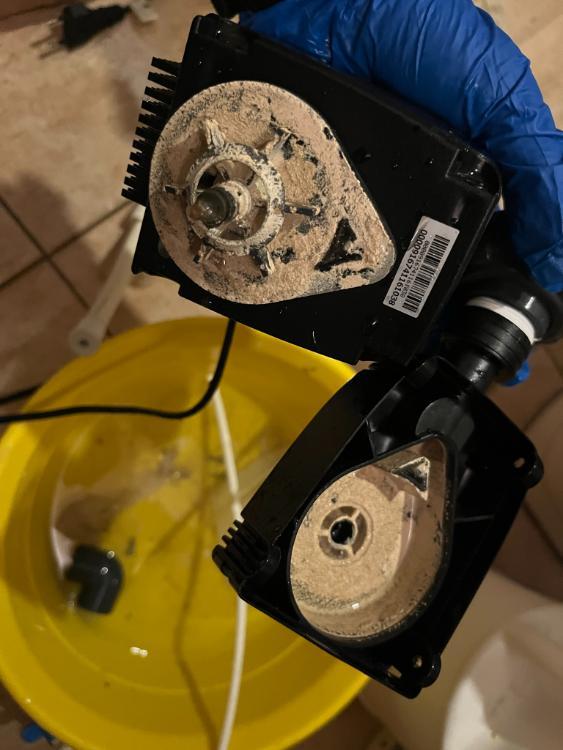
Gave the media a good rinse with old tank water & re-started the cycle again.
Nice & clean again.
Also time to replace the ORP probe.
-
Time to change the fleece on the ClariseaSince 29th December => 3 months 19 days.
.jpg.0b39a99e7ba32a5a29c2788f61a43ea8.jpg) I've received quite a few similar queries- Is the Clarisea Gen 3 good? I'd say better than the earlier versions. I'd say a big improvement over Gen2 (less friction & hence easier to pull the entire roll of fleece). And minor improvement over the Gen 2.5.- How come my fleece can last so long? I raise my Clarisea as high as possible until the outlet pipe is just below the water surface. Raise with either the provided holder, or just simply rest it on a raised basket (this is what i'm doing). The higher pressure will push the water out more efficiently & reduce the frequency of triggering the float switch. Also, I open by bypass valve about 30% as I don't want to over filter the water.Here are some picsUsing a ceramic knife (from Daiso) to cut the fleece.
I've received quite a few similar queries- Is the Clarisea Gen 3 good? I'd say better than the earlier versions. I'd say a big improvement over Gen2 (less friction & hence easier to pull the entire roll of fleece). And minor improvement over the Gen 2.5.- How come my fleece can last so long? I raise my Clarisea as high as possible until the outlet pipe is just below the water surface. Raise with either the provided holder, or just simply rest it on a raised basket (this is what i'm doing). The higher pressure will push the water out more efficiently & reduce the frequency of triggering the float switch. Also, I open by bypass valve about 30% as I don't want to over filter the water.Here are some picsUsing a ceramic knife (from Daiso) to cut the fleece..jpeg.e132e57be74f5feea4f78335a68ffc80.jpeg) To detach the motor side
To detach the motor side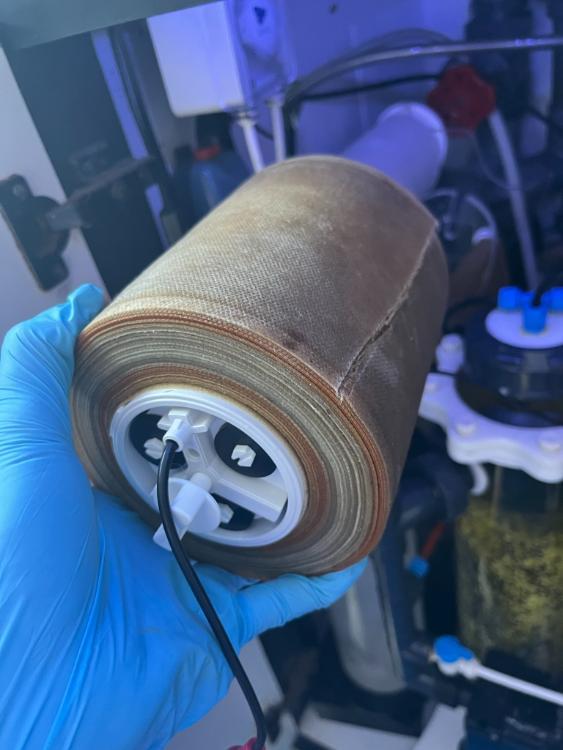 Using the provided tool, push down hard
.JPG.86d775be8b19897bb45cfeaf71ada839.JPG) Used roll detached. Easy
Used roll detached. Easy
.jpg.58710efb43901740e407121ce515d9b8.jpg) A good time to remove the float switch for a scrub.
A good time to remove the float switch for a scrub..jpg.a115687277503e60e79089cfafaa8401.jpg) If you ever remove the C clip (not necessary though), do note that there is a correct orientation for the float. The side with the "+" sign faces the C clip.
If you ever remove the C clip (not necessary though), do note that there is a correct orientation for the float. The side with the "+" sign faces the C clip..jpeg.f3809f0459d00252af1992a6276c51f2.jpeg) Cut a notch to re-attach the fleece to the motor side
Cut a notch to re-attach the fleece to the motor side.jpg.ff1b19533cfa65423ed0712084c2657d.jpg) Then attach the new roll using stapler. Even though the stapler method isn't a very elegant solution, but for most users like us that do not have much sump space, its a very feasible & practical method to do a roll change.
Then attach the new roll using stapler. Even though the stapler method isn't a very elegant solution, but for most users like us that do not have much sump space, its a very feasible & practical method to do a roll change..jpeg.c203119a43cd53ceef393dc03f70ef00.jpeg) A good time to turn off the skimmer as it'll tend to overflow a while when a lot of new fleece material contacts the water.
A good time to turn off the skimmer as it'll tend to overflow a while when a lot of new fleece material contacts the water..jpg.2aa018db69d43948b0cbb29dab2ea1a2.jpg) Then advance the fleece till the staplers are just above the water level. Don't want it rusting withn the next hours if its under water.
Then advance the fleece till the staplers are just above the water level. Don't want it rusting withn the next hours if its under water..jpeg.78abac20dc011350a86e426790a79fb4.jpeg)
-
Did some housekeeping with 3D printed parts.
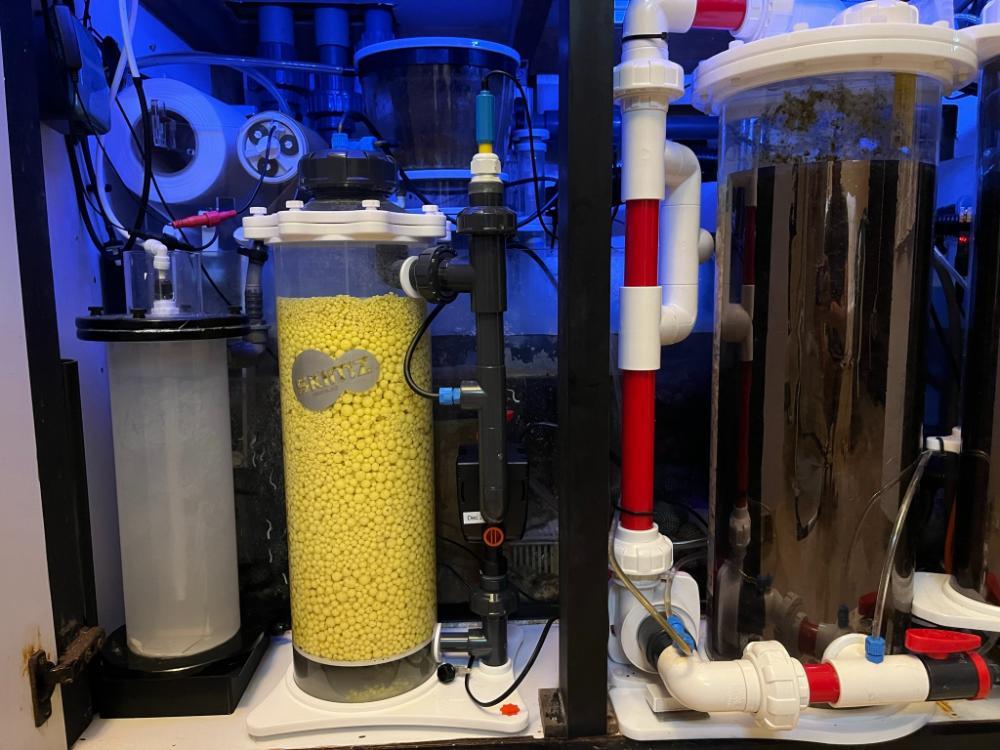
Using this old RODI canister to hold aragonite media for the sulfur reactor effluent.
.jpg.cced8da17f1931a1d9d3a12f6e6ecc9d.jpg)
Secured onto a partition/panel of the sump

A couple of hose clips for the air inlet/outlet of the skimmer.
.jpeg.f8119862045b4352115d60cf7fadef07.jpeg)
I've run out of CO2 absorbtion media (for the recirculating CO2 reactor), so fresh air to the skimmer is still taken from outside the sump. Attaching it here neatly to the table near the window.
.jpg.25e350c22f8749a9ff4c26fb37510f7e.jpg)
The air outlet of the skimmer vents outside the sump as well.
.jpg.32c2409147ea3de7f9c60202699449cb.jpg)
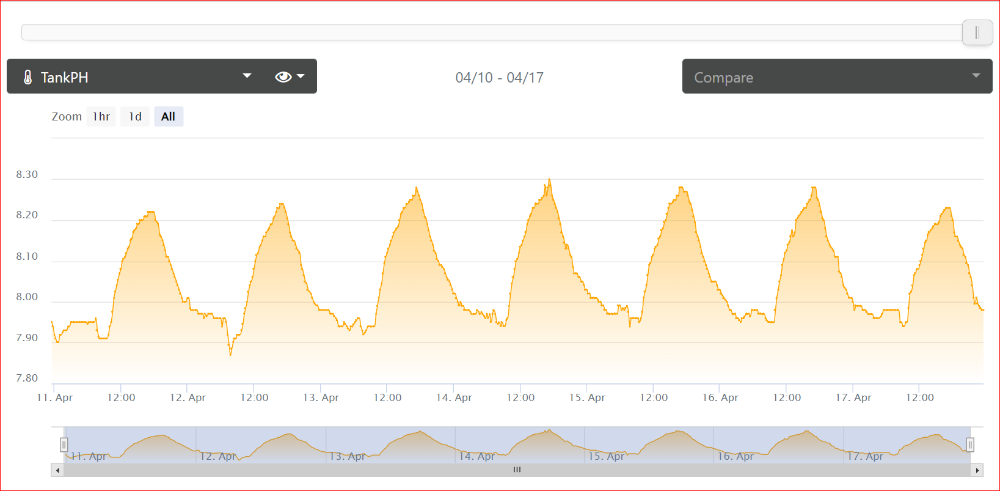
Current tank pH chart (without CO2 reactor)
-
Someone messaged me about what I feed my corals (especially SPS) and concerns about getting the water dirty. In general I feed Reef Roids on alternate days. Usually in the early morning ~ 6.30am when the coral feeding tentacles are still out. I feed my fish with frozen fish/prawn meat in before leaving for work & again at night. The corals will probably get capture some bits of food there too.
.jpeg.7c46b6bb797e0e57fb122f8da9f38cc3.jpeg)
Filter feeders in the tank enjoying the food as well :
.jpg.3c3e1594953d5e194cbcbb5e7db1dfcc.jpg)
My tank cabinet is a 2nd hand one made of chengal wood. Probably around 11 years by now. The painted surface is quite faded & stained.
.jpeg.5fcad0a7867d7a5f2d8a460b864d9705.jpeg)
It wasn't serious enough to warrant to repaint the cabinet so I got this Old English Oil. Did a good job. Not oily when dry.
.jpeg.0078ca2d3e35116b7f4d9b85620ec998.jpeg)
Looks presentable again
.jpeg.cba8022833495b900286272896e68f6a.jpeg)
-
In the past week, i've had issues with a large group of corals detach from a main rock. And it became quite impossible to stick that huge structure back with only super glue. It just got too heavy over time as the coral grow. Or even if super glue works its not reliabile long term. Can detach easily with just a light knock.
Best solution is to tag it with superglue. Then use epoxy at strategic spots.
I used both grey colored epoxy (left over from long time ago). See white arrows in pic below
.jpg.e26defcdc8cdd1154a2e35a61afc8d96.jpg)
I also got a new box of the purple epoxy to secure other rocks/corals. (see purple arrow above). I was't too worried if it looks ugly. In a months time, a light film of algae/coralline will grow over it and it'll just blend in with the other rocks.
.jpg.9aec9a32aa466d49f24f1f091531f375.jpg)
The grey expoxy after mixing.
Press it into the small crevices or wrap around rocks. Once it hardens, it provides a very rigid structure.

Cutting a small piece of the purple one
.jpg.609d12e8a86b61a9114f184373cccfb4.jpg)
.jpg.458100de323fdd04ab062e2cf213782b.jpg)
Mixed
.jpg.e8eeca8842b16499739796643de52b72.jpg)
-
You can facebook message Reef Depot Asia with your request.
-
31 minutes ago, danano said:
Here's another top view. Love how the tables are growing out. Looks like I'll need to rescape soon....
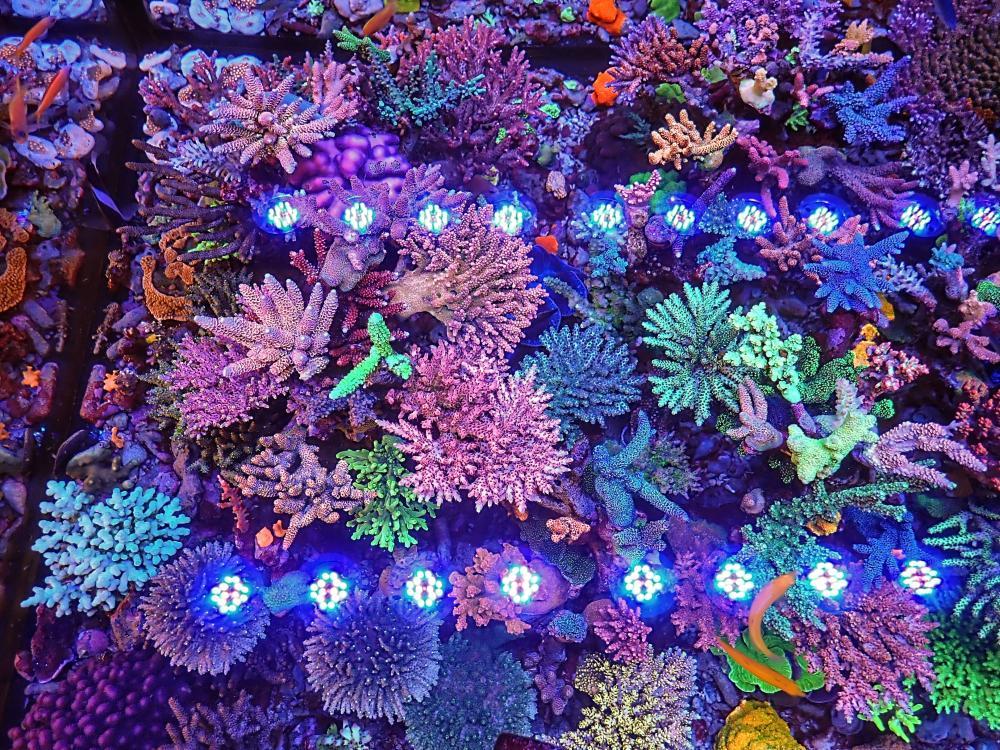
Lovely
Really maximize use of real estate. Not one bit of available light wasted. Can't see the sand bed.
-
 1
1
-
-
Clarisea Gen3 update :
Started using ~ 29th December. This pic taken on 20th March 22.
Its been 2 months 20 days. Winding well. Should probably be able to get about 3 more weeks before the end of roll.
.jpg.a9833b8eae5941913911121b44cb072a.jpg)
-
Clearing some of the Bali Slimer to clear space for other corals.
.jpg.50a65ccc88fc31fe5091fb8cb8fc0eff.jpg)
Knocked off a few corals when taking this out.
.jpg.83d86159d09658ba5c8925cea6e1c067.jpg)
Wasn't easy to cut with bone cutter.
.jpg.2e186b018f1389763a84d0a23c49763e.jpg)
Easier to use the dremel
.jpg.4a77c0e7891b88bbdfaa4c281c2082a9.jpg)
Water change pics :
.jpg.d89a3a1a04b30d072e61085e0e35c2cc.jpg)
.jpg.3ddc36c58006d974dc53f9a3de819e78.jpg)
Overgrown candy cane
.jpg.916b5453658d4a1582eedc66165cc887.jpg)
Blue Dragon
.jpg.f8d48801cd7d922585936f8af5b99882.jpg)
Royal Blue Milli in whitish light
.jpg.0549e29fefdeb9f8a914d6f5f840991d.jpg)
Acropora horrida
.jpg.0efb9806955f0bbefe16f04e6bcfb28b.jpg)
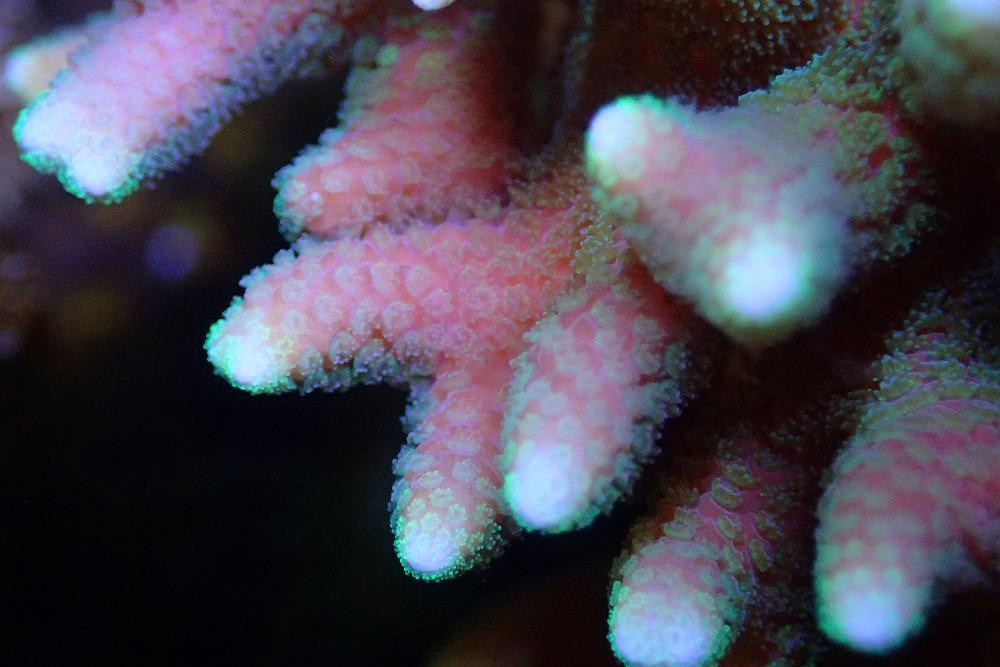
One of my fav coral is the Tonga pink birdnest.
-
Lovely. Any close up tops down pic of your fav few SPS?
-
Some pics from today with yellow filter.
Nauti spiral montipora :
.jpg.75dce8c169c899aacd68178767b791fd.jpg)
Not sure of the ID of this favia
.jpg.4ac97adcad01ad713cb8a02a46c0534c.jpg)
Frag previously from Alex (Thanks!)
.jpg.b37a6efa86499122d1dbfb53473ab8d6.jpg)
Space invader pectinia
.jpg.202c5eefca7619cecdd9f4e20c3153f2.jpg)
-
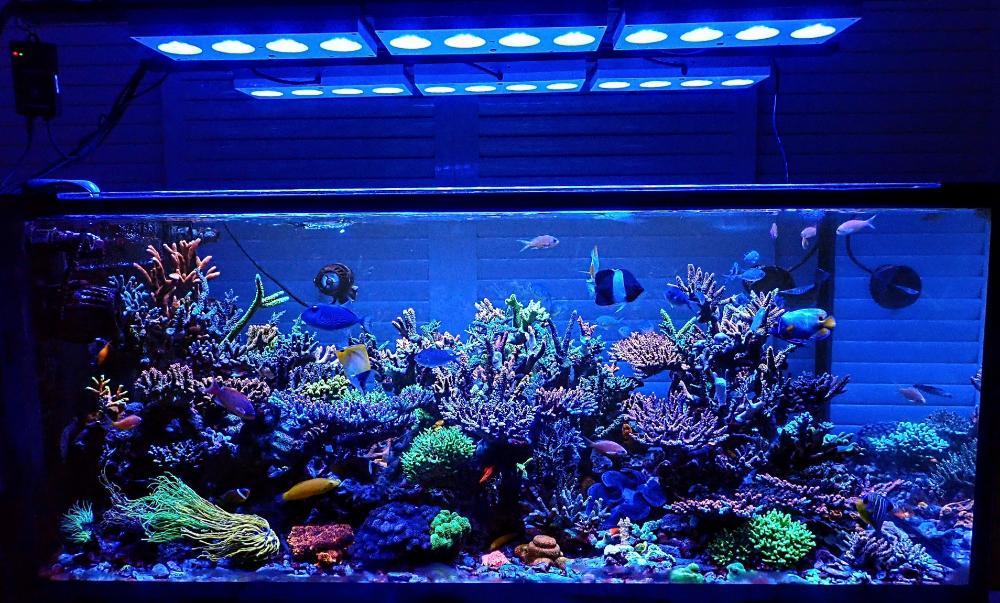
Wow!! With that many lights, you can grow anything.
Nice choice of fish too!
37 minutes ago, danano said:FTS at 17 months. As the corals grow, it's a continuous cycle.... reef, rescape, repeat. A modular reefscape with standalone mounds serves the purpose well.

My Slice of Nature (Part 3)
in Members Tank & Specs
Posted
I'm still running the Alkatronic & plan to continue using it. Still find it very practical & economical to run, especially as a calcium reactor user. Its been running reliably since Feb 2018 with just one tube change so far. Mechanism is proven to be reliable and software is pretty good nowadays.
The mastertronic is covenient and replaces manual measurent using standard test kits. In particular, I find the Phosphate measurement capability good (170 tests with Red Sea test kit). One challenge with the Mastronic the past year is the avaliability of some reagents locally (eg. Phosphate & Magnesium)
I don't have a Dosetronic which executes a balanced dosing based on Alkalinity readings from the Alkatronic (not mastertronic)
Personally I'm testing the Trident to have more integration with the Apex ecosystem. What I have in mind is to integrate with the DOS pumps for dosing. And be able to set a target value & automatically dose. I may be travelling for work in the coming months & want to have a backup dosing system in case the calcium reactor has problems (bad experience in the past of effluent clogging or run out of CO2 when I'm out of the country).
While there are a few other automated tester brands to consider nowadays, another factor I considered is having prompt & strong local technical support from Reef Depot during or even beyond warranty period.