blackpuma
-
Posts
195 -
Joined
-
Last visited
Content Type
Profiles
Forums
Gallery
Everything posted by blackpuma
-
Hi The surface of my grade 0 sand bed is hardening. The surface is compacting into a hard layer. The tank is new. I have only put in saltwater and sand and the pump was left running for already a week. The are no fishes and rocks yet, just and and water..... Thanks
-
Pm'ed you
-
Pm'ed already please call me
-
Pm'ed you on LR
-
WTB Live Rock - For new tank setup
blackpuma replied to blackpuma's topic in Sell off/Pasar Malam Shop
SMS you already -
Any LR for sale ? Kindly PM me. Will consider reasonable offer for good quality rocks Thanks
-
Let me noe if you need help.
-
About $30.00 all in. But also alot of time
-
Leftover Liverocks for Cheap Sale!!!
blackpuma replied to seamonkee's topic in Sell off/Pasar Malam Shop
How about $112. collection today afternoon/tonight Thanks -
In fact it is not really hard, I use my dremel to cut it. I can cut some for you if you need it.
-
1" durso. you have to cut the 90 deg elbow to squeze the durso assembly inside the limited space.
-
Another view of the external boxz......

-
Maybe you can share with me how you expel the air from your 1.25" U tube. Do you use a lenght of tubing to suck the air out and start the siphon ? I have tried using 1" pipe but the siphon just won't start.
-
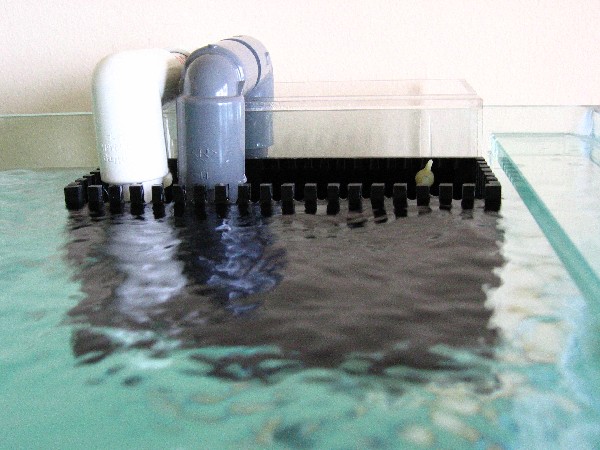
Tested the box today, so far so good. Here are some points in constructing the inner and outer box. 1. Inside box teeth is cut with a Dremel tool. I do not have a router to cut the teeth but paln to buy one when I save enough. 2. All joints are capilarry cemented. Since it's my first time working with acrylic, I started with the inside box first. The inside box do not have to be water tight. With experience gained from making the inside box, I progressed to make the outside box which was reletively water tight. 3 Drain bulkhead is 1" and 3/4" for the siphon tubes. Do not use 1" siphon tubes. I found out the hard way, it is not possible to expel air from a 1" siphon pipe. I ended using two 3/4" siphon pipe for increased flow. 4. All acrylic 5 mm thick from Dama. Hope this helps for those attemting a similar project.
-
Thanks for all the encouragement. Will post complete setup and construction details when the plumbing to the tank is done. Estimated completion, next weekend
-
My DIY'ed overflow box. Leak testing now, the cup is to collect the water dripping from the bulkhead. I did not glue the durso assembly yet , that is why it is leaking. The box is tested leak free. Also neet help to remove some spots on the acrylic caused by accendental spillage of acrylic glue. So far tried brasso but the results are no very good.

-
thankz rock fish for sharing, I will also try to play cheat.
-
Hi Rockfish, Care to share how you glue the acrylic together and make it water tight. Are you using water thin acrylic glue or the thicker ones. I am building a overflow box but encountered a lot of leaks. Any help appreciated. Thanks
-
hi anyone knows how much a M4 nylon wingnut costs ? Thanks.
-
DIY Shoik mah, the guy at DAMA do not want to do it because he is afraid it might leak. Anyway, I wantz to try DIY, so hope can build skimmer next time.
-
Thanks for your generous offer, I pm you if I need the trunking.
-
Hi All, Got my acrylic sawed to size at DAMA today. Any brothers here got advice how to make water tight joints ? I read alot about capillary cementing on the web but is there any points I should look for to ensure the joint is water tight. thanks PS this is the first time I am working with acrylic
-
Acrylic my friend
-
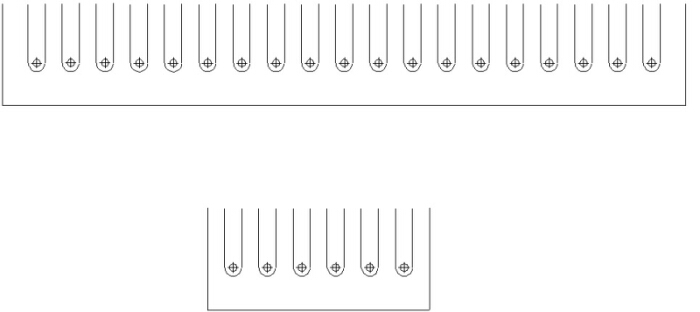
Hi All, I want to cut some teeth on my home made overflow box. I intend to use a templete, see attached image. Basically, the bottom part of the teeth will be drilled but what is the best way to remove the material in between the slot. Any help appreciated. Thanks,
-
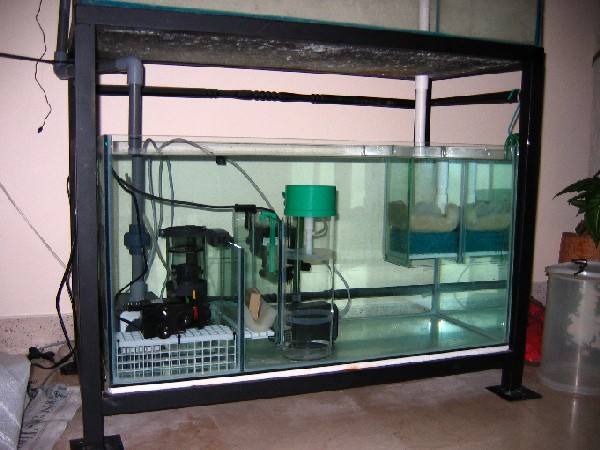
Hi Bros, I currently have a 36(W)16(L)x16(H) and is planning to upgrade to a 36(W)x18(L)x22(H). The 36x16x16 with water is calculated to be 155kg wheras the 36x18x22 is 240 kg, both figures without rocks and sand included. I estimated that it will be about 50% more heavier including sand and LR. Can my existing stainless steel take the weight? This stand was given to me by a friend and it is stainless steel, ideal for the corrosive nature of SW. I have included a picture shown with the sump at the bottom of the tank. The square sections of the stand is 30mm. The sump will be half filled during normal operation and not what you see in the picture, filled almost to the brim. Any help appreciated.