


bezz
-
Posts
422 -
Joined
-
Last visited
-
Days Won
6
Content Type
Profiles
Forums
Gallery
Everything posted by bezz
-
-
-
My personal experience when running LED lights and low nutrients (PO4 & NO3 = 0) if KH > 9, SPS colours start to pale out. This is probably due to the strong intensity of the light and not enough nutrients for the SPS. The details are better explain in the Red Sea Reef Care video series found below. Ignore the advertisement for the Red Sea products, listen to the facts about reef maintenance. I think Red Sea is a good reference as they seem to have done their homework thru scientific research. Anyway, I hope the videos are as educational for you as they are for me
-
the adaptors are constant voltage. Led needs constant current like Sunny mentioned. you can drive them with the adaptor, but they will blow out very fast.
-
I forgot to add that I use the codes from other programs and customize it to my needs, so I did not change alot of the // explanations.
-
I bought my arduinos from ebay. slightly cheaper. can your LED driver dim with a 5v PWM signal? if you are using meanwell, you'll need a 10v signal which is a pain to hook up to ardiuno as you'll need to create a separate circuit. I can't help you here as I bought drivers that specially use 5v pwm dimming. Also, if your drivers don't dim to 100%, sunrise/sunset will not look too nice. you can also buy a ready made ardiuno controller, it is based on a design by a guy on reefcentral. http://www.boostled.com/product_p/typhon.htm
-
I've only work with Uno & its predecessors but both mega & uno function the same. Mega has more ports which also makes it slightly more complex to work with. Most examples you find on the web is based on Uno, so Uno may be a better start since you can play around with other people's program to customise to your needs. hope this helps
-
WEEKLY SHIPMENT UPDATES - 17 DEC to 23 DEC 2012
bezz replied to BH2O's topic in Weekly LFS Stocks Report / LFS Info Centre
any idea what the damage is like? thanks -
any DC water pump can create a wave with the right 1s or 2s cycle. of course to get a better wave, I'll need to contruct a wavebox to house the pump. In short, a DC pump (more than 600l/h) bought from ebay work for me.
-
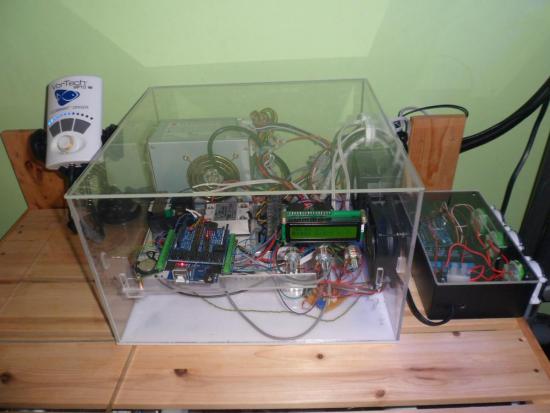
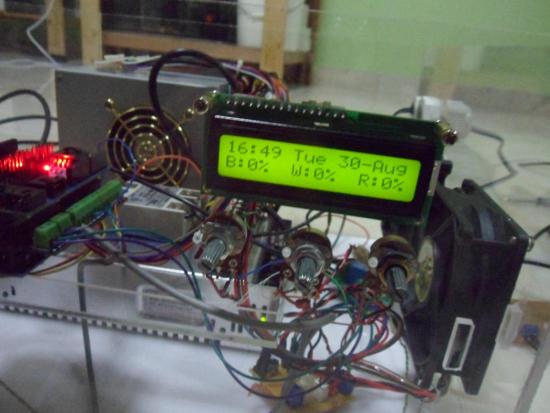
My buggy reef controller codes. I have taken this down for the time being as there are some bugs with the program and I am too busy to troubleshoot. It controls the LED drivers for sunset/sunrise, LED intensity controlled using the 3 potentiometers, temp probe, relays for wavemakers and other equipment. /* Arduino LED controller for reef aquariums */ // Pins to control int blueLed = 9; // LED PWM channel for blues int whiteLed = 10; // LED PWM channel for whites int redLed = 6; // Led PWM channel for reds int fanPin = 7; // Relay connected to digital pin 13 // int WavePin = 13; // Wave maker Relay connected to digital pin 7 int SumpPin = 8; // Sump light Relay connected to digital pin 8 int analogInPin = A0; // Analog input pin that the potentiometer is attached to int analogInPin1 = A3; // Analog input pin that the potentiometer is attached to int analogInPin2 = A2; // Analog input pin that the potentiometer is attached to int sensorValue = 0; // value read from the pot int outputValue = 255; // value output to the PWM (analog out) int sensorValue1 = 0; // value read from the pot int outputValue1 = 255; // value output to the PWM (analog out) int sensorValue2 = 0; // value read from the pot int outputValue2 = 255; // value output to the PWM (analog out) int blueout = 0; int whiteout = 0; int redout = 0; int blue = 0; int white = 0; int red = 0; int relay = 0; // Set up #include <WProgram.h> #include <Wire.h> #include <DS1307.h> #include <LiquidCrystal.h> #include <OneWire.h> #include <TimedAction.h> // #include <DallasTemperature.h> TimedAction timedAction = TimedAction(1500, blink); //this initializes a TimedAction class that will change the state of an LED every second. #define WavePin 13 boolean WaveState = false; #define DS1307_I2C_ADDRESS 0x68 // Temperature **************************************************** #define ONE_WIRE_BUS 7 // Data wire is plugged into port 7 on the Arduino // #define TEMPERATURE_PRECISION 9 OneWire oneWire(ONE_WIRE_BUS); // DallasTemperature sensors(&oneWire); // DeviceAddress insideThermometer, outsideThermometer; // RTC variables byte second, rtcMins, oldMins, rtcHrs, oldHrs, dayOfWeek, dayOfMonth, month, year; // Other variables. These control the behavior of lighting. Change these to customize behavoir int minCounter = 0; // counter that resets at midnight. Don't change this. int blueStartMins = 720; // minute to start blues. Change this to the number of minutes past midnight you want the blues to start. int whiteStartMins = 740; // minute to start whites. Same as above. int redStartMins = 750; // minute to start red. int bluePhotoPeriod = 660; // photoperiod in minutes, blues. Change this to alter the total photoperiod for blues. int whitePhotoPeriod = 580; // photoperiod in minutes, whites. Same as above. int redPhotoPeriod = 400; int fadeDuration = 40; // duration of the fade on and off for sunrise and sunset. Change this to alter how long the fade lasts. //int blueMax = outputValue; // max intensity for blues. Change if you want to limit max intensity. //int whiteMax = outputValue1; // max intensity for whites. Same as above. int fanontime =700; // minute to start fan int fanperiod = 700; // duration of fan on time int Sumpontime = 800; // minute to start fan int Sumpperiod = 240; // duration of fan on time int rtc[7]; // LCD interface pins LiquidCrystal lcd(12, 11, 5, 4, 3, 2); /****** LED Functions ******/ /***************************/ //function to set LED brightness according to time of day //function has three equal phases - ramp up, hold, and ramp down byte setLed(int mins, // current time in minutes byte ledPin, // pin for this channel of LEDs int start, // start time for this channel of LEDs int period, // photoperiod for this channel of LEDs int fade, // fade duration for this channel of LEDs byte ledMax // max value for this channel ) { byte ledVal = 0; if (mins <= start || mins > start + period) { //this is when the LEDs are off, thus ledVal is 0; ledVal = 0; } if (mins > start && mins <= start + fade) { //this is sunrise ledVal = map(mins - start, 0, fade, 0, ledMax); } if (mins > start + fade && mins <= start + period - fade) { //this is when the lights are on max (between sunrise and sunset) ledVal = ledMax; } if (mins > start + period - fade && mins <= start + period) { //this is the sunset. ledVal = map(mins - start - period + fade, 0, fade, ledMax, 0); } analogWrite(ledPin, ledVal); // analogWrite(ledPin, map(ledVal, 0, 100, 0, 255)); return ledVal; } // Relay for Sump & Fan byte setRelay(int mins, byte relayPin, int start, int period) { byte replay = LOW; if (mins <= start || mins > start + period ) { relay = LOW; } if (mins > start && mins <= start + period) { relay = HIGH; } digitalWrite(relayPin, relay); } /***** RTC Functions *******/ /***************************/ // Convert normal decimal numbers to binary coded decimal byte decToBcd(byte val) { return ( (val/10*16) + (val%10) ); } // Convert binary coded decimal to normal decimal numbers byte bcdToDec(byte val) { return ( (val/16*10) + (val%16) ); } // 1) Sets the date and time on the ds1307 // 2) Starts the clock // 3) Sets hour mode to 24 hour clock // Assumes you're passing in valid numbers. void setDateDs1307(byte second, // 0-59 byte minute, // 0-59 byte hour, // 1-24 byte dayOfWeek, // 1-7 byte dayOfMonth, // 1-28/29/30/31 byte month, // 1-12 byte year) // 0-99 { Wire.beginTransmission(DS1307_I2C_ADDRESS); Wire.send(0); Wire.send(decToBcd(second)); Wire.send(decToBcd(minute)); Wire.send(decToBcd(hour)); Wire.send(decToBcd(dayOfWeek)); Wire.send(decToBcd(dayOfMonth)); Wire.send(decToBcd(month)); Wire.send(decToBcd(year)); Wire.endTransmission(); } // Gets the date and time from the ds1307 void getDateDs1307(byte *second, byte *minute, byte *hour, byte *dayOfWeek, byte *dayOfMonth, byte *month, byte *year) { Wire.beginTransmission(DS1307_I2C_ADDRESS); Wire.send(0); Wire.endTransmission(); Wire.requestFrom(DS1307_I2C_ADDRESS, 7); *second = bcdToDec(Wire.receive() & 0x7f); *minute = bcdToDec(Wire.receive()); *hour = bcdToDec(Wire.receive() & 0x3f); *dayOfWeek = bcdToDec(Wire.receive()); *dayOfMonth = bcdToDec(Wire.receive()); *month = bcdToDec(Wire.receive()); *year = bcdToDec(Wire.receive()); } void setup() { // init I2C Wire.begin(); // set up the LCD's number of rows and columns: lcd.begin(16, 2); // initialize the digital pin as an output: // pinMode(fanPin, OUTPUT); pinMode(WavePin, OUTPUT); digitalWrite(WavePin, WaveState); // pinMode(SumpPin, OUTPUT); // Temperature Setup sensors.begin(); // Start up the library if (!sensors.getAddress(insideThermometer, 0)) lcd.println("Unable to find address for Device 0"); if (!sensors.getAddress(outsideThermometer, 1)) lcd.println("Unable to find address for Device 1"); sensors.setResolution(insideThermometer, 12); // set the resolution to x bit sensors.setResolution(outsideThermometer, 12); // set the resolution to x bit } /***** Main Loop ***********/ /***************************/ void loop() { timedAction.check(); // get time from RTC and put in hrs and mins variables getDateDs1307(&second, &rtcMins, &rtcHrs, &dayOfWeek, &dayOfMonth, &month, &year); minCounter = rtcHrs * 60 + rtcMins; delay (100); // read the analog in value: sensorValue = analogRead(analogInPin); // map it to the range of the analog out: outputValue = map(sensorValue, 0, 1023, 0, 255); delay (20); // read the analog in value: sensorValue1 = analogRead(analogInPin1); // map it to the range of the analog out: outputValue1 = map(sensorValue1, 0, 1023, 0, 255); delay (20); // read the analog in value: sensorValue2 = analogRead(analogInPin2); // map it to the range of the analog out: outputValue2 = map(sensorValue2, 0, 1023, 0, 255); delay (20); //set LED values white = setLed(minCounter, whiteLed, whiteStartMins, whitePhotoPeriod, fadeDuration, outputValue1); blue = setLed(minCounter, blueLed, blueStartMins, bluePhotoPeriod, fadeDuration, outputValue); red = setLed(minCounter, redLed, redStartMins, redPhotoPeriod, fadeDuration, outputValue2); delay (50); blueout = map(blue, 0, 255, 0, 99); whiteout = map(white, 0, 255, 0, 99); redout = map(red, 0, 255, 0, 99); // Relay control setRelay(minCounter, fanPin, fanontime, fanperiod); setRelay(minCounter, SumpPin, Sumpontime, Sumpperiod); delay (50); // Print Intensity lcd.setCursor(0, 1); lcd.print("B:"); lcd.print(blueout); lcd.print("%"); lcd.setCursor(6, 1); lcd.print("W:"); lcd.print(whiteout); lcd.print("%"); lcd.setCursor(12, 1); lcd.print("R:"); lcd.print(redout); lcd.print("%"); delay (100); // Print Temperature sensors.requestTemperatures(); float tempCI = sensors.getTempC(insideThermometer); lcd.setCursor(0, 0); lcd.print("Rm:"); lcd.print(TempCI); float tempCO = sensors.getTempC(outsideThermometer); lcd.setCursor(9, 0); lcd.print("T:"); lcd.print(tempCO); // Print Date & Time char* dayOfWeek[] = {"", "Mon", "Tue", "Wed", "Thu", "Fri", "Sat", "Sun"}; char* month[] = {"", "Jan", "Feb", "Mar", "Apr", "May", "Jun", "Jul", "Aug", "Sep", "Oct", "Nov", "Dec"}; RTC.get(rtc,true); lcd.setCursor(0, 0); printDigits(rtc[2],':'); printDigits(rtc[1],' '); lcd.print(dayOfWeek[rtc[3]]); lcd.setCursor(10, 0); //Starts on column 0 row 2 lcd.print(rtc[4]); lcd.print('-'); lcd.print(month[rtc[5]]); delay (100); // digitalWrite(WavePin, HIGH); // set the relay on // delay(1000); // wait time in seconds // digitalWrite(WavePin, LOW); // set the relay off // delay(1000); // wait time in seconds } void printDigits(byte digits, char delimiter) { if(digits < 10) lcd.print('0'); lcd.print(digits,DEC); lcd.print(delimiter); delay (100); } void blink(){ WaveState ? WaveState=false : WaveState=true; digitalWrite(WavePin, WaveState); }
-
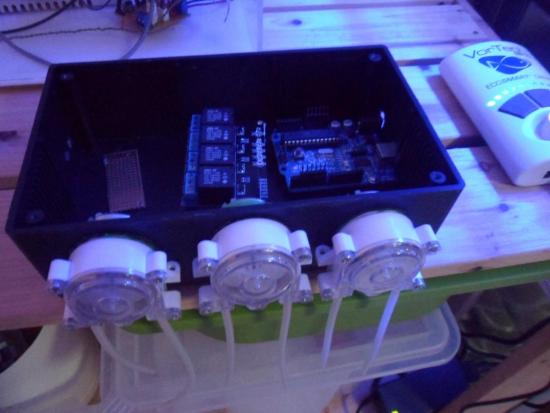
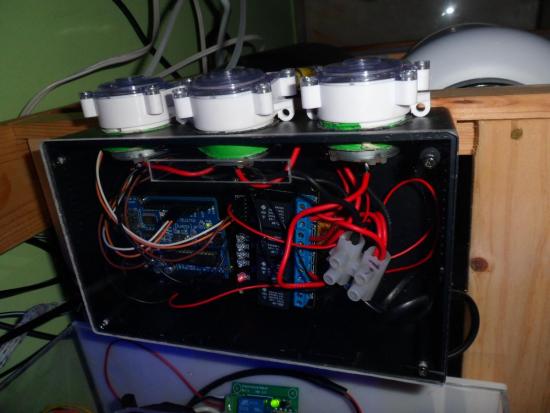
I am not a programmer, nor am I technically trained, I studied Business But I wanted something that is customized to my needs so I google everything I could find on arduino and read and studied it for months before I attempted on DIY. I believe if a person want something, he/she should do their homework. If an idiot like me can do it, anyone can, so please don't PM me as the answers are all on the internet like gp2700 stated. Lastly, you can't just copy the codes from a built for your own use unless you are using exactly the same hardware (relay, switches, LCD, Temp probes, etc). Arduino is great because you can practically program it to do anything (look at Reef Angel) the possibilities can only limited by you skill and imagination. Enough talk, the codes for my simple DIY arduino dosing pump. This dosing pump has been in operation since March 2012. I appreciate it if programmers can give pointers on cleaning up the codes. #include <Time.h> #include <TimeAlarms.h> int Pin1 = 7; // Alk int Pin2 = 6; // Cal int Pin3 = 5; // Mag //byte seconds; void setup() { Serial.begin(9600); pinMode(Pin1, OUTPUT); pinMode(Pin2, OUTPUT); pinMode(Pin3, OUTPUT); setTime(17,59,45,3,1,12); // set time to 8:29:40am Jan 1 2010 Alarm.alarmRepeat(18,00,0, Pump1); Alarm.alarmRepeat(19,00,00, Pump2); Alarm.alarmRepeat(20,00,0, Pump3); Alarm.alarmRepeat(21,00,0, Pump4); Alarm.alarmRepeat(22,00,00, Pump5); Alarm.alarmRepeat(23,00,0, Pump6); Alarm.alarmRepeat(0,00,0, Pump7); Alarm.alarmRepeat(1,00,00, Pump8); Alarm.alarmRepeat(2,00,0, Pump9); Alarm.alarmRepeat(3,00,0, Pump10); Alarm.alarmRepeat(4,00,00, Pump11); Alarm.alarmRepeat(5,00,0, Pump12); Alarm.alarmRepeat(6,00,0, Pump13); Alarm.alarmRepeat(7,00,00, Pump14); Alarm.alarmRepeat(8,00,0, Pump15); Alarm.alarmRepeat(9,00,0, Pump16); Alarm.alarmRepeat(10,00,00, Pump17); Alarm.alarmRepeat(11,00,0, Pump18); Alarm.alarmRepeat(12,00,0, Pump19); Alarm.alarmRepeat(13,00,00, Pump20); Alarm.alarmRepeat(14,00,00, Pump21); Alarm.alarmRepeat(15,00,0, Pump22); Alarm.alarmRepeat(16,00,00, Pump23); Alarm.alarmRepeat(17,00,00, Pump24); // Alarm.timerRepeat(15, RepeatTask); // timer for every 15 seconds // Alarm.timerOnce(10, OnceOnlyTask); // called once after 10 seconds } void loop() { digitalClockDisplay(); Alarm.delay(1000); // wait one second between clock display } void Pump1() { digitalWrite(Pin1, HIGH); // set the LED on delay(40000); // wait for a second digitalWrite(Pin1, LOW); // set the LED off delay(50); // wait for a second } void Pump2() { digitalWrite(Pin3, HIGH); // set the LED on delay(15000); // wait for a second digitalWrite(Pin3, LOW); // set the LED off delay(50); // wait for a second } void Pump3() { digitalWrite(Pin2, HIGH); // set the LED on delay(28000); // wait for a second digitalWrite(Pin2, LOW); // set the LED off delay(100); // wait for a second } void Pump4() { digitalWrite(Pin1, HIGH); // set the LED on delay(33000); // wait for a second digitalWrite(Pin1, LOW); // set the LED off delay(100); // wait for a second } void Pump5() { digitalWrite(Pin3, HIGH); // set the LED on delay(15000); // wait for a second digitalWrite(Pin3, LOW); // set the LED off delay(100); // wait for a second } void Pump6() { digitalWrite(Pin2, HIGH); // set the LED on delay(25000); // wait for a second digitalWrite(Pin2, LOW); // set the LED off delay(100); // wait for a second } void Pump7() { digitalWrite(Pin1, HIGH); // set the LED on delay(40000); // wait for a second digitalWrite(Pin1, LOW); // set the LED off delay(100); // wait for a second } void Pump8() { digitalWrite(Pin3, HIGH); // set the LED on delay(15000); // wait for a second digitalWrite(Pin3, LOW); // set the LED off delay(100); // wait for a second } void Pump9() { digitalWrite(Pin2, HIGH); // set the LED on delay(28000); // wait for a second digitalWrite(Pin2, LOW); // set the LED off delay(100); // wait for a second } void Pump10() { digitalWrite(Pin1, HIGH); // set the LED on delay(33000); // wait for a second digitalWrite(Pin1, LOW); // set the LED off delay(100); // wait for a second } void Pump11() { digitalWrite(Pin3, HIGH); // set the LED on delay(15000); // wait for a second digitalWrite(Pin3, LOW); // set the LED off delay(100); // wait for a second } void Pump12() { digitalWrite(Pin2, HIGH); // set the LED on delay(28000); // wait for a second digitalWrite(Pin2, LOW); // set the LED off delay(100); // wait for a second } void Pump13() { digitalWrite(Pin1, HIGH); // set the LED on delay(40000); // wait for a second digitalWrite(Pin1, LOW); // set the LED off delay(100); // wait for a second } void Pump14() { digitalWrite(Pin3, HIGH); // set the LED on delay(15000); // wait for a second digitalWrite(Pin3, LOW); // set the LED off delay(100); // wait for a second } void Pump15() { digitalWrite(Pin2, HIGH); // set the LED on delay(25000); // wait for a second digitalWrite(Pin2, LOW); // set the LED off delay(100); // wait for a second } void Pump16() { digitalWrite(Pin1, HIGH); // set the LED on delay(33000); // wait for a second digitalWrite(Pin1, LOW); // set the LED off delay(100); // wait for a second } void Pump17() { digitalWrite(Pin3, HIGH); // set the LED on delay(15000); // wait for a second digitalWrite(Pin3, LOW); // set the LED off delay(100); // wait for a second } void Pump18() { digitalWrite(Pin2, HIGH); // set the LED on delay(28000); // wait for a second digitalWrite(Pin2, LOW); // set the LED off delay(100); // wait for a second } void Pump19() { digitalWrite(Pin1, HIGH); // set the LED on delay(40000); // wait for a second digitalWrite(Pin1, LOW); // set the LED off delay(100); // wait for a second } void Pump20() { digitalWrite(Pin3, HIGH); // set the LED on delay(15000); // wait for a second digitalWrite(Pin3, LOW); // set the LED off delay(100); // wait for a second } void Pump21() { digitalWrite(Pin2, HIGH); // set the LED on delay(25000); // wait for a second digitalWrite(Pin2, LOW); // set the LED off delay(100); // wait for a second } void Pump22() { digitalWrite(Pin1, HIGH); // set the LED on delay(33000); // wait for a second digitalWrite(Pin1, LOW); // set the LED off delay(100); // wait for a second } void Pump23() { digitalWrite(Pin3, HIGH); // set the LED on delay(15000); // wait for a second digitalWrite(Pin3, LOW); // set the LED off delay(100); // wait for a second } void Pump24() { digitalWrite(Pin2, HIGH); // set the LED on delay(28000); // wait for a second digitalWrite(Pin2, LOW); // set the LED off delay(100); // wait for a second } void digitalClockDisplay() { // digital clock display of the time Serial.print(hour()); printDigits(minute()); printDigits(second()); Serial.println(); } void printDigits(int digits) { Serial.print(":"); if(digits < 10) Serial.print('0'); Serial.print(digits); }
-
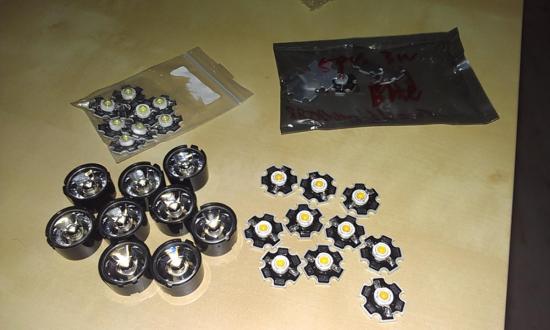
thanks for all the interest. only this is left 3. 3W 20K white LED x 9 = $16. the rest are sold or reserved. thanks
-
1. 3W Warm white LED x 10 = $18 2. 3W Blue LED x 5 = $10 3. 3W 20K white LED x 9 = $16 4. LED lens 9 x 60 degree = $5 All items are brand new and leftover from my DIY, never used before. PM me with your contact to arrange for collection if you are interested.
- 1 reply
-
- 1
-

-
5 red notes. I got 1 a few weeks ago, now its feeding on anything I throw into tank and swimming all over the place. But it was hiding for 2 weeks when I first got it.
-
http://www.reefcentral.com/forums/showthread.php?t=2084966 So many complains about this salt on RC. Reefers from Australia to Taiwan are having problems with cloudiness... Any of you experience this? I only do frequent small water (5L) changes and even then I still get cloudy water sometimes.
-
Any small 2" - 3" yellow eye kole tangs? Thanks
-
Weekly-lfs-shipment-updates16th-jul-to-22th-july/
bezz replied to a topic in Weekly LFS Stocks Report / LFS Info Centre
How much is the Barletts at Iwarna, anyone? Thanks -
Hydrogen Peroxide Dip/Bath to exterminate hair algea
bezz replied to cutebarra77's topic in General Reefkeeping_
The Hydrogen Peroxide we get from pharmacies is only 3% concentration and is intended for use as an antiseptic, so it should be safe to handle with bare hands. Lab grade chemicals on the other hand is a different ball game altogether... -
Hydrogen Peroxide Dip/Bath to exterminate hair algea
bezz replied to cutebarra77's topic in General Reefkeeping_
I got some PMs asking about this method. I want to put a disclaimer here to try this method at your own risk, there is no guarantee that your corals will survive the dip, its your coral and your call. I would advice to start slow using 30% H2O2 and 70% tank water and dip at most 30-45 secs. This is enough to kill the algae. Most times its not immediate and you have to wait a few days for the algae to turn white and dissolve. Dip it in a bucket of tank water before putting the rock back in tank. Be warn, all stuff on the rock will be kill also. Pods, coralline algae, bugs, whatever is on the rock will fly out once the rock is in the solution. Before using this method, I never thought how much life a small rock could hold -
Hydrogen Peroxide Dip/Bath to exterminate hair algea
bezz replied to cutebarra77's topic in General Reefkeeping_
I have been dipping rocks & corals in H2O2 for a while to get rid of algae. It is extremely effective, but you need to dilute the solution to 50% tank water and not dip too long. I've tried all corals and Zoas are the least affected, they reopen immediately after the dip. A warning, I left some SPS in the solution too long and ended up bleaching them. There is no rule, it depends on the condition of the coral. Some hardy SPS bleach but sensitive ones are okay. If you are worried, don't try this method. -
They can grow up to 2 ft and they are not reef safe.
-
Hydor pico pumps consume very little power & runs very cool. You can test the pumps by running them in a small bucket of water for 6hrs. For Atman and other China brands, you can feel the hot water. For hydor pico, the water runs quite cool. My 2 pico pumps are still running strong after 3yrs+ of use. Too bad, aquamarin still have not brought in the new pico that is magnet mounted...
-
Use the ULR phosphorus checker as it measures to 0.01, while phosphate checker only measures to 0.1 which is useless if your phosphate is very low like around 0.09-0.01.
-
all sold. thread closed. thanks
-
Calcium Reactor - SOLD Hydor 2 (120v version with converter) - $40 Hanna Phosphorous Checker (with 1 pack of reagents) - SOLD Hanna Alkalinity Checker (with 1 pack of reagents) - SOLD Collection is at Redhill PM me with your contact number if you are interested.


