
How to use the Salfert testkit for calcium???


-
Topics
-
-
Latest Update
-
0
-
-
0
Zoanthid blowout sale :)
Selling $20 a frag/ $50 for 3!, REGARDLESS OF ID. Too many to post photos of, so come and view yourselves. FIRST COME FIRST SERVE - Dont need to worry about dieing frags (you can see yourself) - No worries for over-saturation due to colouration filters! (You can see for yourself) - No worries on death of zoas as youre going to pick the healthiest ones yourself - Worried to pay $20 a polyp frags (Yes,some are single polyps but rarer ID, get 3 and they would be discounted anyway) - Have other premium range zoas not going at promotional prices, but willing to sell LOWER THAN MOST / ANY ZOA FARMER IN SG - Of course, self-collection at your convenience - Of course, If i like you, ill give u even better prices - If you already have some zoas youre looking for, pm me the ID and ill let you know if I have any, and we can work out a deal from there -
196
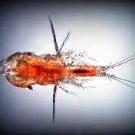
WTS live rotifers, tigger pods, phyto
Ups Sent from my 22101316G using Tapatalk -
3
-


Recommended Posts
Join the conversation
You can post now and register later. If you have an account, sign in now to post with your account.